Learning How to Print W-2 And W-3 Forms in QuickBooks
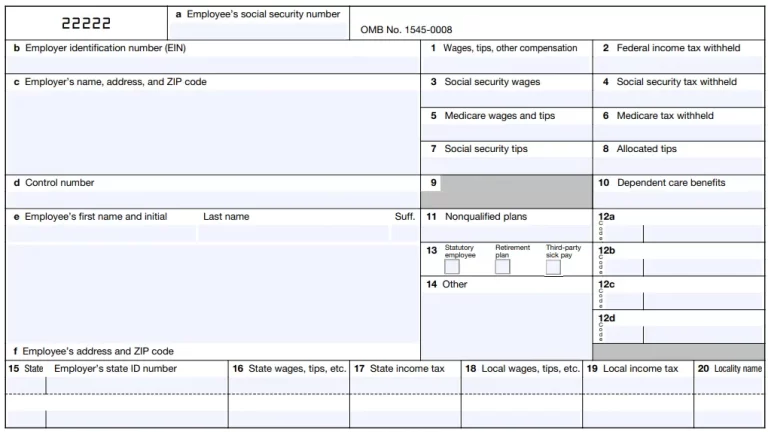
Tax season comes up with a lot of challenges, as it is a stressful and time-consuming task. But now creating, generating, or printing the W2 and W3 forms has become easier with QuickBooks. The W-2 is a federal tax form that is used to report the total wages and tax withholdings for each individual employee. In comparison, the W-3 form is used to report the total pages, taxable earnings, and all types of taxes withheld for all your employees in a year. Furthermore, if you want to get a detailed procedure to print W2 and W3 forms in QuickBooks, then continue reading this post.
When Is the Right Time to File Form W-3?
The date for filing the W-3 form depends on how your W-2s are filed with the Social Security Administration (SSA).
- In case you mail the W-2 copy A to SSA, then file the form W-3 plus W-2 A copy.
- You won’t have to file Form W3 if QuickBooks files on your behalf, or if you file them electronically.
How to Find W-2 in QuickBooks Desktop?
For reviewing the W-2 copies B and C at the end of January 31. Also, you can view the current year and the previous two years’ W-2s forms online. Make sure that you get the W-2 via mail in early February. In case you fail to receive it by the due date, then get in touch with your employer. For any additional security, verify your phone number or personal details before seeing your W-2 form.
Learn More – File Form 940 in QuickBooks
Steps to View W-2 Form in QuickBooks Workforce App
- Select the Taxes or More tab and then hit the W-2s.
- After this, choose the Download option and then pick the W-2 form that you want to view or print.
Steps to View W-2 Form in QuickBooks Web Browser
- Firstly, browse through the workforce.intuit.com.
- Now, move to the Documents menu.
- Tap on the W-2s or Shared Documents option.
- Choose the W-2 copy or document that you want to view or download.
How to File Your W-2 & W-3 Forms in QuickBooks?
For filing the W-2 and W-3 forms in QuickBooks, you must follow the instructions closely.
Filing of the W-2 Form Electronically
In case you have set up to have QuickBooks automatically pay taxes and file forms.
QuickBooks will eventually file the W-2 form on your behalf and then send its copies to the employees if selected for a paper copy. Otherwise, the W-2 form will be sent to your email address given in your employee profile.
Note:- If you want to prevent any additional fees for filing the W-2 form, make sure to file it by January 3.
- Choose the Settings menu and tap on the Payroll Settings tab.
- Now, click the Edit menu from the Form W-2 printing.
- Head to the I’ll print and mail W-2s to my employees.
- Thereon, you can send an invitation to your employees to pick a paperless W-2 form.
- Then, begin printing the form.
In case you set up for paying & filing electronically via QuickBooks
When you choose to set up for paying and filing electronically via QuickBooks with Automate Taxes and Forms, do the following:
- Make sure that you file the form W-2s with the IRS department.
- Also, send copies of the W-2 form to your employees who have chosen paper delivery. Otherwise, your copies will be sent to the email address given in the personal details of the employee.
Read More – File QuickBooks Form 941
Steps to Print For Yourself
- Browse to the Settings icon and tap on the Payroll Settings option.
- Now, beneath the Form W-2 Printing, hit the Edit tab.
- Thereon, pick the “I’ll print and mail W-2s to my employees” option.
- Now, print your completed W-2s form successfully.
For manually filing the W-2 Form, perform the following steps:
Step 1: E-Filing of Your W-2 Form
- Initially, log in to your QBO account with the correct sign-in details.
- Choose the Taxes > Payroll Tax > Filing tab.
- Now, search for the W-2 copies A & D (Employer) in the Action Needed section. Then, tap on the File menu.
- When asked, determine whether any employee was an active participant in a retirement plan during the tax year.
- Pick the View option to launch the Acrobat Reader from the Employer Copies: Form W-2 page.
- At last, check and then print Copy D (Employer’s Copy) for your records.
After the successful processing of the W-2s filing, you will get an email to inform you that it is complete. Now onwards, you can review the status of your filing on the status page.
- Browse to the Taxes and then the Payroll tax.
- Thereon, click the Payroll forms or filings and then opt for the W-2 option.
Step 2: Print & Send W-2 form to your employees
Now, you can easily print and send a W-2 form to your employees.
QuickBooks Desktop Payroll Assisted
The W-2 form will be filed by QuickBooks on your behalf. All you can do is print your copies and send them to your employees once it’s all set. If it’s filed by QuickBooks, then you need to pay the extra charges.
QuickBooks Desktop Payroll Enhanced
First Step: Setting up your Filing
For electronically filing the W-2 form, do as follows.
- Launch QuickBooks and choose Employees, then Payroll Center.
- Now, launch the QuickBooks Desktop Payroll Setup.
- Choose the File Forms tab from the Payroll Center.
- Opt for the Change Filing Method option from the Other Activities list at the bottom.
- Hit the Continue tab and choose the Federal Form W-2/W-3 from the list of forms, then click Edit.
- Afterwards, pick E-file, then Finish. By this, it will open the enrollment instructions that you can read and print.
- Shut down the View Enrollments window.
- Finally, opt for the Finish Later option.
Second Step: Generate Your W-2 Forms
- For creating the form, choose the Employees, then Payroll Tax Forms and W-2s.
- Now, hit the Process Payroll Forms option.
- Choose the Annual Form W-2/W-3 – Wage and Tax Statement/Transmittal from the File Forms section, and hit the Create Form option.
Third Step: Sending of your W-2 form
- For sending the W-2 form, choose the All employees to file by batch from Process W-2s.
- Provide the year of the form in which you are filing and click OK.
- When you are in the Select Employees for Form W-2/W-3 window, choose your employees. Alternatively, you can also choose Mark All to select all employees displayed.
- Moving further, hit the E-File Federal Forms.
- Now, mention your business phone number and email address.
- Finally, hit the Submit option to complete the process.
Fourth Step: Print your W-2 form.
QuickBooks Desktop Payroll Standard, QuickBooks Desktop Payroll Basic
For this, you have to file the Federal and State W-2 and W-3 forms manually by January 31.
Also See – Print Form 1099 and 1096 in QuickBooks
How to Print Your W-2 and W-3 Forms in QuickBooks?
The users mainly requires to print the W-2 forms for sending the paper copies to the employees and W-3 form is printed to send it to your accountant. However, you may also send an invitation to the employees to access QuickBooks Workforce and then they can view as well as print the W-2 copies of the current and up to last two years. Furthermore, read the procedure described below for the seamless printing of the forms.
First Step: Purchase W-2 Paper For Printing
Note: For instance, if your employees have lost or don’t have the original copy of the W-2 form, or you want to have the copy of its records then you can use the plain paper for printing.
On the other hand, you must require a W-2 form when you wish to print via QuickBooks and mail the official copies to the employees.
- Visit the QuickBooks Checks & Supplies site for purchasing the W-2 paper.
- Choose the Tax Products and then click the Blank W-2 kits option.
- After this, access the guidelines displayed on the screen to complete the order.
- If you are working on the QuickBooks Online Payroll or QuickBooks Desktop Payroll Enhanced, you must buy the 3 or 4-part perforated paper.
- Otherwise, you can access the 4-part perforated paper on getting the QuickBooks Desktop Payroll Assisted.
You masy aslo Read – QuickBooks Payroll Not Withholding Taxes
Second Step: Print Your W-2s and W-3 Forms
Once you have make the appropriate choice of the QuickBooks product, you must print your W-2 and W-3 forms.
QuickBooks Online Payroll
For printing the current year’s or 1 previous year’s tax forms, consider the following points:
- 1st January, if your automated taxes and forms settings are disabled.
- 15th January, if your automated taxes and forms settings are enabled.
Printing of Your Current Year or 1 Year Prior Forms
If you are wondering how to print the previous year’s W-2 in QuickBooks Online, then do as follows:
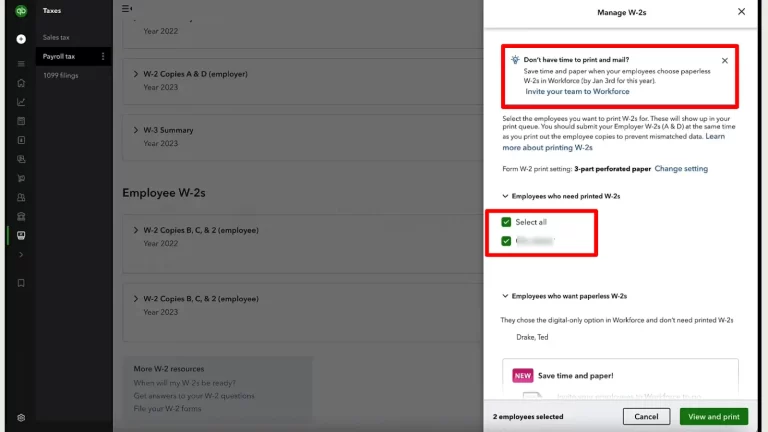
- Choose the Filings tab and then navigate to the Resources tab.
- After this, click on Resources and hit the W-2s form.
- Start checking the list of employees who chose a printed copy.
- You must know that W-2s won’t print for employees who have chosen paperless. For that, they can print their copy from QuickBooks Workforce if necessary.
- In case your automated taxes and forms settings are disabled, check your Form W-2 print setting option. Then, opt for the Change setting to edit the paper type if necessary.
- Now, hit the View or Manage from the copy that you require.
- W-3 Summary Transmittal of Wage and Tax Statements
- W-2, Copies B, C & 2 (employee)
- W-2, Copies A & D (employer)
- Next, tap on the View and Print option.

- Finally, hit the Print icon from the Acrobat Reader Toolbar and click on the Print option.
Print Your Previous Year Forms
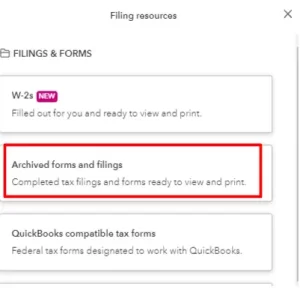
- Click on the Filings tab and then choose the Resources option.
- After that, browse to the Archived Forms and Filings tab.

- Mention the date range that you need, or look for the forms that you need.
- Now, tap on the View option from the W-2 or W-3 form you want to print.
- Head to the Print icon from the Reader toolbar and hit the Print option once again.
QuickBooks Desktop Payroll Assisted
The users can print the W-2 form by the 10th of January. If you opt for the Intuit Print option, then all you require is to print your W-2s form only if your employee has lost or didn’t get their original W-2 form. To learn more about how to print a W-2 in QuickBooks Desktop, use the following steps.
- Firstly, choose the Employees menu and click Payroll Center.
- Choose the File Forms tab and then hit the View/Print Forms & W-2s.

- Provide your payroll PIN accurately and click OK.
- Pick the W-2s tab and then choose the year, then all or individual employees.
- Now, choose the Open/Save Selected button.
- You must pick the applicable reason for printing the W-2s.
- Finally, opt for the File on Adobe Reader and select Print.
QuickBooks Desktop Payroll Enhanced and QuickBooks Desktop Payroll Standard
For printing your W-2s form on or after January 1, do as follows:
- Update QuickBooks and the payroll tax table.
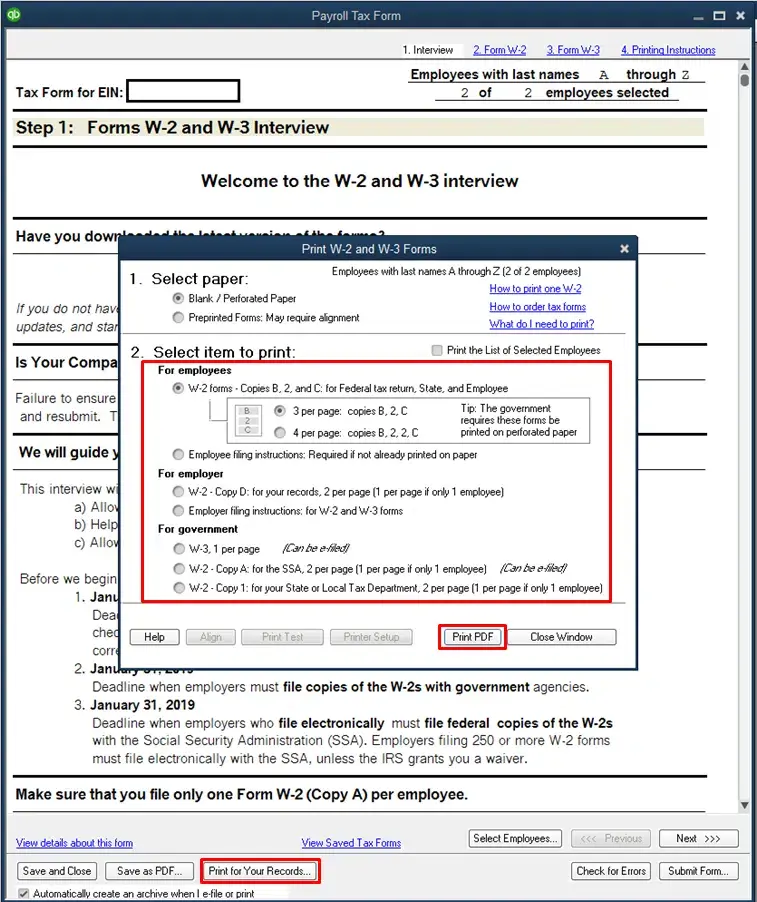
- From the Employees drop-down menu, select Payroll Tax Forms & W-2s, then Process Payroll Forms.
- From the File Forms tab, scroll down and select Annual Form W-2/W-3- Wage and Tax Statement/ Transmittal.
- After this, tap on Create Form and then choose all or individual employees to file.
- Mention the year, then select OK.
- Choose all or individual employees to print.
- Afterwards, hit the Review/Edit to review each W-2. Make sure that you check the W-2 form and put a check mark in the Reviewed column.

- Finally, click Submit Form and carry on with the steps to print and file the forms.
Conclusion
Now, we hope that you can easily print W-2 and W-3 forms in QuickBooks and file them on time to prevent late filing. Thus, it helps you experience the smooth filing process. If you are still struggling while printing these forms, then connect with our BizBooksAdvice professionals for quick resolution.
Frequently Asked Questions (FAQ’s):-
Question 1: How to correct a rejected e-file W2 form?
Ans. The following are the steps you must implement to correct a rejected e-file W-2 form.
- Choose the Employees tab, click the Payroll Center option, and then the File Forms tab.
- When you are in the Filing History section, tap on the E-filing option and pick the Agency Rejected link.
Question 2: How to print W2 in QuickBooks without a payroll subscription?
Ans. You can’t print W-2 forms in QuickBooks without having an active payroll subscription.
Question 3: How to Print w3 in QuickBooks Desktop?
Ans. For printing the W-3 form on QuickBooks Desktop, first generate the W-2s and W-3s form, which summarizes the W-2s. Use the steps for printing.
- Move to the Employees menu, click the Payroll Tax Forms and W2s option.
- Head to the Process Payroll Forms option and opt for the Annual Form W2/W3 Wage and Tax Statement.
- Now, hit the Create Form and then choose e-filing or printing.
Question 4: How to Print W3 in QuickBooks Online?
Ans. You don’t have an option to print W3 in the QuickBooks Online application.
Question 5: How to E-file W2 and W3 in QuickBooks Desktop Payroll?
Ans. For e-filing the W-2 and W-2c in QuickBooks Desktop Payroll, you must generate the forms in QuickBooks. Then, create an electronic file and submit the file via the Social Security Administration Business Services Online website.

E-File Your taxation form smoothly & Get Professional QB Help with the following forms:
Form 1040, Form W-2, Form 1099-NEC, Form 1099-MISC, Schedule C, Form 941, Form 940, Form 1065, Form W-9
Receive instant and step-by-step assistance for stress-free form filing.
Recent Posts
-
How to Fix QuickBooks Error 6155 While Opening a Company File?
-
How to Eliminate QuickBooks Error 102 (Maintenance or Server Issues)?
-
Best Ways To Fix QuickBooks Error 6176 (Company File Access Issue)
-
Fix QuickBooks Error 3008 With Effective Solutions
-
How to Create a W-9 in QuickBooks | Fill Out, Print & More


