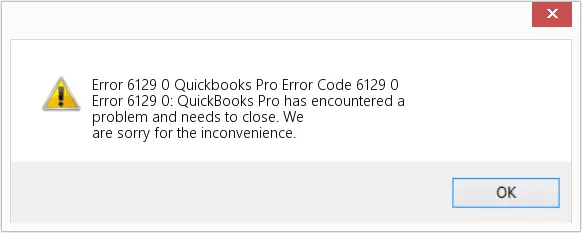
How to Fix QuickBooks Error Code 6129: (Database Connection Failed)

- By Jonathan Browns
- May 12, 2026
- Accounting
- 7 min read
Running into QuickBooks Error Code 6129 can be challenging especially when it prevents your from opening the company file. This issue generally appears when you see the message indicating “QuickBooks Error Code 6129, 0 – Database connection verification failure.” However, when the error arises, QuickBooks fails to establish a connection with the database server preventing the software from accessing the company file.
Herein, this post you will explore all the major reasons that causes QuickBooks Desktop Error 6129, 0 and proven methods to fix it.
Couldn’t find the way to resolve the QuickBooks Error Code 6129? Call Us : +1-866-408-0444 and talk to our QuickBooks experts instantly and grab the best assistance to fix the issue.
Why am I getting QuickBooks Error Message 6129?
Users often get the QuickBooks Error Message 6129 when the application fails to connect with the company file database. However, it may appears due to numerous reasons discussed below.
- Insufficient permissions to open the QuickBooks company folder may prevent you from opening the file.
- Antivirus software or the firewall is blocking QuickBooks processes causing the database verification failures associated with QuickBooks Error 6129.
- You are accessing the older QuickBooks version to open the latest version of company file.
- Corrupt or missing QuickBooks installation may prevents the software from communicating with the database.
- Incorrect internet connection may also arise this error.
Instant Methods to Resolve QuickBooks Database Connection Failed Error 6129
Now, that you have understood the actual causes that trigger the Quick’ Desktop Error 6129, it’s time to fix it. Herein, we have elaborated all the troubleshooting methods to address the issue.
Method 1: Rename the .ND and .TLG Files
As mentioned earlier, corrupted or damaged .ND and .TLG files can trigger the QuickBooks Error 6129. Renaming these files allows QuickBooks to create new, undamaged versions, which often resolves the error message “QuickBooks Error 6129, 0”. Follow these steps:
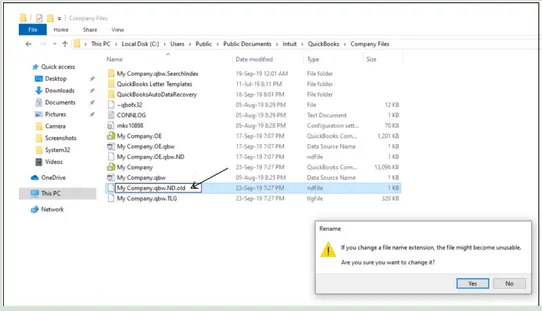
- Open the folder where your QuickBooks company files are stored.
- Locate the files with the .ND and .TLG extensions. They will look like this:
- company_file.qbw.nd
- company_file.qbw.tlg
- Right-click each file (.ND and .TLG) and select Rename.
- Add .OLD at the end of each file name (e.g., company_file.qbw.nd.OLD). Save the changes.
- Launch QuickBooks and try opening your company file again.
Method 2: Run the QuickBooks Database Server Manager
Incorrect working of the QuickBooks Database Server Manager may also arise QuickBooks Desktop Error 6129. So, to fix the issue, verify that the Database server manager is running properly.
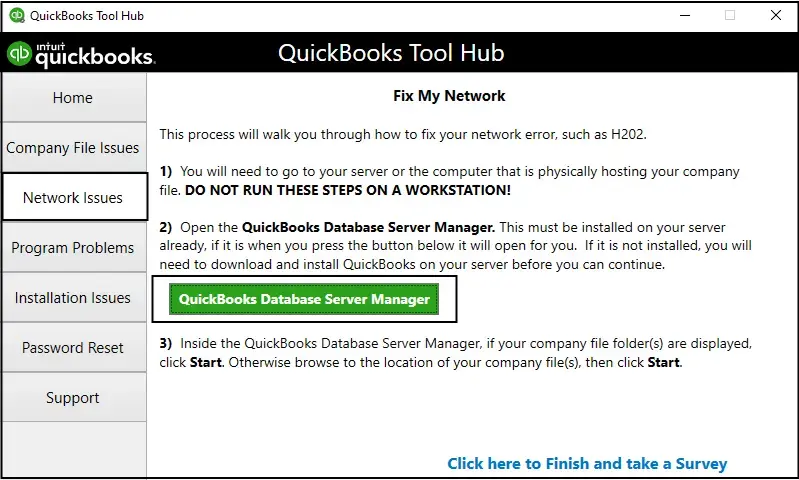
- Firstly, launch the QuickBooks Tool Hub on your computer. If you haven’t installed it yet, then first download and install QuickBooks Tool Hub 1.6.0.8.
- Browse to the Network Issues tab.
- After this, tap on QuickBooks Database Server Manager tab and start installing QuickBooks if it’s not available on the server.
- Now, select the Start Scan menu when you locate your data file. If it isn’t not available, tap on the Browse tab and begin searching for your file, and click the Start Scan tab.
- At last, launch the QuickBooks application. Then, open your company file to check if the issue exists.
Method 3: Run the QuickBooks File Doctor Tool
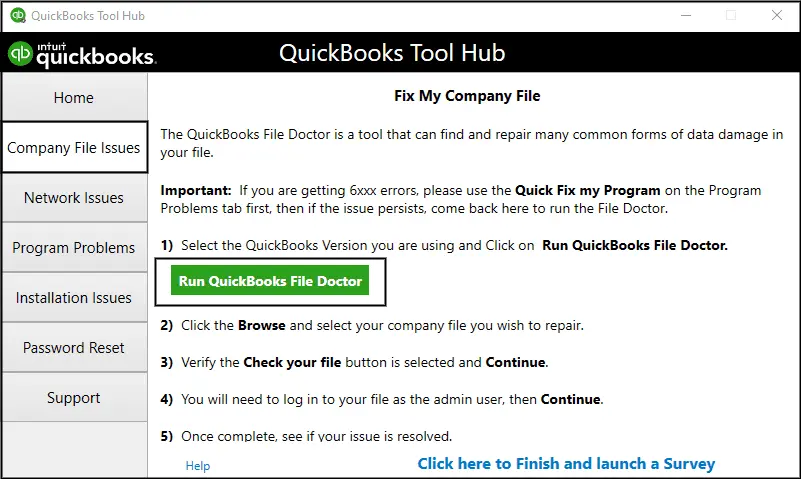
The QuickBooks File Doctor tool is a built-in repair utility which help in diagnosing and fixing the company file and network-related issues. It is also useful in fixing the QuickBooks Error Code 6129 that appears due to database connectivity problems or damaged company files.
Method 4: Review Your Folder Permissions Manually
Proper Windows administrative permissions is required to view, read or write the QuickBooks company file folder. So, to resolve the issue it’s essential to ensure that the folder containing the QuickBooks company file have full control access or shared permissions enabled.
Method 5: Copy the QuickBooks file to the desktop
By copying the file to the desktop and opening it from there will help identifying whether the problem lies with the company file location.
- If you are able to launch the file from the desktop, it indicates that the company file location is completely damaged.
- Your company file is saved in multiple folders which crosses the file system path limitation.
- Even after changing the location if the file won’t open, it means your file is damaged.
- Initially, launch the company file folder that has your data file.
- Locate the file having .QBW file extension and right-click on it.
- Choose the Copy option and move to the desktop and tap on Paste.
- Keep holding the Ctrl key and open the QuickBooks. As a result, it will launch the No Company Open window.
- Now, click the Open or restore an existing company. Return to your desktop and locate your company file and then launch it.
- If you continue getting the QuickBooks Database Connection Failed Error 6129, try the next solution.
Method 6: Exit all the QuickBooks processes
To shut down all the background running processes, you must implement the following steps.
- Initially, login as an Administrator on your server computer.
- Press the Ctrl + Shift + Esc keys together to launch the Task Manager.
- Now, show processes for all the users. Then, opt for the Users tab.
- You must choose each QuickBooks process (QBW32.EXE, qbupdate.exe, and QBDBMgr.exe). Then, click the End Task option.
- Next, launch the company file in multi-user mode and see if the error exists.
Method 7: Configure Firewall Ports & Antivirus Software
At times, the QuickBooks Desktop Error 6129, 0 may occur when the firewall and antivirus program block access to certain QuickBooks program of files. So, to resolve the issue you must configure the firewall ports and set up an exception to your antivirus software.
Conclusion
QuickBooks Error Code 6129 may restrict access to your company file due to database connection failures or configuration issues. However, by performing the above solutions you can easily the issue and restore access to your company files.
If the issue exists, you can communicate with your BizBooksAdvice professionals for immediate resolution.
Frequently Asked Questions (FAQ’s):-
Question 1: Can I still open my company file after getting QuickBooks Error 6129?
Ans. No, you won’t be able to launch your data file instantly after encountering QuickBooks Error 6129. This is so because it states an issue with a database connection. So, to fix the issue, you must run QB Tool Hub to repair the damage to the file.
Question 2: What is error code 6129 in QuickBooks?
Ans. At times, the users may experience Error Code 6129 in QuickBooks due to damage within the Network Data file. In other instances, the issue may arise due to incorrect folder permissions or problems linked with Database Server Manager.
Question 3: How to restore a QuickBooks Company file?
Ans. To restore a QuickBooks company file, browse to the File menu > Open or Restore Company. After this, click Restore a backup copy and then the Next tab. Choose the Local Backup > Next, and then start looking for your data file.
Question 4 : How to prevent the QuickBooks Error 6129 from occurring in the future?
Ans. To avoid the occurrence of QuickBooks Error 6129 from happening in the future, you must perform these steps:
- Try to update the QuickBooks Desktop regularly to avoid technical glitches in the application.
- Ensure that you conduct regular backups of the QuickBooks company file.
- Above all, test that your system is well-connected with an uninterrupted internet connection.
About The Author

Jonathan Browns
Jonathan Brown is a trained QuickBooks professional with 10 years of experience in the accounting sector. Moreover, he is passionate about helping businesses reduce the stress of managing accounts. Also, he is proficient in assisting entrepreneurs and small business owners to use QuickBooks and enhance their accounting experience.

QuickBooks Desktop, Payroll or Enterprise
Advanced Support for QuickBooks Desktop, Payroll & Enterprise Solutions
From payroll tax setup, direct deposit issues to Enterprise performance tuning and Desktop upgrades - our QuickBooks experts provide accurate and stepwise assistance. Get dependable support designed to minimize downtime and maximize efficiency.
Recent Posts
-
This QuickBooks Company File Needs to Be Updated: A to Z Guide
-
Renew QuickBooks Subscription: Desktop & Online Renewal Guide
-
QuickBooks Online Login: Sign in to Access Your QB account
-
Change EIN in QuickBooks: Complete Guide for Desktop, Online & Payroll
-
How to Fix QuickBooks Error 15241 During Payroll Update