How to Fix QuickBooks Error H202: Troubleshoot Multi-User Mode

- By Jonathan Browns
- May 27, 2026
- Accounting
- 7 min read
QuickBooks error H202 can show up on your screen when you try to switch to multi-user mode. This can be because of a restrictive Windows Firewall, improperly configured hosting, or third-party interference. However, there are numerous other factors that can lead to this problem in QuickBooks.
In this article, we will explore what leads to the error code H202 in depth and how to troubleshoot it.
An Overview of QuickBooks Error Code
The table below provides a quick overview of the QuickBooks error code if you prefer a quick summary.
| Error Code | H202 |
| Description | The error appears when you try to switch to multi-user mode or access a company file over the network. |
| What causes it | Corrupt or damaged network data (.nd) file, incorrectly configured hosting, more than one computer acting as servers in the same network, restrictive Windows firewall, or antivirus firewall, antivirus or third-party interruption, or lack of access to the folder storing the company file |
| How to fix it | Check the hosting configuration, launch QuickBooks Database Server Manager, run QuickBooks File Doctor to scan and repair company file and network issues, make sure crucial QuickBooks services are running on the host computer, set up Windows folder permissions to ensure QB has access to share the company file over the network, and ping the host computer from the workstation |
| Tools involved | QuickBooks Tool Hub, QuickBooks File Doctor, QuickBooks Database Server Manager |
What is Error Code H202 in QuickBooks Desktop?
Error code HX0X is a series of errors in QuickBooks Desktop related to multi-user mode. H202 is one of them and appears when you try to switch to a multi-user environment.
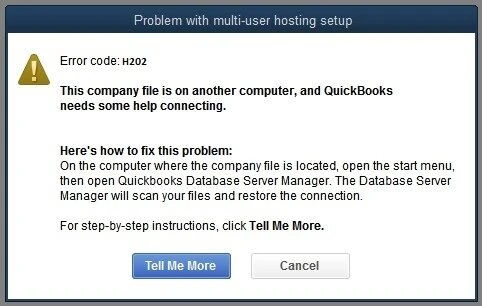
An error message accompanied by the code might appear on your screen like this:
“This company file is on another computer, and QuickBooks needs some help connecting.”
or
“Problem with multi-user hosting setup. QuickBooks could not open the file in multi-user mode. (H202)”
Let us understand what leads to this multi-user mode error.
Potential Reasons for QuickBooks Error H202: Switching to Multi-User Mode
To methodically troubleshoot an error, we must understand where and how it originates. This is because there are a lot of aspects(factors) involved in errors like H202. Therefore, carrying out some steps blindly will be of no use.
Here are some common factors that lead to QuickBooks error H202:
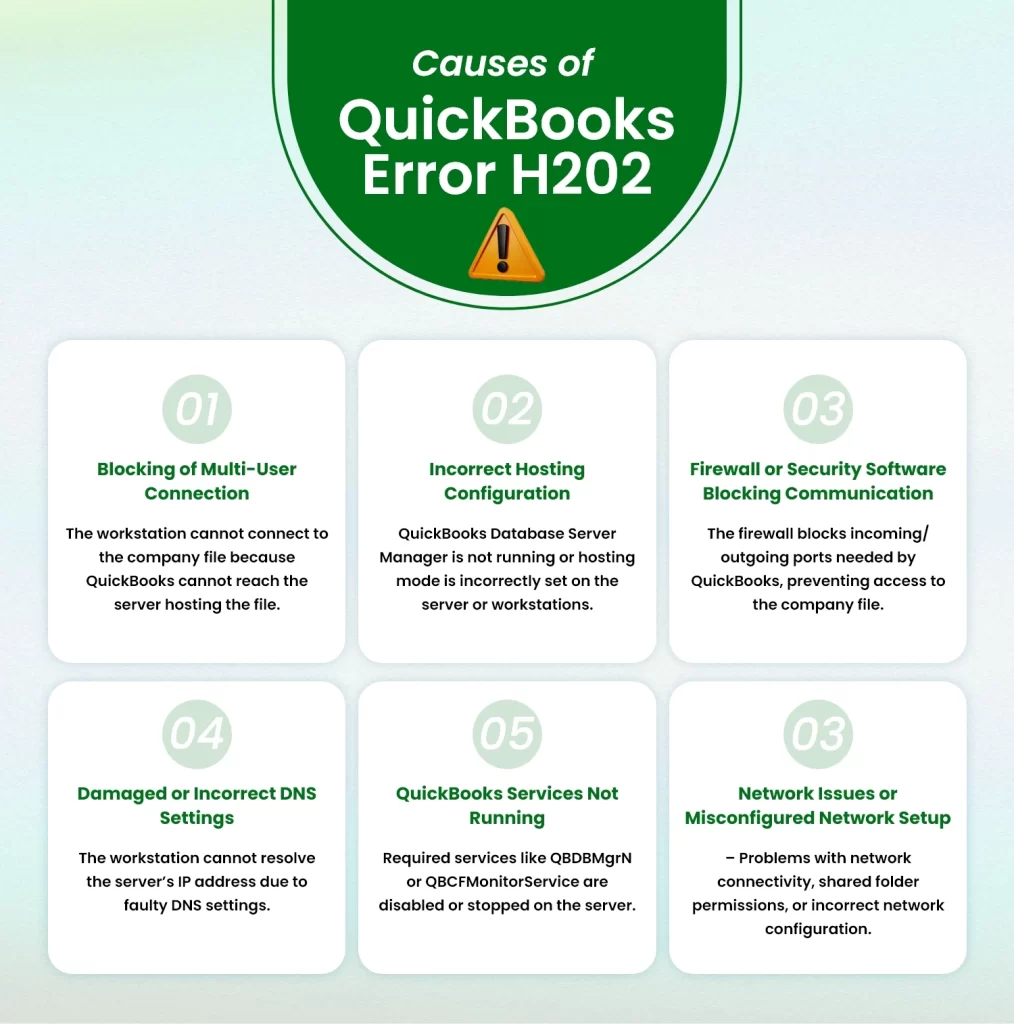
- QB is unable to get the IP address of the computer where the company file is hosted
- The network data (.nd) file might be damaged
- There is more than one computer hosting the company file on the network
- The Windows or antivirus firewall on the server is blocking incoming and outgoing communication
- QuickBooksDBXX or QBCFMonitorService or both might not be running on the host computer
- The antivirus or security software sees specific QB programs as threats and stops them from running
Before Troubleshooting QuickBooks Multi User Mode Error H202
Before you proceed with comprehensive methods to address the QuickBooks multi user mode error H202, there are some quick things you can try.
Moreover, it is important to ensure these for better performance when utilizing QBDT in multi-user mode.
Update the Operating System
The operating systems and programs are always evolving as the developers roll out new features, protocols, and product enhancements. This is done both to elevate the user experience and curb the ever-increasing cybersecurity and data security threats.
Thus, you should make sure your operating system is updated to the latest release. This will also ensure there are no incompatibility issues between the OS and programs.
Update QB Desktop
To work smoothly on your system and with third-party applications, QuickBooks needs to be up-to-date.
If you haven’t already, update your QuickBooks Desktop application.
Save a Backup of Your Company File
You should save a backup of your company file to keep your accounting data safe. This keeps you prepared in case things ever go wrong. Make sure the backup is stored in a secure location.
Ensure You Have a Strong, Stable Network Connection
To run QB in multi-user mode and avoid running into errors, make sure that you have a strong, stable network connection. In case you are on WiFi and face problems accessing your company file over the network, you can switch to an Ethernet cable.
Multi-user mode depends on a strong, stable local connection.
Section A: How to Fix Error H202 in QuickBooks Desktop for Windows
In this section, we will discuss how to fix error H202 in QuickBooks Desktop for Windows. If your query is for a QB product for Mac or a different operating system, scroll down to the suitable section.
Make Sure Hosting is Not Enabled on Workstations
Only one computer should act as a server on a network. The rest are workstations to access the company file and work on it.
We need to check all the workstations and ensure that they are not set to host the company file. This doesn’t include the computer you have designated to be the server. That will be the only computer hosting the company file.
Let us first begin with the workstations where you receive the QuickBooks error H202. Follow these steps:
- In a workstation where you face a problem, open QuickBooks Desktop
- Launch the File menu and choose Utilities
- Check if you see the Host Multi-User Access option or the Stop Hosting Multi-User Access option in the list menu that appears.
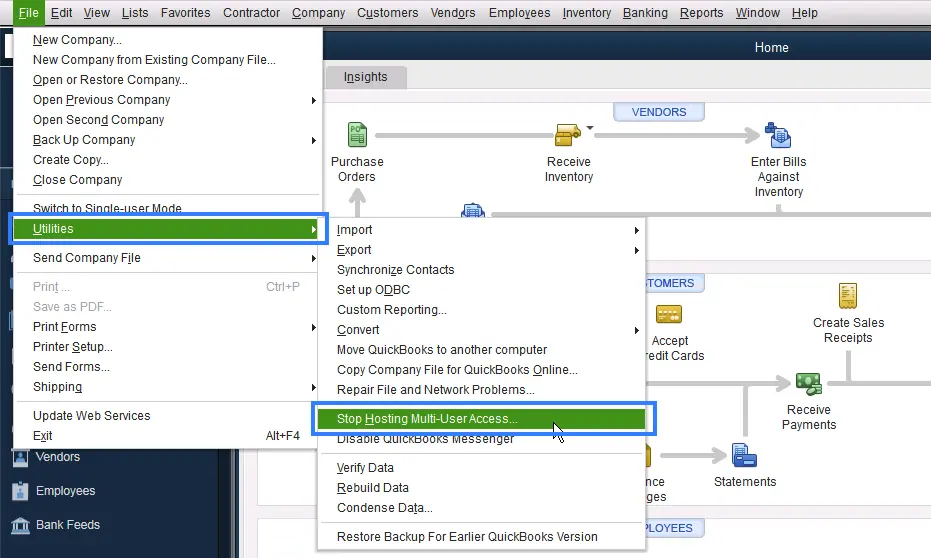
- If you see the Host Multi-User Access option, the workstation isn’t hosting the company file. This means there is nothing required to be done on this workstation. You can move to the next one.
- If you see the Stop Hosting Multi-User Access option, the workstation is hosting the company file. Click Stop Hosting Multi-User Access.
Do the same for all the QuickBooks workstations on the network.
Check the Hosting Configuration
Now, we proceed to the server computer.
Hosting needs to be enabled on the server computer for the workstations to access the company file over the network. Let us check and make sure of that.
- On your server computer, open QuickBooks Desktop
- Launch the File menu and choose Utilities
- Check if you see the Host Multi-User Access option or the Stop Hosting Multi-User Access option in the list menu that appears.
- If you see the Host Multi-User Access option, the computer isn’t hosting the company file. Click on that option to start hosting the company file.
- If you see the Stop Hosting Multi-User Access option, the computer is hosting the company file. Thus, you do not need to change anything.
Make Sure the Company File is Not Open in Single-User Mode
When setting up multi-user mode, you can follow this approach.
- Disable hosting on all computers and close QuickBooks Desktop on each one.
- Make sure the company file is not open in single-user mode on a computer.
- Now, first begin hosting the company file on the server.
After you have set up the folder permissions and are ready, access the company file on a workstation.
Launch QuickBooks Database Server Manager from the Tool Hub
QuickBooks Database Server Manager ensures that the workstation can communicate with the server.
Thus, make sure it is running on the host computer.
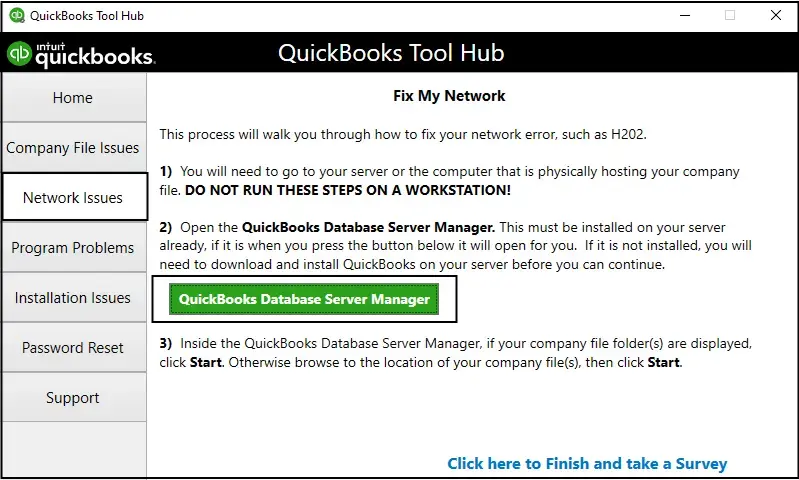
- Open QuickBooks Tool Hub
However, if you do not have a recent version of QuickBooks Tool Hub installed on your computer, you will need to do so first.
- Navigate to Network Issues.
- Click on QuickBooks Database Server Manager
Note: You will get a prompt to install QB Database Server Manager if it is not installed on your computer.
- When the QB Database Server Manager shows up on your screen, check whether you see the folder storing the company file among the shortcuts.
- In case you can’t, click on the Browse option and navigate to where the company file is stored.
- Finally, tap on Start Scan.
- The Database Server Manager will begin scanning the company file and repairing it if there are any issues with Windows permissions.
- Once done, hit Close.
Now, open QB on the workstations and try to open the company file. However, if QuickBooks error H202 keeps you from doing so, move to the next step.
Run QuickBooks File Doctor
QuickBooks File Doctor, found in the QuickBooks Tool Hub, can scan and repair company files and network issues without the need for manual troubleshooting.
Here is how you can run it to address company file and network issues:
- Launch QB Tool Hub
- Navigate to the Company File Issues
- Click on the Run QuickBooks File Doctor option
- A window will now appear, where you can click on Browse and choose your company file
- Next, choose the option to check your file and network and hit Continue
- If asked for, enter the QB admin password followed by Next
- Let the tool run and repair the company file and network problems.
When it is done, restart the computer and check if the multi-user mode error H202 that you faced earlier is resolved.
Check and Make Sure QB Services Run on the Server
For multi-user mode to run properly on the host computer, certain QB programs must be running. This includes QuickBooksDBXX and QBCFMonitorService.
Let us check and make sure QuickBooksDBXX and QBCFMonitorService run on the host computer.
- Launch the Run window by pressing the Windows + R keys
- Now, in the Run window, enter services.msc and select OK
- In the list that appears, find and locate QuickBooksDBXX (XX stands for the year in your QuickBooks version added with 10. For instance, if you run QuickBooks Desktop 2024, XX will be 34.)
- Now, choose Automatic from the Startup Type drop-down menu
- Check the Service status and make sure that it is Running or Started. If it is neither of them, select Start
- Proceed to the Recovery section
- For all the instances of First failure, Second failure, and Subsequent failures, click on the corresponding drop-down menus and select the Restart the service option.
- Finally, select Apply followed by OK.
We are not done yet. You need to follow the above steps for QBCFMonitorService as well.
- In the Services window that appears after you enter services.msc and hit Enter (or press OK), you will find QBCFMonitorService.
- After that, the steps will be the same as in the case of QuickBooksDBXX above.
Once done, launch QB Desktop on the workstation, and try to open the company file. If you encounter QuickBooks Enterprise error H202 yet again, move to the next step.
Add QB Services to the Administrator Group on the Host Computer
QuickBooks services like QuickBooksDBXX and QBCFMonitorService require admin permissions on the host computer to work smoothly. Therefore, give these services administrator permissions if you haven’t already.
Set up Windows Folder Permissions
QuickBooks needs certain permissions to access the files and share them over the network. Thus, you will face a problem in working in multi-user mode if the permissions aren’t set correctly.
Therefore, set up Windows folder permissions for QuickBooks and then resume your operations. If the multi-user mode error H202 in QuickBooks Desktop appears again, move to the next step.
Configure Windows Firewall to Allow QB Through
Windows Firewall can sometimes block QuickBooks access to required ports. This interrupts the communication. Configure your Windows Firewall to create QuickBooks exceptions on the server.
Now, move to the next step.
Configure Antivirus or Security Software
Antivirus or security software installed on the host computer can see QB programs as threats and stop them from running or quarantine them.
Moreover, these software also feature a firewall that can restrict QB from accessing the internet or sharing files over the network. Therefore, create QuickBooks exceptions to the antivirus or security software.
After you have configured both the Windows firewall and antivirus(/security software), restart your computer. Check if the QuickBooks error H202 that you faced earlier is resolved.
Ping the Server from the Workstation
To check the connection, ping the host computer from the workstation.
Follow these steps to ensure network discovery is marked.
- On the host computer, search for Network in the Start menu and select Network and Sharing Center.
- Choose Change advanced sharing settings.
- In the Network discovery and File and printer sharing sections, ensure Turn on network discovery is marked.
Now, let us retrieve the server name from the host computer.
- Launch the Run window by pressing Windows + R keys.
- In the Run box, type cmd and hit Enter.
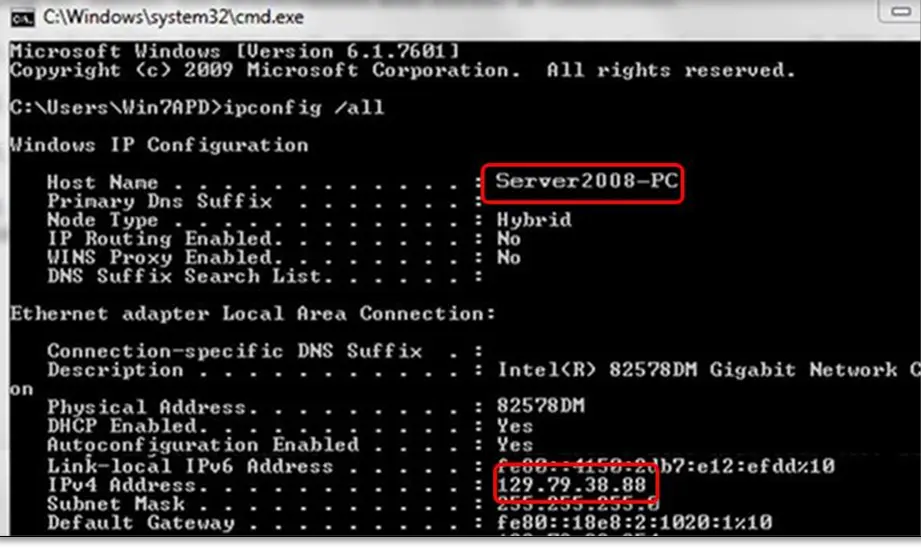
- Now, type ipconfig/all in the Command Prompt window that appears and press the Enter key.
- In the Windows IP Configuration section, look for the Host Name. You will find your server name on the right.
- Note down the hostname in a notepad or Word document where you can access it easily.
Now, let us go back to the workstation and ping the server.
- Launch the Run window by pressing Windows + R keys.
- In the Run box, type cmd and hit Enter.
- Type ping [your server name] (enter the host name that you earlier copied and hit Enter. Make sure you type the host name without brackets.
- Now, check if you get a reply without a packet loss. If you do, the server is working fine.
However, if there is a packet loss or very slow reply, troubleshoot your network.
Section B: How to Fix Error H202 in QuickBooks Desktop on Linux
You might run into QuickBooks error H202 when the server computer is a Linux or Citrix operating system.
On top of the common reasons for multi-user mode issues, the problem can stem from:
- A 64-bit version of Linux
- The hostname of the Linux server is set to the Fully Qualified Domain Name (FQDN)
To troubleshoot the error code H202, you can carry out the general methods in the previous section.
For Linux-specific servers, we have listed the troubleshooting methods below:
Follow the steps below on your Linux computer to bypass broken Domain Name Settings (DNS).
Edit the Host Files
On each workstation where you run QuickBooks, follow the steps below to add the server’s Fully Qualified Domain Name:
- On a workstation, press Windows + R keys to open the Run window.
- Type %SYSTEMROOT%\system32\drivers\etc into the Run box and hit Enter.
- Locate the file named Hosts and double-tap on it.
- Select Notepad from the Programs section and choose OK.
- Enter the Linux server’s IP number in the next blank line and press the Tab key.
- Type the Fully Qualified Domain Name and then click on File and choose Save.
- Back in the File menu, choose Exit.
Do the same for all the workstations and then open the company file in multi-user mode. If you see the QuickBooks multi user mode error h202, move to the next step.
Change the QBGlobalAppConfig.ini File
On the host computer, follow the steps below to edit the QBGlobalAppConfig.ini file.
- Open the Linux Terminal window.
- Navigate to QBGlobalAppConfig.ini
- Check the default range for ports. In case there are spaces before and after the equal sign (=), remove them.
| QBDT Version | From | To |
| QuickBooks Desktop Enterprise 20.0 | 55388 = 5 | 55388=5 |
| QuickBooks Desktop Enterprise 19.0 | 55383 = 5 | 55383=5 |
| QuickBooks Desktop Enterprise 18.0 | 55378 = 5 | 55378=5 |
| QuickBooks Desktop Enterprise 17.0 | 55373 = 5 | 55373=5 |
- You can install the Linux Database Server Manager to find the complete list of portals.
- Save the changes to the QBGlobalAppConfig.ini file
- Now, restart the QBDBFILEMON and QBDBMGRN services.
Switch to multi-user mode now.
Map Drives
If nothing works, you can map the drive where the company file lives to every workstation. This will require you to set up a mapped drive.
Section C: How to Fix Error H202 in QuickBooks Desktop on Citrix Server
If you see the error H202 in QuickBooks when on a Citrix server, it can be because the file is hosted via client-side application virtualization.
Therefore, try using server-side application virtualization to host company files to fix error code H202.
Some Other HX0X Series Errors in QuickBooks Desktop
The table below lists some other HX0X series errors that you can encounter in QBDT.
| Error code H101 |
| Error code H303 |
| Error code H505 |
Expert Tips to Prevent Multi-User Mode Errors Like H202
You cannot control when you run into HX0X error codes in QuickBooks Desktop. However, there are some healthy practices that you can adopt to minimize such instances and avoid errors:
- Optimize your hosting configuration by using a computer as a dedicated server and always have the hosting off on the workstations
- Switch to an Ethernet cable for a local area network connection to avoid weak or dropping Wifi signals
- Set up inbound and outbound rules for Windows and antivirus firewall to create exceptions for QB programs
- Regularly update your operating system and QuickBooks program
- After major system updates, reconfigure Windows and the antivirus firewall
- If you suspect network data corruption, rename the .nd file by appending .old to its name to prompt QB to recreate a fresh copy of the file.
Final Words
QuickBooks error H202 can keep you from switching to the multi-user environment. Therefore, it becomes imperative to resolve it to resume your day-to-day operations. In this article, we discuss the causes of this specific error and how to troubleshoot it on Windows workstations and servers, as well as on Linux and Citrix servers.
Frequently Asked Questions
Why do I see an error when switching to multi-user mode?
You might run into an error when switching to multi-user mode because of incorrect hosting configuration, a restrictive firewall, or an unstable local area network connection. Other reasons could be a third-party or security software interference, or crucial QB services not running on the host computer.
What is the QuickBooks error H202?
Error code H202 in QuickBooks is one of the HX0X series errors. It can appear when you try to switch to multi-user mode and access your company file on a workstation.
How can I fix QuickBooks error H202?
To resolve QuickBooks error H202, make sure the hosting is set up correctly. It involves checking and verifying that the server computer is hosting the company file and the workstations aren’t. Next, launch QuickBooks Database Server Manager, and ensure crucial QuickBooks services are running on the host computer.
About The Author

Jonathan Browns
Jonathan Brown is a trained QuickBooks professional with 10 years of experience in the accounting sector. Moreover, he is passionate about helping businesses reduce the stress of managing accounts. Also, he is proficient in assisting entrepreneurs and small business owners to use QuickBooks and enhance their accounting experience.

QuickBooks Desktop, Payroll or Enterprise
Advanced Support for QuickBooks Desktop, Payroll & Enterprise Solutions
From payroll tax setup, direct deposit issues to Enterprise performance tuning and Desktop upgrades - our QuickBooks experts provide accurate and stepwise assistance. Get dependable support designed to minimize downtime and maximize efficiency.
Recent Posts
-
This QuickBooks Company File Needs to Be Updated: A to Z Guide
-
Renew QuickBooks Subscription: Desktop & Online Renewal Guide
-
QuickBooks Online Login: Sign in to Access Your QB account
-
Change EIN in QuickBooks: Complete Guide for Desktop, Online & Payroll
-
How to Fix QuickBooks Error 15241 During Payroll Update