Fix QuickBooks Error H505 & Regain Access To Multi-User Mode

- By Jonathan Browns
- Dec 18, 2025
- Accounting
- 7 min read
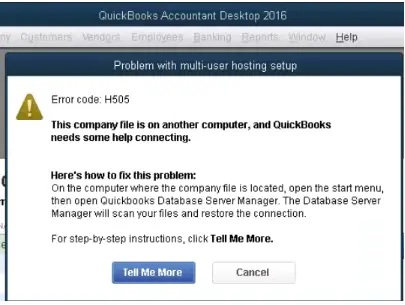
The QuickBooks Error H505 often appears with a warning message, “This company file is on another computer, and QuickBooks needs some help connecting.” It may often appear while switching to the multi-user mode, and is usually caused by a misconfigured multi-user setup, firewall settings blocking communication, or internet connectivity issues. As a result, this error restricts users from working in a multi-user environment, potentially disrupting ongoing tasks.
In this detailed post, we’ll walk you through all the possible causes of QuickBooks Error Code H505 and solutions to resolve it. Thus, it will help you regain access to multi-user mode.
What is QuickBooks Error H505?
The QuickBooks Error H505 falls under the category of the H-series of errors that may arise while working in multi-user mode. This error mainly reflects that something is blocking the multi-user connection to your server. Therefore, it’s essential to address the issue asap and regain access to multi-user mode in QuickBooks.
Possible Causes Behind the Error Code H505 QuickBooks
The Error Code H505 QuickBooks mainly strikes due to damage to the .ND file or interruption due to Windows Firewall. Apart from this, there are multiple other factors that cause this issue, which are discussed below.
- Incorrect DNS Settings or hosting settings may give rise to the QuickBooks Error Code H505.
- Issues related to your computer’s IP address.
- Windows Firewall or antivirus software is interrupting work in multi-user mode.
- Some essential QuickBooks services, like QuickBooksDBXX, QBCFMonitorService not working properly.
- This issue may arise if multiple workstations are acting as the host server.
- Working on the QuickBooks Desktop, which is outdated.
Learn How to Fix Error H505 QuickBooks Desktop Effortlessly
In this blog section, we will talk about all the effective troubleshooting methods to resolve Error H505 QuickBooks Desktop. So, let’s have a look at all the solutions and apply them according to the cause of the error.
Method 1: Run the QuickBooks Database Server Manager On your Server
- Before starting the process, check that you have the latest version of QuickBooks Tool Hub. If not, then first set it up for resuming further.
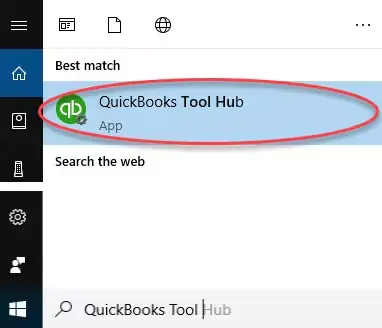
- Now, launch the Tool Hub and choose the Network Issues tab.
- Choose the QuickBooks Database Server Manager. Herein, if QuickBooks isn’t previously installed on your server, they will ask you to install it.
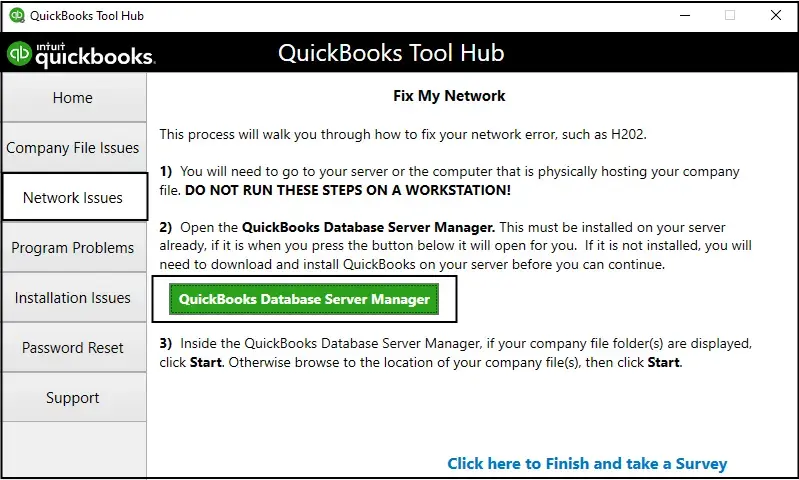
- From the QBDBMgrN, tap on the Start Scan option to locate your company file. If you can’t find them, click on the browse option and pick the Start Scan option.
- Consequently, the QBDBMgrN will begin to repair the firewall permissions automatically. Once the scanning is over, tap on the Close option.
- Finally, access the QuickBooks application on every workstation with Error H505 QuickBooks. Later on, move to the File menu, click the Switch to Multi-User Mode, and see if you are still encountering the same issue.
Method 2: Use the QuickBooks File Doctor Tool To Repair the Damaged file
To fix the damage or corruption in the QuickBooks company file, you must run the QuickBooks File Doctor Tool. For that, ensure you have the latest QuickBooks Tool Hub installed.
- Open the QuickBooks Tool Hub by clicking on its respective icon twice.
- From there, choose the Company File Issues tab and head to the Run QuickBooks File Doctor Tool.
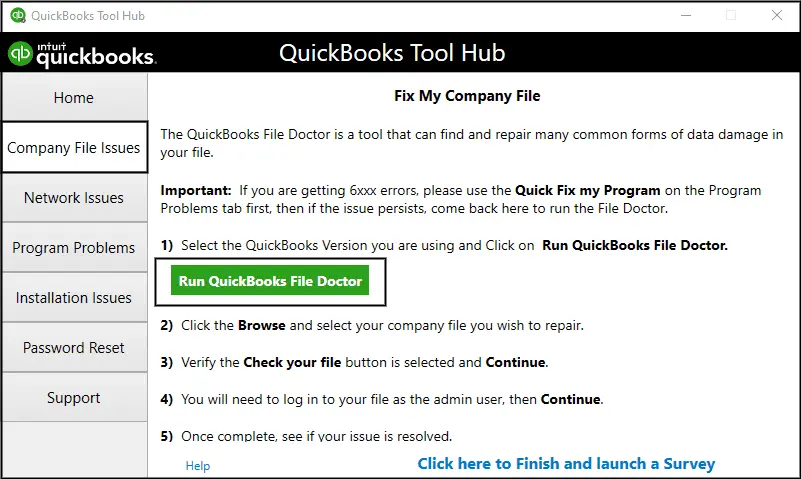
- Now, hold on for some time unless the tool is scanning, and then run a repair on the company file.
- Afterwards, pick the company file having issues. If you can’t find them, tap on the Browse option and then begin searching for them.
- Thereon, head to the Check your Network option and then pick the Continue option.
- Insert the QuickBooks admin password and tap on Next.
- Herein, if you are able to switch to multi-user mode without any issue, then it shows that the issue is resolved.
- If the issue is still not resolved, try another solution.
Method 3: Verify the Services Running on the server
Important for the Full Program Option: For the users running the full version of QuickBooks on a server PC, the multi-user hosting must be enabled.
The users must review that the essential QuickBooks Services, including QuickBooksDBXX and QBCFMonitorService, are working correctly. To verify that, you must perform the following instructions.
- Primarily, launch the Start menu and then open the Run window on your server.
- Insert “services.msc” in the text box and click OK to open the Services window.
- Now, look for the QuickBooksDBXX service and then double-tap on it. Herein, you will see that the XX reflects the QuickBooks version you are using.
- Thereon, opt for the Automatic option for the Startup Type.
- Also, see that the Service Status is either configured as Running or Started. If none of this is chosen, go with the Start option.

- Afterwards, hit the Recovery tab and click Restart the Service by clicking the First Failure, Second Failure, and Subsequent Failure options.
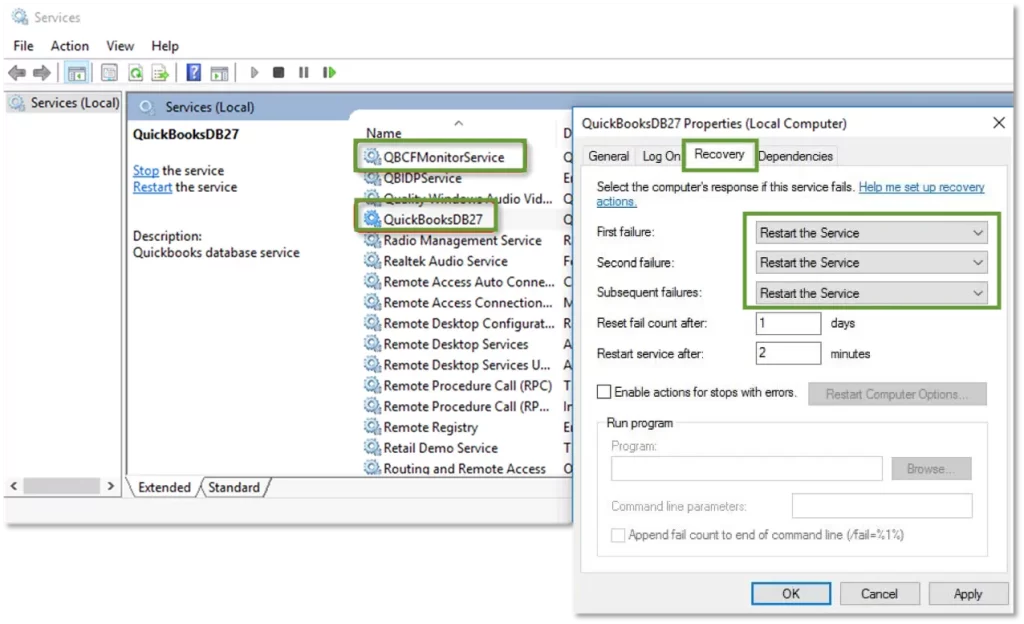
- When all the changes are done, click the Apply and then the OK tab to save the changes.
- Resume the same steps for the QBCFMonitorService also.
Once you are all set to go, launch QuickBooks on every workstation. Then, browse to the File menu > Switch to Multi-User Mode. If you are able to run everything appropriately, it states that the issue is resolved.
Method 4: Switch Off the Host Multi-User Access Option
It is essential that your host’s multi-user access option is disabled on your workstations. These are basically the computers on your network that don’t host the data files. Your server computer is the one that is hosting the file.
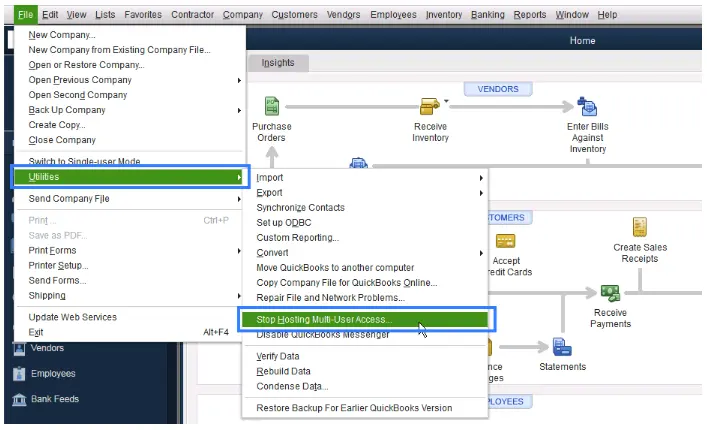
- Open QuickBooks on any workstations facing Error H505.
- Make sure that you won’t launch the data file and instead, access the File menu > Utilities tab.
- If you are able to see the Host Multi-User access option, then avoid choosing it. You must go to another workstation that is actually causing the problem.
- Thereon, choose the Stop Hosting Multi-User Access option.
- Next, resume the above steps for all the workstations that are encountering the error.
Once you review all your workstations, browse to your server computer. It is basically the computer that is hosting your data file.
- On your server computer, launch QuickBooks and click the File menu.
- Choose the Utilities tab and head to the Host Multi-User Access option.
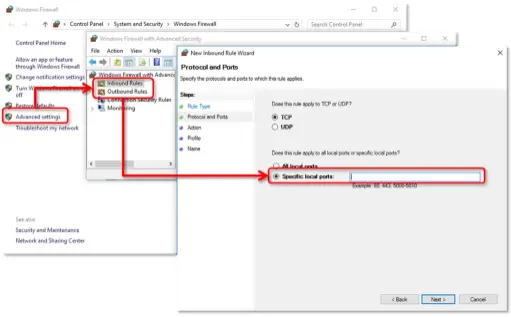
Method 5: Reset the Firewall Settings on your server
Windows Firewall is an inbuilt security application that sometimes blocks QuickBooks as it sees the program’s network activity as a threat. So, it requires certain rules to allow communications, especially for multi-user access. Here comes a time when you need to configure Windows Firewall for QuickBooks to access the multi-user mode and help fix the QuickBooks Enterprise error h505.
Method 6: Add Services to Your Windows Admin Group On Your Server
You must require proper admin permissions on your server computer to run the QuickBooksDBXX and QBCFMonitorService smoothly. However, to give proper Windows access permissions to share the company file, you must perform the following steps.
Check that the permissions are set accurately
- Access the Start menu and hit the File Explorer tab.
- After this, right-click on the company file and click the Properties tab.
- From the security tab, hit the Advanced tab > QBDataServiceUserXX > Edit menu.
- Make sure that the following settings are set to Allowed.
- Traverse Folder/Execute File
- List Folder/Read Data
- Read Attributes
- Read Extended Attributes
- Create Files/Write Data
- Create Folders/Append Data
- Write Attributes
- Write Extended Attributes
- Read Permissions
If you notice that the permissions aren’t set appropriately.
- Firstly, right-click the company file folder and choose Properties.
- After this, click the Security > Edit menu > QBDataServiceUserXX > Full Control > Allow tab.
- Thereon, hit the Apply and then the OK tab.
Edit the Folder Permissions
To make changes to the folder permissions, perform these steps.
- Launch the Start menu and then open the File Explorer.
- After this, locate and right-click on the following folders.
- C:\Program Data\Intuit\Entitlement Client\v8
- C:\Program Data\Intuit\Entitlement Client\v6.0
- C:\Program Data\Intuit\Entitlement Client\v5
- C:\Program Data\Intuit\Entitlement Client\v3
- C:\Program Data\Intuit\Entitlement Client
- C:\Program Data\Intuit\QuickBooks Enterprise Solutions X.0 (X = version) or C:\Program Data\Intuit\QuickBooks 20XX (XX = year)
- C:\Program Data\COMMON FILES\INTUIT
- C:\Program Data\COMMON FILES\INTUIT\QUICKBOOKS
- C:\Users\Public\PublicDocuments\Intuit\QuickBooks\FAMXX (XX = year)
- C:\Users\Public\PublicDocuments\Intuit\QuickBooks\Company Files
- C:\Users\Public\PublicDocuments\Intuit\QuickBooks\Sample Company Files\QuickBooks Enterprise Solutions X.0 (X = version) or C:\Users\Public\PublicDocuments\Intuit\QuickBooks\Sample Company Files\QuickBooks 20XX (XX = year)
After this, carry on with these steps for any one of the folders below. You won’t have all these folders, as they are specific to certain QuickBooks Desktop versions.
- Primarily, right-click on the folder and tap on Properties.
- Move to the Security tab and browse to the Everyone option.
- Next, pick the Full Control option and hit Apply, followed by OK.
Method 7: Check Your Internet Connection By Pinging Your Server
You need to ping your server from a workstation to test the internet connectivity. Herein, you need to ping the server from each workstation that is receiving Error H505 QuickBooks Desktop.
Enable the Network Discovery on the Server PC and any workstations getting Error H505
- Launch the Start menu on both the server and your workstations.
- Now, insert “Network” in the text box and pick the Network & Sharing Options.
- Head to the Change Advanced sharing settings option.
- Verify that the Turn on Network Discovery is chosen from the Network Discovery and File and Printer Sharing sections.
Afterwards, receive the server name from your server.
- Launch the Start menu on your server PC and then open your Run window.
- Mention “CMD” in the search box and click the OK tab.
- When in the CMD window, type “ipconfig/all” and hit the Enter key.
- After this, start looking for the Host Name in the Windows IP Configuration section. You will notice the server name written on the right side.
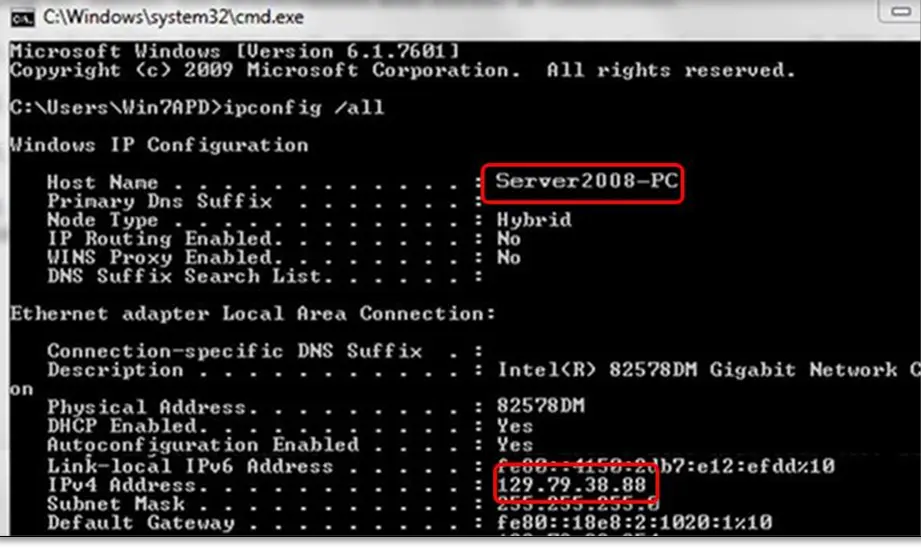
- Now, note down the hostname or copy it to a Word document from where you can access it easily.
Return to your workstations to test the server. These steps might be a bit challenging, so you can access the IT experts to help you with that.
- Launch the Start menu on your workstation and open the Run window.
- Insert “CMD” in the search console and click OK.
- Now, when you see the Command Prompt screen, type “ping [your server name]” within the text box and hit the Enter key. Avoid inserting any brackets around the server name.

- Resume all the steps for every workstation confronting the Error Code H505.
Furthermore, if you notice any reply for each pocket with no loss, it states that everything is working perfectly fine. On the other side, if you see the packet loss or a very slow reply, then you need to stop. Also, you need to connect with an IT professional to assist you with the network.
Method 8: Re-establish the .ND (Network Data File)
The network data file is the one that stores the IP address as well as the port information. But, sometimes users might end up with the Error H505 QuickBooks in a multi-user setup due to damage or corruption.ND file. So, to resolve the issue, you must change the name of the .ND file by performing these steps.
- Exit from the QuickBooks application and move to the folder holding the QuickBooks company file.
- After this, look for the .ND file and then delete the .ND file.
- Again, open the QuickBooks application and choose the File menu.
- Now, head to the Utilities > Host Multi-User Access option. As a result, this action will recreate the.ND file.
- At last, try to launch the data file again to see if the issue still exists.
Conclusion
So, hereby we sum up this post and ensure that by using the above solutions, you can easily address the QuickBooks Error H505. Also, it will allow you to work in a multi-user environment without any hindrance. Furthermore, if you are struggling with this issue, then talk to our BizBooksAdvice experts for a quick resolution.
Frequently Asked Questions (FAQ’s):-
Question 1: How to fix the QuickBooks multi-user mode not working error?
Ans. You can resolve the QuickBooks multi-user mode not working error by applying the following solutions.
- Change the name of the .ND and .TLG files
- Try running the QuickBooks Database Server Manager
- See if the QuickBooks services are running properly.
- Configure the Firewall and antivirus software settings accurately.
- Edit the hosting mode.
Question 2: What network configurations should I check for QuickBooks Error H505?
Ans. The users must take care of the following things to check for QuickBooks Error H505.
- Verify that both the host and workstation computers are on the same network.
- Ensure that the server’s IP address is static. This is so because the dynamic IP address might hamper the connectivity.
- Also, check that the network sharing settings are properly configured.
Question 3: What role do user permissions play in QuickBooks Error Code H505?
Ans. At times, the incorrect user permissions may generate connectivity issues. So, it’s essential to check that the user has enough file permissions to run on both the local PC and the server where the file is hosted.
Question 4: How to avoid QuickBooks Error H505 from occurring in the future?
Ans. To prevent the QuickBooks Error H505 from occurring in the future, you must consider the following points:
- It’s essential to update the QuickBooks software regularly.
- Also, check that your system is connected to a stable internet connection.
- Verify that your Windows Firewall and antivirus software are configured to give proper QuickBooks access.
Question 5: Does QuickBooks Error Code H505 affect my data?
Ans. No, the occurrence of the QuickBooks Error Code H505 won’t cause any damage to your data. But, for the safer side, it is essential to generate a backup of the company file to avoid any further discrepancies.
About The Author

Jonathan Browns
Jonathan Brown is a trained QuickBooks professional with 10 years of experience in the accounting sector. Moreover, he is passionate about helping businesses reduce the stress of managing accounts. Also, he is proficient in assisting entrepreneurs and small business owners to use QuickBooks and enhance their accounting experience.

QuickBooks Desktop, Payroll or Enterprise
Advanced Support for QuickBooks Desktop, Payroll & Enterprise Solutions
From payroll tax setup, direct deposit issues to Enterprise performance tuning and Desktop upgrades - our QuickBooks experts provide accurate and stepwise assistance. Get dependable support designed to minimize downtime and maximize efficiency.
Recent Posts
-
Fix QuickBooks Error PS032 | QB Payroll Update Error
-
How to Fix QuickBooks Error 12031 (Network Timeout Issue)
-
QuickBooks Error PS036: Causes, Fixes, and Prevention
-
Converting from QuickBooks Desktop to QuickBooks Online: A Complete Guide
-
Tried Everything? Here’s How to Fix QuickBooks Error Code 80070057