Expert Tips to Create QuickBooks Antivirus Exclusions

- By Jonathan Browns
- Oct 01, 2025
- Accounting
- 7 min read
Installing a safe and secure antivirus software in your system must be the utmost priority for users to safeguard their devices from online threats or other malicious infections. But, sometimes, the antivirus software blocks access to QuickBooks considering it a threat. Therefore, to run the application smoothly, it is necessary to create QuickBooks antivirus exclusions. In this guide, we have explained how to add QuickBooks to different antivirus software as exceptions for a better accounting experience.
Pre-Considerations Before Adding Exemptions for QB In Antivirus Software
Herein, we have mentioned some of the key points that you must remember before adding exemptions for QuickBooks in antivirus software.
- Primarily, you must verify that you have installed the most current version of the QBDT on your PC. As a result, it will ensure that you won’t get various issues while registering for exemption for QB in antivirus software.
- Moreover, it is also necessary to download all the latest Windows Updates. Doing so will eventually enable you to access fresh tools and improvements for different tasks.
- Above all, verify that you have given permissions to QuickBooks through Windows Firewall because the Firewall might obstructs the QB application to run the internet.
How to Create QuickBooks Antivirus Exclusions Smoothly?
You have to give a total exemption to different QuickBooks files in the antivirus program to create QuickBooks antivirus exemptions. So, to know about all such files, let’s have a quick look at the table given below.
| QB Desktop Executable Files | Relevant File Path |
| QuickBooksMessaging.exe | C:\Program Files\Intuit\QuickBooks YEAR |
| IntuitSyncManager.exe | C:\Program Files\Common Files\Intuit\Sync |
| QBW32.exe | C:\Program Files\Intuit\QuickBooks YEAR |
| QBServerUtilityMgr.exe | C:\Program Files\Common Files\Intuit\QuickBooks |
| QBLaunch.exe | C:\Program Files\Common Files\Intuit\QuickBooks |
| FileMovement.exe | C:\Program Files\Intuit\QuickBooks YEAR |
| DBManagerExe.exe | C:\Program Files\Intuit\QuickBooks YEAR |
| FileManagement.exe | C:\Program Files\Intuit\QuickBooks YEAR |
| AutoBackupExe.exe | C:\Program Files\Intuit\QuickBooks YEAR |
| QBUpdate.exe | C:\Program Files\Common Files\Intuit\QuickBooks\QBUpdate |
| Dbmlsync.exe | C:\Program Files\Intuit\QuickBooks YEAR |
| QBCFMonitorService.exe | C:\Program Files\Common Files\Intuit\QuickBooks |
| OnlineBackup.exe | C:\Program Files\ QuickBooks Online Backup |
Expert Tips to Add QuickBooks Desktop Antivirus Exclusions
Below, we have discussed the detailed process of adding QuickBooks Desktop antivirus exclusions to complete the accounting tasks smoothly.
1. Set the QB Application As an Exemption in McAfee-
The McAfee antivirus program enables users to add QB to its exclusion list to perform tasks smoothly without any further discrepancies. Note down the steps below for instantly excluding QB from the antivirus application.
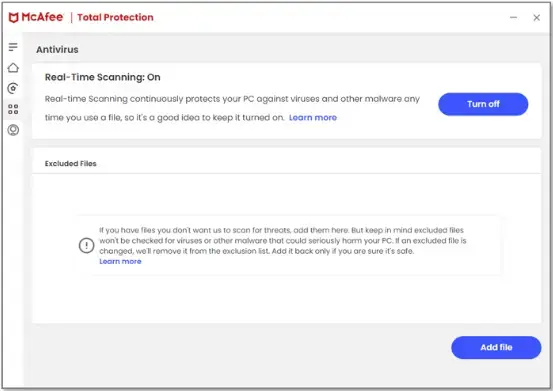
- On your Windows PC, you must launch the most up-to-date version of the McAfee application.
- After this, move to the left menu and hit the My Protection tab.
- Now, head to the Device menu and then opt for the Real-Time Scanning menu.
- Soon after this, beneath the Excluded Files section, you must pick the Add File option.
- Thereon, start looking for the file that you wish to exclude from being scanned.
- Next, perform the above steps again to remove the multiple files.
- Once all the necessary changes are made, you will notice that the chosen files have not been scanned by the McAfee software.
2. Setting the QB as Exemption for Avast Software
For setting up the QB application as an exception in Avast will eventually exclude your individual files, folders or websites through all scans and shields.
- Begin the procedure by launching the Avast Antivirus software and then tap on the Menu icon.
- After this, choose the Settings option and click the General > Exceptions > Add Exception menu.
- Now, all you require is to review the questions to ask page and then hit the Next option. Later on, you must ensure that you circle the checkbox next to the “I Understand Risks” option.
- Thereon, you must include the path of the QB program file and then opt for the Add Exception.
- Following this, tap on Browse, hit the QB Program file and then pick the Add Exception tab.
- Next, you must follow the same steps again for every QB executable file on your PC.
- With this, you can now access the QB Desktop for all your tasks without encountering any issues because of Avast antivirus.
3. Mention the QuickBooks As Exemption in Bitdefender
- Open the Bitdefender application on Windows PC.

- On the main dashboard, click Protection from the navigation menu.
- Now, tap on Open and then hit the Settings tab.

- After this, you must opt for the Manage Exceptions and then hit the + Add an Exception.
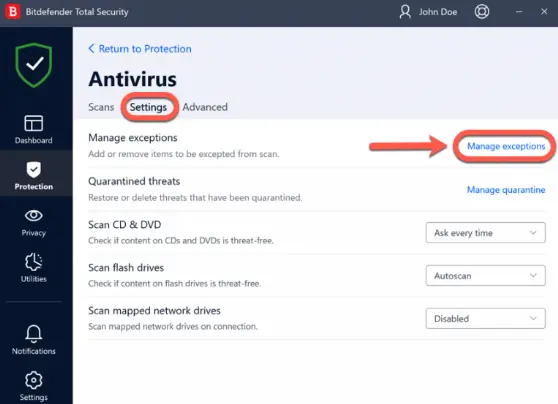
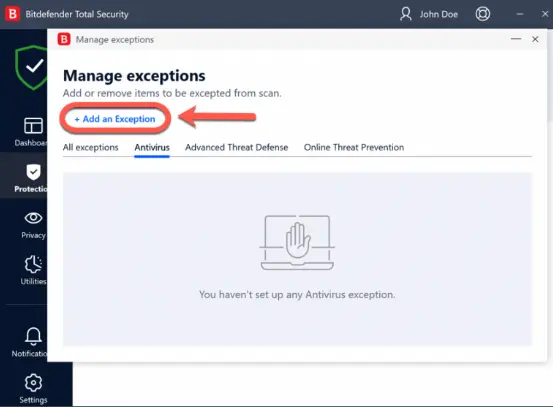
- Thereon, provide the path of the file or folder that you wish to exclude from scanning in the corresponding field.
4. Ensure that QuickBooks is Added As Exception in Norton
To exclude Norton as an Exclusion in the QuickBooks application, you must follow the following steps.
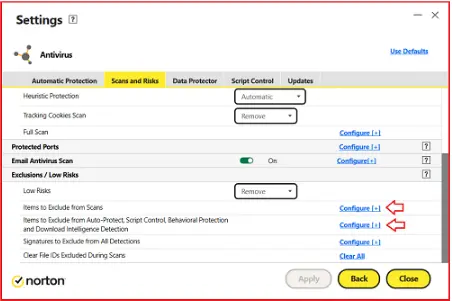
- Launch the Norton antivirus software.
- From the main window of Norton, opt for the Settings tab.
- Now, access the Settings window to opt for the Antivirus tab.
- Following this, choose the Scans and Risks option to proceed further.
- Now, beneath the Exclusions/Low Risks section, tap on the Configure option beside the following rows.
- Items to Exclude from Scans
- Items to Exclude from Auto-Protect, Script Control, Behavioral Protection and Download Intelligence Detection.
- From the new window, you must switch to the Add Folders or Add Files tab. Herein, you can assign exclusions to local drives, folders, groups of files, single files or network drives. However, if your Norton product won’t support the exclusions for files on a network, include a network drive to the exclusion list.
- Next, tap on the Browse icon within the Add Item dialog box.
- Pick the item you wish to remove from the scan and hit the OK tab.
- When you see the Add Item dialog box, hit the OK tab.
- Finally, tap on the Apply and then the OK tab for saving the changes.
5. Adding QuickBooks As Exception in Kaspersky-
- Begin the procedure by launching the main screen of the Kaspersky window.
- After that, tap on the Settings icon from the lower part of the window.
- Thereon, move to the Security Settings tab, followed by the Threats and Exclusions tab.
- Now, opt for the Manage Exclusions link to bring up the Exclusions window.
- Moving onwards, choose the Add button and then insert an exclusion in any one of the following ways.
- Tap on the Browse option and select the folder that you wish to exclude from scanning and hit the Select tab.
- Within the File or Folder field, mention the full name or mask of the file or folder.
- Into the Object Field, mention the full name.
- In case you complete both the fields, File or Folder, and Object then the Specified File or Folder isn’t scanned for specified threat type.
- Within the File hash field, insert the hash if you wish the files to be excluded from scanning by their hashes.
6. Adding QB as Exception in Trend Micro Security
Once you include Trend Micro Security as the exception list in QuickBooks, you can accomplish your tasks easily. To get the desired results, you must follow the below-given steps.
- Primarily, launch the Trend Micro app on your system and then switch to the Settings menu.
- After that, opt for the Exception Lists and hit the Programs/Folders option.
- Thereon, move towards the Add tab and then access the Browse option to search the QB program file.
- Later on, switch to the Open tab and hit the OK option.
- Conclude the entire process by clicking Apply and then using the OK option.
7. Adding QB As Exclusion in Webroot
To commence with the ongoing accounting tasks, you must mention the Webroot Secure Anywhere to the exception list in QuickBooks Desktop. To do so, follow the steps below.
- Launch the Webroot Secure Anywhere application on the PC and opt for the PC Security option.
- After this, switch to the Block/Allow Files tab and then opt for the Add File button.
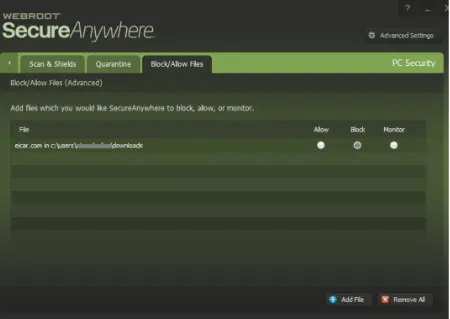
- Now, start looking for the QB Program file and then hit the Block radio button.
- It is advised to repeat the same steps for every QB executable file.
- Finally, you must run the QB application for different tasks smoothly..
8. Include ESET As an Antivirus Exemption For QuickBooks
- Initiate the process by launching the ESET antivirus application and then hit the F5 key.
- Afterwards, switch to the Advanced Setup tab and then tap on the Detection Engine option.
- Soon after this, opt for the Exclusions tab and hit the Edit menu listed along with the Performance Exclusions.
- Now, choose the Add option and then click the Browse tab to pick the appropriate program file.
- Furthermore, hit the Open tab > OK, and the QB program file will be linked along with the exclusion list.
- Thereon, you must apply the same steps for every QB executable file.
9. Exempt the Avast Antivirus From the QB Desktop
- In the beginning, launch the Avira Antivirus on your system and then hit the Cogwheel icon.
- After that, head to the PC Protection section and choose the Real-Time Protection tab.
- Thereon, move to the Exceptions and then pick the various QB executable files.
- Now, opt for the Add menu to grant total exemptions to the selected QB files from the antivirus software.
- Later, you can edit the settings by hitting the Apply and OK tab.
- Ultimately, you must run the QuickBooks application without imposing any restrictions on Avira Antivirus.
10. Mention Sophos Antivirus Software As Exemption in QB
- To begin with, launch the Sophos antivirus application and tap on the Protection menu.
- Afterwards, opt for the General tab and then switch to the Exceptions section.
- Now, you must head to the QuickBooks program and click the OK tab.
- Thereon, you must follow the previous steps to apply to every QB executable file.
- At last, you must launch the QB Desktop application and then accomplish your tasks without getting any blockage at the end of Sophos antivirus.
Conclusion
We ensure that you may find this blog worth reading and guide you on how to create QuickBooks antivirus exclusions for running the accounting software smoothly. Also, it helps you accomplish your accounting tasks with QuickBooks without any hassle. Furthermore, if your antivirus software is still blocking you from running QuickBooks, then take help from our BizBooksAdvice for better guidance.
Frequently Asked Questions (FAQ’s):-
1. What are the key points you must consider before you create QuickBooks antivirus exclusions?
Every time when you create antivirus exclusions in QuickBooks, you must verify that you have the latest QB Desktop updates installed on the system. Moreover, you must download and install regular updates for your antivirus program.
2. How to check antivirus exclusions in QuickBooks?
In order to verify the antivirus exclusions in QuickBooks, start looking for the antivirus settings and then access the section related to exclusions. Later on, you must include the specific QB files and folders that you wish to remove from scanning.
3. How do I add QuickBooks exclusions to my antivirus software?
For adding QuickBooks to your exclusions lists, you have to modify the specific antivirus settings. Once you add them the QB as an exclusion to the antivirus software you can easily accomplish your tasks.
4. Does QuickBooks updates affect antivirus exclusions?
Yes, the QuickBooks updates may affect the antivirus exclusions. By installing the QB updates, you may often see changes to files and directories, and then your antivirus software may also flag these changes. Thus, it might interrupt the update process.
5. What should I do to add exclusions to AVG antivirus?
To add the exclusions to AVG antivirus, you must implement the steps given below.
- Launch the AVG antivirus software and then tap on Menu > Preferences tab.
- After that, you must tap the Scans option and pick the appropriate scan type.
- Thereon, opt for the Add Exceptions tab and choose the file, folder, or application that you wish to exclude from being scanned.
About The Author

Jonathan Browns
Jonathan Brown is a trained QuickBooks professional with 10 years of experience in the accounting sector. Moreover, he is passionate about helping businesses reduce the stress of managing accounts. Also, he is proficient in assisting entrepreneurs and small business owners to use QuickBooks and enhance their accounting experience.

QuickBooks Desktop, Payroll or Enterprise
Advanced Support for QuickBooks Desktop, Payroll & Enterprise Solutions
From payroll tax setup, direct deposit issues to Enterprise performance tuning and Desktop upgrades - our QuickBooks experts provide accurate and stepwise assistance. Get dependable support designed to minimize downtime and maximize efficiency.
Recent Posts
-
This QuickBooks Company File Needs to Be Updated: A to Z Guide
-
Renew QuickBooks Subscription: Desktop & Online Renewal Guide
-
QuickBooks Online Login: Sign in to Access Your QB account
-
Change EIN in QuickBooks: Complete Guide for Desktop, Online & Payroll
-
How to Fix QuickBooks Error 15241 During Payroll Update