Access QuickBooks GoPayment App: Take Payments On the Go

- By Jonathan Browns
- Dec 15, 2025
- Accounting
- 7 min read
The QuickBooks GoPayment is a free mobile application for both Android and iOS users. Also, it allows small businesses to accept payments from anywhere through credit/debit cards, Apple Pay, and Google Wallet by accessing the compatible card reader. As a result, it is the most convenient way to transfer money even while travelling. Herein, in this blog, you will get to know how to get started with the GoPayment App, QuickBooks, and the steps to process payments.
Pre-Considerations Before Setting Up the QuickBooks GoPayment App
Before receiving payments on your mobile device via the GoPayment app, you need to take care of the following things:
- Get access to a stable internet connection and instant messaging.
- You have the option to access your device with the GoPayment.
- While using the audio jack card reader, make sure the volume is up while connecting with the card reader.
- Make sure that your mobile device has the latest operating system release.
- Check that your speakerphone is turned off.
- Verify that the background running apps are closed.
- Also, check that your system meets the basic system requirements to run the GoPayments app on the device.
How to Get Started With the QuickBooks GoPayment App?
To run the QuickBooks GoPayment app to make certain payments, you must perform the step-by-step instructions outlined below.
First Step: Get the QuickBooks GoPayment App Download
- Apple Devices: You can download via the Apple Store.
- Android Devices: The users can download the app via the Google Play Store.
- Set up your device to test whether it will work with QuickBooks GoPayment.
Apple Users
- Disable the restrictions for QuickBooks GoPayment. For that, go to the Settings menu, click the Screen Time, Content & Privacy, and then disable the toggle to off.
- Thereon, disable the RTT/TTY. For that, move to the Settings menu > Accessibility > RTT/TTY and then disable it to Off.
- Allow all cookies: Navigate to the Settings menu, go to Safari, and hit Advanced. Also, verify that the Block all Cookies is switched off.
Android Users
- Turn off TTY: For that, launch the Phone app, click the three dots, and choose Accessibility > TTY mode.
- QuickBooks GoPayments needs to be turned on for the Java app.
Second Step: Generate a User ID from your approval email
Once you approved, you will receive an email from BusinessServices@intuit.com.
- Launch the email and then hit the Create a Login or Login tab.
- After that, your username is pre-populated along with your email address.
- Insert the password you want and then tap on the Submit option.
Note: Verify that you keep track of the user ID. With this, you can access the online service center and the QuickBooks GoPayment app.
Third Step: Process a Transaction
You have the option to directly swipe or manually add a credit card for a sale. All you require is to plug in the card reader and then swipe. If you won’t have a card reader, then tap on the Key Card for manually adding the card details.
Customize your Receipts
For customizing your receipts, you must insert a logo, phone number, and custom message if required.
Apple
You must review the customization of my mobile payments receipt (Apple).
Android
- Start the process by signing in to the online service center.
- After that, browse to the Account option and click the Mobile Payments tab.
- Now, move to the Quick Links and opt for the Customize Receipt tab.
- Do the necessary changes as required and hit the Save and Preview Receipt tab.
- Finally, hit the Done or Make Changes option to customize the changes.
Setting up additional mobile payment users
- To begin with, you must log in to the online service Center.
- Move to the Account option and click the Mobile Payments tab.
- Thereon, choose the Invite User option and provide your First Name, Last Name, Email Address (required), and Phone (optional).
- Now, you need to assign a role to this user and then hit the Submit option.
- As a result, the QuickBooks GoPayment will instantly send you an invitation to the user’s email address.
- If they don’t already have an Intuit user ID, you will be prompted to complete the form.
- On the other side, if they have an Intuit user ID, they must opt for the Already have Intuit User ID tab and then hit the Sign in tab.
How to Process Payments in the QuickBooks Mobile & QuickBooks GoPayments Apps?
You can access the QuickBooks GoPayments to make payments even while travelling. It operates as a mobile POS, which helps you accept cash, checks, and cards using a Bluetooth reader. Moreover, it also receives the payments done via Apple Pay, Google Wallet, and Samsung Wallet.
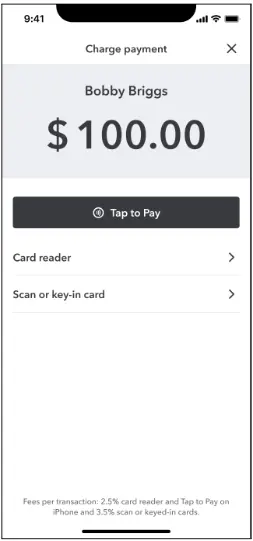
Important Tip: Only the business owners or company admins can access the Tap to Pay on iPhone option. Once you enable it, the team members or employees can process the payments made via Tap to Pay on iPhone. Once it is enabled, you can get access to this feature on all QBM and QuickBooks GoPayment apps linked with the Company ID. Furthermore, the users or employees can then use the feature via the apps.
Understand More About the Processing Fees For QuickBooks Payments
You must browse through the QuickBooks Payments website to explore more about the new plans and processing fee rates. Herein, check out how you can qualify for lower payment rates.
Check Whether you Qualify For Discounts
To obtain the rate review, you must consider the following points:
- You have processed via QuickBooks Payments.
- In QuickBooks Online: The average amount of $10,000 in the past three months.
- In QuickBooks Desktop: The average amount must be $15,000 in the past three months.
- You can process with QuickBooks Payments for at least three consecutive months.
- Make sure that your account doesn’t have any funds on hold and remains in good standing.
QuickBooks won’t review accounts for the following discounts or fees
- Authorization Fees
- AMEX SE Program: These discount rates are set by American Express.
Process Payments on the Go
If you don’t have a card reader, then you can order one for the QuickBooks GoPayments. Once you get it, you need to set it up.
A. Process Payments via Green QuickBooks GoPayment App
By processing payments via the green QuickBooks GoPayment app, you can apply payments, generate invoices, and manage customers. However, the green app only syncs with the QuickBooks Online application.
Make a New Sale
If you are getting the payment immediately, then you need to create a sales receipt.
- Launch your QuickBooks GoPayment app, click the Plus (+) tab, and then the New Sale option.
- Thereon, provide the total sale amount, or choose the Items to add the products and services.
- You must pick the total sale amount, or hit the items to include the products and services.
- Choose the Review Order tab and click the Charge $ Option.
- Now, you must pick an appropriate payment method.
- Opt for the Card Reader for processing payments using the QuickBooks Card Reader.
- Pick the Key in Card and provide the card details manually.
- Next, you must hit the Charge option and click the Tender Done option.
- Finally, choose the Send option to email or text the receipts.
1.1 Take Payment for an existing invoice
If you have sent an invoice to a customer in the QBO application, they can pay online through the email you sent to them.
Besides this, you can also process payments for open invoices in person. The QuickBooks GoPayment app syncs the payment with the invoice present within the QBO application.
- Primarily, launch the QuickBooks GoPayment App and click the Plus (+) icon.
- After this, hit the Invoice Payment option and look for the customer, or use the search field.
- Now, choose the invoice the customer wants you to pay and click the Charge option.
- Furthermore, pick any one of the payment methods:
- Opt for the Card Reader to process the payments using the QuickBooks Card Reader.
- Choose the Key in Card option and then insert the card details manually.
- Finally, when you are done making all the changes, hit the Charge option.
1.2 Take Payment in Advance
You have the option to receive the payment before generating an invoice using the QuickBooks GoPayment app. Herein, the QBO application stores the payment in the form of credit.
- Start the process by opening the QuickBooks GoPayment app and clicking the Plus (+) option.
- After this, choose the Customer Payment option and pick the customer or hit the Plus (+) to include all the details.
- Browse to the Add Charge amount and then insert an amount in the respective text field.
- Now, opt for the Charge $ and then pick an appropriate payment method.
- Pick the Card Reader to process the payments done via the QuickBooks Card Reader.
- Otherwise, go with the Key in Card option and then provide the card details manually.
- When all the changes are made, hit the Charge option > Tender Done tab.
- At last, choose Send to email or text the receipt.
B. Process Payments Using the Blue QuickBooks GoPayment App
For making payments via the Blue QuickBooks GoPayments app, you need to connect with a stand-alone QuickBooks Payments account. You can also link with a QuickBooks Desktop account managed via Merchant Service Center (MSC). But it doesn’t sync your payment details with any of your QuickBooks products.
Important Tip: Once you log in as a primary admin, you can have an amazing experience with the QuickBooks GoPayment app.
Follow the steps written below to take a customer payment in person.
- Primarily, launch the QuickBooks GoPayment app and click the Amount tab.
- Provide the total sale amount, or pick the Items tab to add the products and services.
- Choose the Taxable Option to charge sales tax.
- Opt for the View Details option for adding a memo or discount.
- Now, pick the Arrow icon and pick the suitable payment method.
- Next, browse to the Card Reader option, or head to the Other Payment option to pick either the Key in card, cash, or check option.
- Pick the Card Reader for processing the payments done using the QuickBooks Card Reader.
- Choose the Key in the card to add the card details manually.
- Pick the cash to process for the payments done via bills or coins.
- Move to the check to process payments using an e-check or a bank transfer (ACH).
- When all the necessary changes are done, opt for the Charge option and click Send to email or text the receipt.
C. Tap to Pay in the QuickBooks GoPayment or QuickBooks Online Mobile App (iPhone Only)
Using the latest Tap to Pay feature in Apple, merchants can now accept payments on the go without setting up the card readers.
1.1 Enable the Tap to Pay option
Below, we have provided the step-by-step instructions to enable the QuickBooks GoPayment and QuickBooks Online mobile apps on iOS.
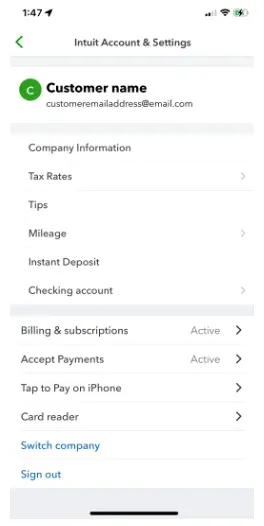
- To begin with, tap on the Menu icon and click the Gear icon.
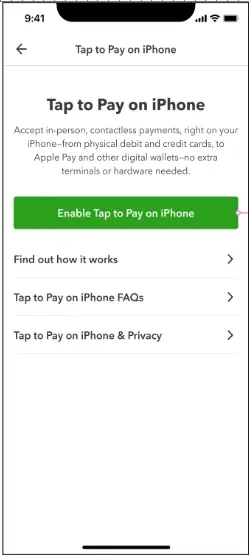
- Thereon, opt for the Tap to Pay on iPhone option.
- Browse to the Enable Tap to Pay on iPhone option.
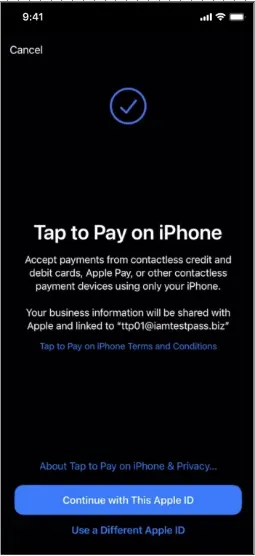
- After that, pick how you wish to set up your Tap to Pay option:
- Continue with this Apple ID (recommended): With this Option, you can set up Tap to Pay with your iPhone’s Apple ID.
- Use a different Apple ID: You can set up Tap to Pay along with an alternative Apple ID.
- Note: Your device will eventually configure after choosing the desired Apple ID. However, it may take several minutes to complete the setup.
- Consequently, you will get a message stating “Tap to Pay on iPhone ready” after you complete the setup.
- Furthermore, head to the Got It, and then Tap to Pay is ready to use.

Once you set up the Tap to Pay on your iPhone, you have the option to accept contactless payments on your iPhone using the QuickBooks GoPayment app via physical debit or credit cards and mobile digital wallets, including Android.
1. 2 Use Tap to Pay for Invoices (iPhone Only)
Now, with the help of Apple’s new Tap to Pay feature on the updated iOS version, merchants have the option to accept payments on the go without setting up card readers.
Below, we have provided the step-by-step instructions to accept Tap to Pay payments with an invoice in the QuickBooks GoPayment or QuickBooks Online mobile app.
- Under this process, move to the Menu icon and click the ALL tab.
- After that, choose the Invoice payment within the Sales area and pick the invoice that you wish to pay.
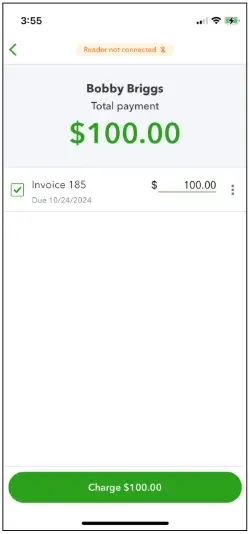
- Thereon, pick the Charge Payment tab and tick the checkbox beside the invoice you wish to pay.
- Next, hit the Charge tab and then click the Tap to Pay option.
- Furthermore, your customer can then choose their payment method to pay on your iPhone. Herein, they can either use a debit or credit card or a digital wallet on their Android phones.
- Once the payment is complete, you will get the “Done” message.


How to Fix QuickBooks GoPayment App Issue?
Most often, users may experience that their QuickBooks GoPayment app keeps changing its screen orientation automatically from portrait to landscape. So, to fix the issues of change in screen orientation, you must perform the following steps.
Solution 1: Restart your Device
Firstly, you must try to restart your devices because sometimes minor glitches in the software may cause screen orientation lock due to a malfunction. Once you relaunch your device, you can re-enable the screen orientation lock and then test if the QuickBooks GoPayments app is working.
Solution 2: Update Your QuickBooks GoPayments App
If you are still experiencing the issue while running the QuickBooks GoPayments, try updating the application. You have to look for the possible updates on both the tablet and the app. Also, verify that your Samsung Galaxy Tab A7 Lite’s Android operating system is updated.
For updating the app, perform the following steps.
- Initially, launch the Google Play Store on your Android mobile device.
- After this, look for the QuickBooks GoPayments app.
- Now, locate and then install any available updates for the QuickBooks GoPayments app.
- Once the updates are installed, look to see whether the screen orientation is working correctly.
Solution 3: Verify the Customization Options For Screen Orientation
At times, misconfigured customization options for screen orientation might hamper the functionality of the app. So, to fix the issue, configure the customization options by performing these steps.
- Initially, move to the Apps menu from your mobile’s Settings menu.
- After this, choose the GoPayment menu from the list of options available.
- Head to the App Settings (or Advanced Settings) to check and adjust the orientation options.
Solution 4: Install the QuickBooks GoPayment App on Another Android Device
You can also try addressing the issue by installing the QuickBooks GoPayment app on another Android device. Then, you can test the functionality to find out if the issue is related to your device. If you notice that the app is working properly, it means that the issue lies with the screen resolution or system compatibility.
Conclusion
Hereby, we end this post and hope that now you can easily get started with the QuickBooks GoPayments application. Thus, it helps in making payments from anywhere and anytime through the online portals. Furthermore, if you still require any additional help, then connect with our BizBooksAdvice professionals for help.
Frequently Asked Questions (FAQ’s):-
Question 1: How much time QuickBooks GoPayments take to process the payments?
Ans. The payments done through the QuickBooks GoPayments app usually take around 2-3 business days and are deposited into your bank account, especially for first-time transactions. However, the processing time doesn’t include weekends and holidays, so you must compute the estimated time framework accordingly.
Question 2: What is Go Payment on QuickBooks?
Ans. You can access QuickBooks GoPayment for payment on the go. This application usually works as a mobile POS, which accepts cash, checks, and cards using a Bluetooth reader. You may also access Apple Pay, Google Wallet, and Samsung Wallet.
Question 3: What payment methods does the GoPayment app accept?
Ans. The QuickBooks GoPayment app accepts payments via ACH, Apple Pay, or PayPal for a smooth payment experience.
Question 4: What devices are compatible with GoPayment?
Ans. The QuickBooks GoPayment is compatible with all iPhone, iPad, and iPod touch devices running iOS 4.0 or higher operating systems.
Question 5: Can I void a payment with the QuickBooks GoPayment app?
Ans. Yes, you can void a payment in the QuickBooks GoPayment app.
About The Author

Jonathan Browns
Jonathan Brown is a trained QuickBooks professional with 10 years of experience in the accounting sector. Moreover, he is passionate about helping businesses reduce the stress of managing accounts. Also, he is proficient in assisting entrepreneurs and small business owners to use QuickBooks and enhance their accounting experience.

QuickBooks Desktop, Payroll or Enterprise
Advanced Support for QuickBooks Desktop, Payroll & Enterprise Solutions
From payroll tax setup, direct deposit issues to Enterprise performance tuning and Desktop upgrades - our QuickBooks experts provide accurate and stepwise assistance. Get dependable support designed to minimize downtime and maximize efficiency.
Recent Posts
-
QuickBooks Payroll Not Withholding Taxes? Here’s What to Do
-
QuickBooks View My Paycheck: Access Pay Stubs & Payroll Info
-
QuickBooks Error 15103: Understanding Causes & How to Fix It
-
QuickBooks Not Connecting to Server: A Troubleshooting Guide
-
QuickBooks Online Advanced Login, Pricing & Feature Comparison Guide