Export Chart of Accounts QuickBooks – How to Do it Effortlessly?

- By Jonathan Browns
- Oct 16, 2025
- Accounting
- 7 min read
Managing your Export Chart of Accounts QuickBooks is important for maintaining accurate financial records. However, exporting that data, be it for audits, data migration, or regular backups, can be a challenging task if you do not have the proper tools.
However, this blog will act as a proper guide if you are struggling with the process of exporting your charts in the QuickBooks application. Go through this blog to understand how you can export the chart of accounts easily.
What do You Understand by Export Chart of Accounts QuickBooks?
The chart of accounts in the QuickBooks application is a complete list of your QuickBooks Online accounts along with their balances. QuickBooks users often use this feature of the application to keep bookkeeping records in one place and updated. Your accounting requires that you keep a record of your transactions in the correct accounts, at the right place. The Export chart of accounts in QuickBooks lets you do that.
QuickBooks Desktop Export Chart of Accounts Layout
In this section, we will give insights into the components that constitute the formation of the Chart of Accounts in the QuickBooks application. There are various types of charts of accounts, and each of them has different kinds of items or specified entries that can be put in, for each type of specified chart of accounts. Each line item demonstrates an account within each category. The main account types for a chart of accounts are asset, liability, income, and expense accounts. Let us throw light on the main accounts for a chart of accounts:
Read More:- Download QuickBooks Desktop 2024 & Unlock Its Full Potential
Asset accounts
The chart of accounts streamlines various asset accounts by organizing them into line items so that you can track multiple components easily. These types of accounts can be confusing as they not only keep track of what you paid for each asset, but they also follow processes like depreciation.
Your asset accounts mainly include:
- Buildings and land
- Equipment and vehicles
- Inventory
- Bank accounts
- Accounts receivables
Liability accounts
Liabilities are things you owe or have to pay or clear the dues for. Major liability accounts include things like:
- Accounts payables
- Payroll taxes
- Bank loans
- Credit card balances
- Deferred tax liabilities
Current liabilities are any outstanding payments that are due within the year, while non-current or long-term liabilities are payments due more than a year from the date of the report.
Income accounts
Income accounts are the category that business owners hardly put to use. Some of the most common types of revenue or income accounts include sales, rental, and dividend income.
Consider creating separate line items in your chart of accounts for different types of income.
Note- When putting up or collecting the data in one place in your income accounts category, consider anything that brings money into the company, including things like interest income.
Expense accounts
Expense accounts record money that has been spent, helping you track funds that are no longer available.” Different types of expense accounts include salaries or advertising expenses.
Note- It’s also a good idea to break up expenses into separate accounts. Within each line account, you can create sub-categories for the various expenses associated with each carrier.
Steps For Setting Up Charts of Accounts in QuickBooks
Setting up your chart of accounts is fairly simple. Firstly, you need to create your blank chart and assign the columns. The chart of accounts has mainly three columns-
1. Create business account names
The account names are the titles of the business accounts you are putting to use. For instance, bank fees and rent expenses might be account names you use.
2. Assign account numbers to business accounts
Account numbers are the numbers that are given to each account name. These numbers typically have four digits, and each account has a different and unique number.
The most common number sequences for each account are:
- Assets: 1,000 to 1,999
- Liabilities: 2,000 to 2,999
- Income: 4,000 to 4,999
- Expenses: 6,000 to 7.999
Note – You can create sub-accounts to streamline your account numbering.
3. Organize account names into one of the four account category types
For seamless and easy organization, each of your account names should have an account type. Choose the main account types like assets vs. liabilities or income vs. Expenses.
Types of Accounts QuickBooks Sets Up For You
Everyone gets the same set of standards accounts. QuickBooks adds accounts based on your type of industry. If you do not see the account you want to use, consider adding it manually. You can also edit, delete, or hide an account.
| Account | What it is | Automatically added by QuickBooks when you… |
| Accounts Payable (A/P) | Tracks bills and bill payments for your business. If your business uses multiple A/P accounts, QuickBooks lets you choose one when you enter and pay bills. | Create a bill for the first time. |
| Accounts Receivable (A/R) | Tracks invoices and payments from customers. If you use more than one A/R account, QuickBooks lets you choose one when you invoice or receive payment. | Create an invoice for the first time. |
| Opening Balance Equity | Offsets opening balance transactions to make sure the Balance Sheet remains balanced. | Enter the opening balance for a balance sheet account. |
| Payroll Expense | Tracks payroll items (expense) for the company, including salaries, wages, bonuses, and commissions. This includes company contributions like company paid health plans and company paid portions of taxes like Social Security and Medicare. | Turn on payroll for the first time. |
| Payroll Liabilities | Tracks taxes and deductions from your employees’ salaries until you turn them over to the government. This includes federal and state income withholding, local and employee paid taxes like Medicare and Social Security. | Turn on payroll for the first time. |
| Retained Earnings | At the beginning of a new fiscal year, QuickBooks transfers net income into your retained earnings account. | Set up a new company file. |
| Sales Tax Payable | Tracks all sales tax you collect and pay. Amounts not yet paid are a liability payable to the sales tax jurisdictions. | Turn on sales tax. |
| Uncategorised Expense | Expenses not categorized to a specific expense account like an opening vendor balance. | Enter an opening balance for a vendor. |
| Uncategorised Income | Income not categorized to a specific income account like an opening customer balance. | Enter an opening balance for a customer. |
| Un-Deposited Funds | Tracks customer payments you collect until you deposit them. | |
| Inventory Asset | Tracks the value of your inventory. | Add an inventory part or assembly for the first time. |
| Reconciliation Discrepancy | Tracks previously reconciled transactions changed since the last account reconciliation. | Enter an adjustment to reconcile discrepancies. |
Note- These are the same types of accounts that are created for both the versions, be it QuickBooks online or desktop.
How to Export the Chart of Accounts from QuickBooks Desktop?
The procedure to export the chart of accounts from QuickBooks Desktop is quite simple and can be done in a few steps. Let us have a look at the steps as follows-
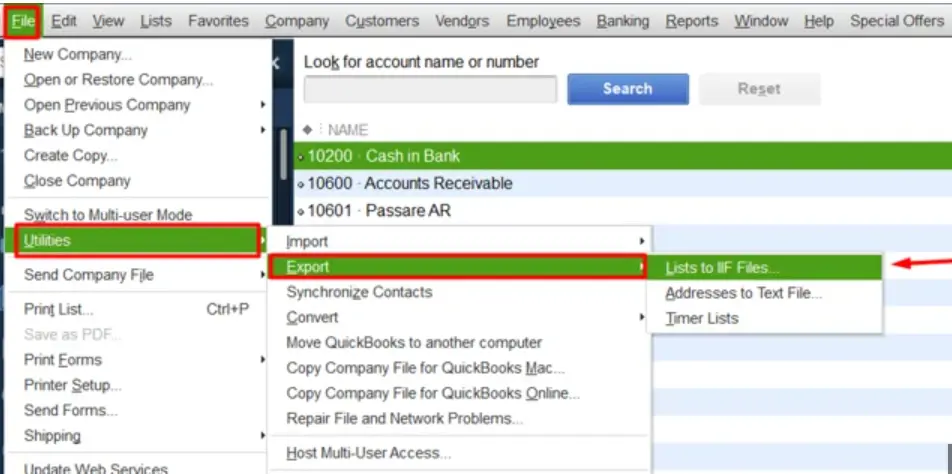
Step 1: Export Chart of Accounts
- Open the QuickBooks application and the desired company file.
- Look for the Chart of Accounts you want to export.
- Go to the taskbar to choose the preferred file.
- Choose the option Utilities and then select the option Export.
- Choose lists that are appearing on the screen.
- Select the chart of the Account tab.
- A dialog box will appear. Save the file in the location that is listed in the drop-down menu.
Step 2: File Conversion
The steps to convert your file for exporting are as follows-
- Firstly, open your Excel.
- Search for the preferred data via the taskbar that appears on the top.
- Go to the Text option and click it. Now a dialog box will appear as Import Text File.
- Find the folder that contains the Chart of Accounts you have saved in the previous step.
- Search for the IIF file you have saved.
- Now, open the file and follow the below-mentioned steps below:
- Choose the file you want to export.
- Choose the Delimited tab and furthermore, click the Next button.
- Now select the column of data format.
- Click the General Option.
- A small dialog box will appear on the computer screen. Choose the location for importing the file.
- Choose the worksheet that already exists and then click on the Okay button.
- Go to the drop-down, find the named file, and then click on Save.
- Now, save the file in Excel Sheet format.
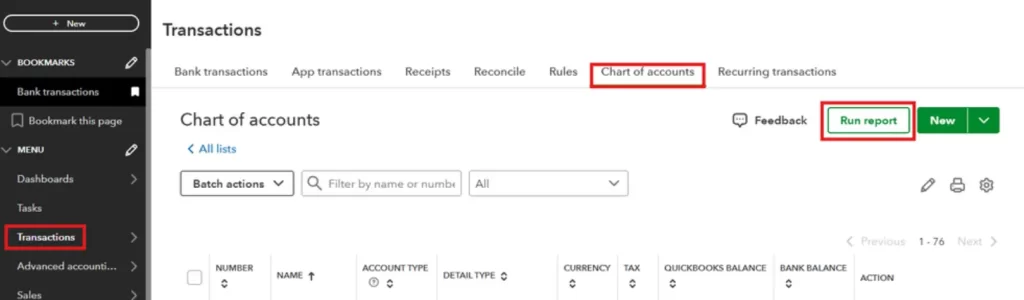
How to Export Chart of Accounts in QuickBooks Online?
The steps to export the chart of accounts in QuickBooks Online are as follows-
You can save a PDF copy or print your Chart of Accounts by clicking the small printer icon above the Chart of Accounts. To find it, go to the Accounting tab on the left navigation menu.
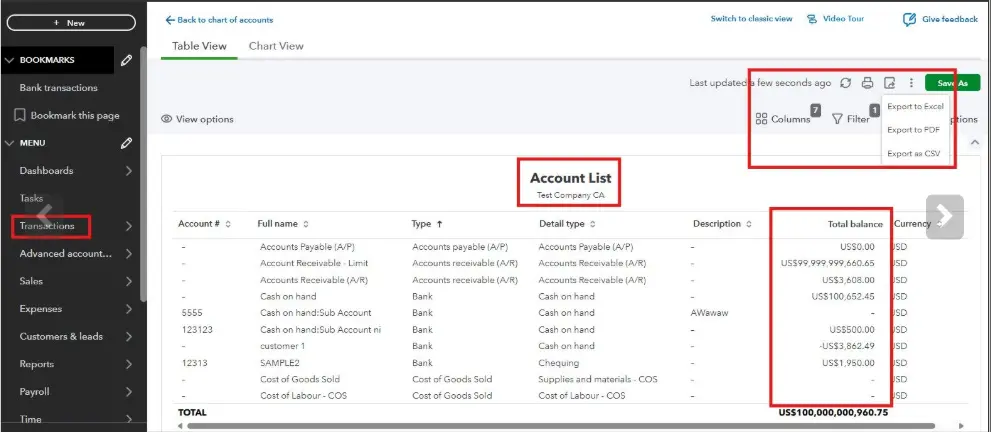
You can export your General Ledger by clicking on the Gear icon and then choosing the Export option. However, till this moment, QuickBooks does not offer to export the charts completely.
Tips for organizing your chart of accounts
Once you set up your Chart of Accounts, it is important to keep it organized. Follow the tips that are given below-
- Use simple account names: When setting up your line items for the first time, make sure to keep it simple. Create titles for your line items that are easy to remember for you as well as your accountant.
- Create sub-accounts: Make sure to create sub–accounts for each transaction you make. It will be easy for you to understand and navigate things, keeping things uncluttered.
- Add financial statements: You can add an account statement column to your COA for recording which statement you’ll be using for each account—cash flow, balance sheet, or income statement.
- Track account movement: Your chart of accounts reflects or demonstrates your business, and this is why you should keep it updated and keep removing the stagnant accounts that are not in use anymore. But you have to keep the general rule for adding or removing accounts, which is to add accounts as they come in, but wait until the end of the year or quarter to remove any old ones.
Conclusion
We have come to the end of this blog. In this blog, we have covered every aspect of QuickBooks export chart of accounts, whether it is the online or desktop version. In case you are still not clear about how to export the chart of accounts in QuickBooks, consider calling our BizBooksAdvice at the toll-free number.
Frequently Asked Questions (FAQs)
1. Why would I export my Chart of Accounts?
Ans. To share with an accountant, migrate to another system, create backups, or edit in bulk outside QuickBooks.
2. What formats can I export the Chart of Accounts in QuickBooks Online?
Ans. CSV or Excel (XLS/XLSX) from the COA view; you may also export as a IIF file if converting for QuickBooks Desktop.
3. How can I export for migration to another accounting system?
Ans. Export the COA with the required fields (name, type, parent account, description, balance) in CSV/Excel or IIF, then map fields to the target system during import.
4. I’m seeing errors during export. What should I check?
Ans. Check account types and hierarchy validity, ensure no illegal characters, confirm you’re using the correct format (IIF for Desktop), and verify there are no special characters in account names. Also, confirm you have permission to export.
5. What should I do after exporting the COA?
Ans. Save a backup copy, securely store the file, review the exported data for completeness, share with your accountant or import target system, and verify integrity after import (account names, types, and hierarchies.
About The Author

Jonathan Browns
Jonathan Brown is a trained QuickBooks professional with 10 years of experience in the accounting sector. Moreover, he is passionate about helping businesses reduce the stress of managing accounts. Also, he is proficient in assisting entrepreneurs and small business owners to use QuickBooks and enhance their accounting experience.

QuickBooks Desktop, Payroll or Enterprise
Advanced Support for QuickBooks Desktop, Payroll & Enterprise Solutions
From payroll tax setup, direct deposit issues to Enterprise performance tuning and Desktop upgrades - our QuickBooks experts provide accurate and stepwise assistance. Get dependable support designed to minimize downtime and maximize efficiency.
Recent Posts
-
Converting from QuickBooks Desktop to QuickBooks Online: A Complete Guide
-
Tried Everything? Here’s How to Fix QuickBooks Error Code 80070057
-
This QuickBooks Company File Needs to Be Updated: A to Z Guide
-
Renew QuickBooks Subscription: Desktop & Online Renewal Guide
-
QuickBooks Online Login: Sign in to Access Your QB account