QuickBooks Not Detecting Mapped Drives? Fix Access & Network Issues Fast

- By Jonathan Browns
- Jan 19, 2026
- Accounting
- 7 min read
Most often, the users might experience the QuickBooks is not showing mapped drives error if the Network Discovery is disabled. In other instances, this issue may arise due to the inappropriate mapping of the network drives. Consequently, this issue may obstruct the users from opening the mapped drive while launching or saving the data file. So, if this issue is also bothering you while launching the file, then don’t panic. Instead, thoroughly review this post to learn more about the causes and solutions to fix the QuickBooks open company file from network drive error.
Reasons Why QuickBooks open company file from network drive for windows Error Occurs
Users often end up with QuickBooks open company file from network drive for Windows error occurs due to the following reasons.
- You haven’t enabled the Network Discovery option in your Windows operating system.
- The users won’t have sufficient administrative rights to operate the QuickBooks application.
- Sometimes, the issues created while locating the UNC path may cause this error. As a result, it prevents you from getting the IP address and DNS automatically.
- Incorrect mapping of the hard drive could also be responsible for this issue.
- Another reason may be issues with the unstable or weak internet connectivity.
Easy Ways to Rectify the QuickBooks Is Not Showing Mapped Drives Error
Now that you have understood the actual causes that trigger QuickBooks not to show the mapped drives error, let’s find ways to fix it. For that, you must use the solutions described below to fix the issue and access the data file smoothly.
Solution 1: Make Sure You Are Accessing the Correct File Extension
As there are multiple file types that exist in QuickBooks Desktop, there might be the possibility that your file extension is inappropriate. Therefore, it is mandatory to review that you open the data file having the QBW extension at the end of the file name.
Solution 2: Switch On the Network Discovery
The users might encounter the QuickBooks open company file from network drive issue when the network discovery is turned off. Therefore, to rectify the issue, you must turn it on by implementing the steps given below.
- Initially, hit the Start menu, insert “Settings” into the search panel, and hit the Settings tab.
- After this, browse to the Sharing Options and then expand the Private Network.
- Thereon, you must ensure that two options are chosen, i.e, Turn on network discovery and Turn on Automatic Setup of network-connected devices.
- Once all the mandatory changes are done, hit the Save Changes tab.
Solution 3: Mapping of a Network Drive in Windows
Go through the steps below for the Windows 7/8/10 you are working on. Performing these steps will help you remap the network drive. Thus, it will help you resolve the ” QuickBooks is not showing mapped drives error.
Instructions For Windows 7 Users
- In the beginning, hit the Windows logo key and then pick the Computer option from the list of options available.
- After that, head to the Tools tab from the menu bar. Herein, you can hit the Alt key to unhide the menu bar.
- Now, move to the Map Network Drive, and it will eventually launch a new window on the screen.
- Next, hit the box adjacent to the drive and opt for the unused drive from the search results.
- Following this, hit the Browse tab and move to the network location where QuickBooks files are placed.
- After this, you can try mapping with your server IP address if the UNC path isn’t working.
- Furthermore, hit the OK and then the Finish tab.
- Presently, you can begin looking for the unused drive, which will then become a network drive.
- At last, try launching the application and check if these steps help you rectify the QuickBooks open company file from network drive for Windows error.
Instructions For Windows 8 and 10 Users
- Herein, you first have to launch the Start menu and type PC in the search field.
- After this, pick the “This PC” option from the given list of options.
- Thereon, right-click on the Network from the left side of the panel.
- Following this, choose the Map Network Drive by clicking on the drop-down arrow.
- Now, all you require is to hit the box next to the Drive checkbox and opt for the unused drive from the options available.
- Afterwards, tap on Browse and shift to the location where your data file is placed. Otherwise, you may also try accessing the server IP address if you are having any problems accessing the UNC path.
- Complete the process by hitting the OK and then the Finish tab.
Solution 4: Switch to the Server Computer and Do a Wildcard Search for Data files
- You must reach your server computer and do a wildcard search for all data files by mentioning the following in the search console.
- *.qbw (Working Files)
- *.qbb (Back Up Files)
- *.qba (Accountants Copy Files)
- *.qbx (Accountants Transfer Files)
- *.qby (Accountants Change Files)
- After this, the users must verify that you have added an asterisk (*) sign before the extension type to ensure that the search feature is working fine.
- Once you are able to locate the file, write down its file location.
Read More:- Backup QuickBooks Company File
Solution 5: Testing the Connectivity By Pinging Your Server
To verify that you are linked with a stable and uninterrupted internet connection, you have to ping the server. For that, you must carry on with the instructions outlined below.
- Primarily, you must determine the name of the server computer.
- Launch the Run window by pressing the Windows + R keys.
- After this, mention CMD in the search panel and click OK.
- Now, insert ipconfig/all in the black screen and hit the Enter key.
- Thereon, you must note down the hostname (servername) in a safe place.
- Afterwards, include “ping [server name]” and then press the Enter key.
- Next, you must look for the reply of each packet.
- If you get a reply for each packet, it states that your computer is linked to your Network.
- In case you receive a packet loss or a slow reply, then your Network must be checked out by an IT expert.
Solution 6: Launch a Company File On Your Workstation
You can launch a company file on your workstation by performing the steps below. ‘
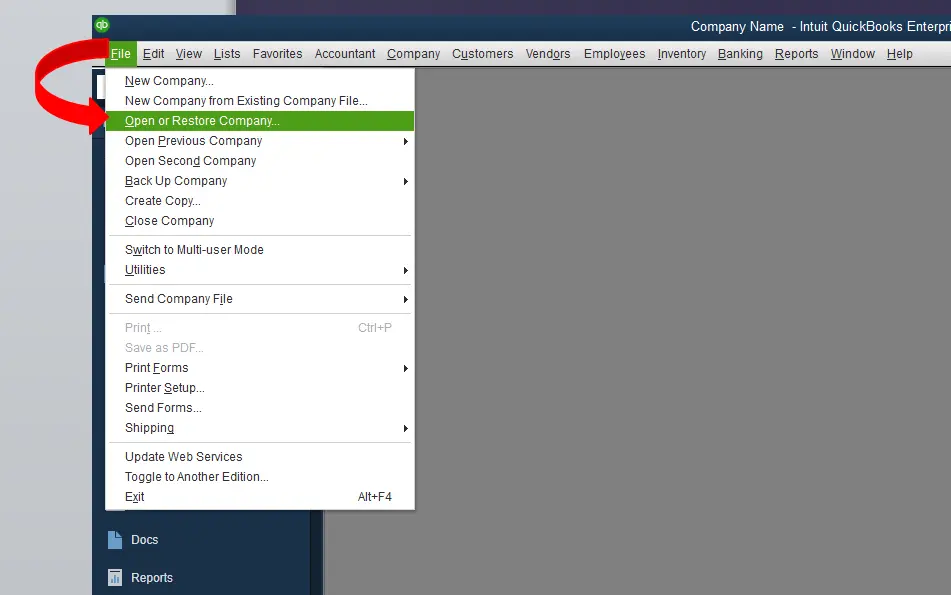
- Begin the process by launching the QuickBooks application and then moving to the File menu.
- Afterwards, switch to the Open or Restore Company.
- Now, head to the Open a Company File, then choose the Next option.
- You must pick the company file that you want to launch and hit the Open tab.
Solution 7: Grant Windows Access Permissions to Share the Data Files
If the users don’t have enough admin permissions to share the data files, then they might result in a QuickBooks open company file from network drive error.
- Begin the process by clicking the Start menu and inserting File Explorer into the search panel.
- Afterwards, launch the File Explorer and then search for the folder that carries your data file.
- Now, you must right-click on the icon of the data file folder and hit the Properties tab.
- Thereon, move to the Sharing menu from the Properties window and hit the Add tab.
- You must browse to the QBDataServiceUserXX service, which corresponds to the QuickBooks Desktop version you are presently working with.
- Next, allot the Full Control access permissions to all users and hit the Share tab.
- After this, hit OK and successfully access the data files through all workstations over the Network.
Solution 8: Give Automatic Access to the Server’s IP Address and DNS
Sometimes, the problems in searching the UNC path might give rise to incorrectly mapped drives. Therefore, to eliminate the issue, you must turn on automatic access to the server’s IP address and DNS.
- In the beginning, tap on the Start menu and navigate to the Settings tab.
- Afterwards, browse to the Control Panel icon. Then, move to the Network and Sharing Center via the Control Panel window.
- Proceeding further, pick the Change Adapter and access the Network Connection window.
- Presently, you must right-click Ethernet, and after that, hit Properties in the list.
- When you are on the Networking tab, you must tap on the Internet Protocol Version 4 option.
- Following this, head to the Properties and mark the Obtain the IP Address Automatically radio button.
- Once done, mark the Obtain DNS Server Address Automatically radio button and click OK.
- At last, all you require is to manually input the settings when connecting to the server. Then, start running QuickBooks and verify if you can locate the mapped drives.
Solution 9: Perform the Reinstallation of the QuickBooks Desktop
Even after implementing the above solutions, you couldn’t fix the error, so try reinstalling QuickBooks Desktop. Doing so will remove the technical bugs from the QuickBooks application, and you can continue accessing the data file with ease.
Conclusion
QuickBooks is now showing that mapped drives are a complicated issue, which can now be resolved by implementing the above solutions. Thus, it will let you access your company file so that you can work seamlessly. Furthermore, if you still have any further doubts, then you can connect with our QB professionals for help.
Frequently Asked Questions (FAQs)
1. How to map a drive in QuickBooks Desktop?
Ans. To map a drive in QuickBooks Desktop, you must use the given steps.
- Firstly, launch the Start menu and move to This PC on your computer,
- After this, head to the More(…) icon and hit the Map Network Drive tab.
- Now, pick a drive letter in Drive and then tap on Reconnect at sign-in to keep the drive mapped every time you log in to your computer.
- At last, hit the Finish tab to complete the process.
2. Why is my mapped drive not showing up?
Ans. The mapped drive not showing up issue may arise while accessing the User Account Control. Whenever you try signing in to Windows as an administrator, you will be given two different options. One is an admin having the proper rights, and another is without any admin privileges.
3. Why is my QuickBooks not connecting to the server?
Ans. QuickBooks might face difficulty while connecting to the server because of the interference of Windows firewall or antivirus software. Therefore, to rectify the issue, you must verify whether the firewall or antivirus software is creating any problems. Also, it is essential to include the Firewall as an exception in QuickBooks.
4. How can you find the QuickBooks company file location?
Ans. You can find the QuickBooks company file location with the help of the following paths.
- The location for the QuickBooks data file is C:\Users\Public\Public Documents\Intuit\QuickBooks\Company Files.
- After this, you wish to check the file name, date, or size to determine which one is appropriate.
- However, if you are hosting the file via a Hosting Service, you can immediately reach out to an expert.
5. How can you change the mapping in QuickBooks?
Ans. To modify the mapping in QuickBooks, you must perform the following steps.
- Initially, you must browse to the Settings > Integration > Accounting.
- After this, pick the Expenses option to move further.
- Now, hit the three vertical dots against the QuickBooks organisation you want to edit, and choose the Edit Mappings option.
About The Author

Jonathan Browns
Jonathan Brown is a trained QuickBooks professional with 10 years of experience in the accounting sector. Moreover, he is passionate about helping businesses reduce the stress of managing accounts. Also, he is proficient in assisting entrepreneurs and small business owners to use QuickBooks and enhance their accounting experience.

QuickBooks Desktop, Payroll or Enterprise
Advanced Support for QuickBooks Desktop, Payroll & Enterprise Solutions
From payroll tax setup, direct deposit issues to Enterprise performance tuning and Desktop upgrades - our QuickBooks experts provide accurate and stepwise assistance. Get dependable support designed to minimize downtime and maximize efficiency.
Recent Posts
-
Converting from QuickBooks Desktop to QuickBooks Online: A Complete Guide
-
Tried Everything? Here’s How to Fix QuickBooks Error Code 80070057
-
This QuickBooks Company File Needs to Be Updated: A to Z Guide
-
Renew QuickBooks Subscription: Desktop & Online Renewal Guide
-
QuickBooks Online Login: Sign in to Access Your QB account