Easy Ways to Backup QuickBooks Company File

- By Jonathan Browns
- Jan 19, 2026
- Accounting
- 7 min read
Are you concerned about the safety of the sensitive company data? Well, in that case, you must conduct a backup QuickBooks company to keep a copy of your financial records. Generating the backup of the file will safeguard your crucial company data even if the original one gets damaged. So, let’s read this post and get the complete instructions to understand how to backup company file in QuickBooks Desktop & Online.
Discover How to Backup Your QuickBooks Desktop Company File
If you also want to keep yourself secure from any data damage or loss, then it’s essential to backup the QuickBooks company file. Once you create the backup of the file, you can restore your data if the original data gets lost or damaged. Thus, it will let you work uninterruptedly without any hindrance.
First Step: Creating a Backup of the Company File
By generating a backup of the company file, you can save everything in your data file. It might consist of accounting data, templates, images, letters, and related files, including (QuickBooks Statement Writer, Cash Flow Projector, Business Planner & Loan Manager). But it won’t allow us to create a backup of the payroll forms.
Furthermore, you have two different methods to backup your data. You can either conduct the backup of the company file manually or automatically.
Method 1: Schedule Automatic Backups
To schedule the automatic backup of your QuickBooks company file, perform these steps.
- Launch the QuickBooks application, move to the File menu, and from there click on Switch to Single-User Mode.
- Once again, choose the File menu, and head to the Backup Company > Create Local Backup.
- Head to the Local Backup option and then hit Next.
- From the Local Backup Only section, choose the Browse tab and pick the appropriate location to save the backup file.
- Now, choose how many backup files you want to generate. This step is optional, so you can also skip it.
- Hit the Complete Verification option, and it will start running a test to ensure that the backup file is in good shape before you save it.
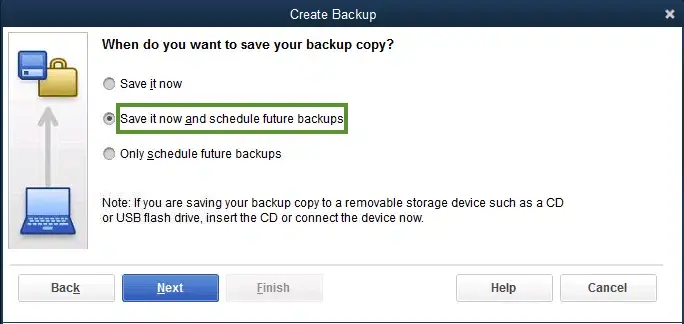
- Once done, hit the OK tab > Save it now and schedule future backups > Next. Otherwise, if you don’t wish to save the backup now, go with the Only schedule future backups tab.
- Thereon, click the Save backup copy automatically when I close my company file checkbox. Then, pick the number of times between the backups.
- Furthermore, to generate a schedule, click on the New tab. Then, complete all the details in the fields to generate the backup schedule. Herein, you can also set a specific time or day of the week.
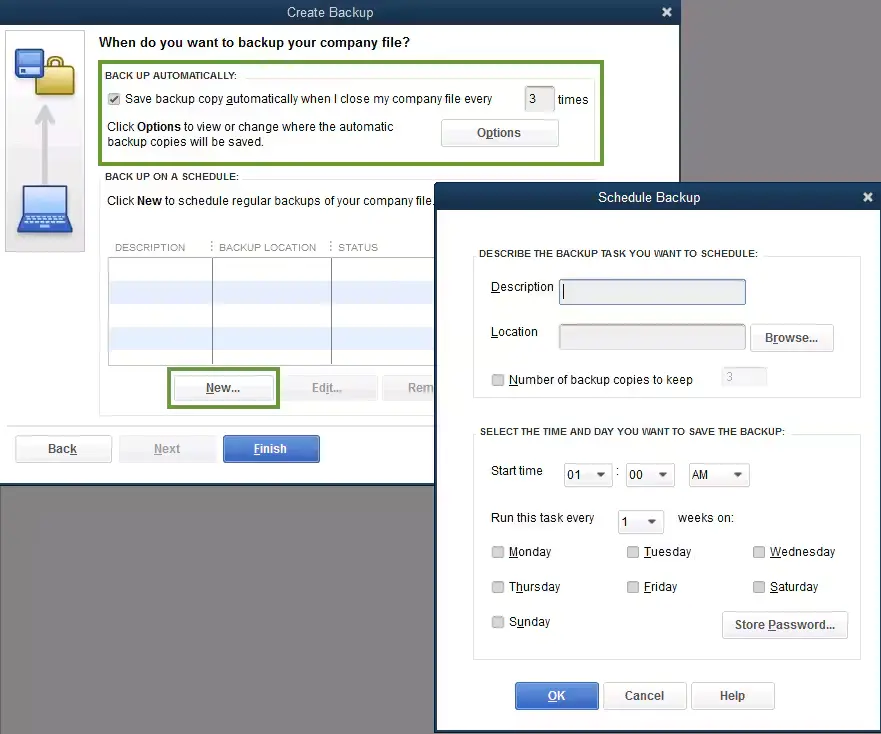
- Once you schedule the backup, hit the OK tab. Then, QuickBooks will prompt you to insert the Windows login password. It will assign QuickBooks the permission to run the scheduled backup.
- Now, if you are ready to create your backup, choose the Finish tab.
By this, QuickBooks will create a backup and schedule your future backups at the same time. After the backup is complete, you will receive a confirmation message on your screen.
Method 2: Backup Your Company File Manually
You also have the option to generate a backup of the QuickBooks company file manually. For that, you may resume with the instructions outlined below.
- Launch the QuickBooks application, click on File > Switch to Single-User Mode.
- Again, browse to the File menu > Backup Up Company > Create Local Backup option.
- From the new window, choose the Local Backup > Next option.
- Thereon, hit the Browse tab and pick the location where you save your backup company file.
- Now, you need to set the number of backup of the data file you wish to keep. This step is optional; you may also skip this step.
- By this, it will instantly run a test to ensure your backup file is in good condition.
- Once you are all set, hit the OK tab > Save it Now > Next tab.
As a result, QuickBooks will create a single backup company file. Once you are all set, you will receive a confirmation message popping up on your screen.
Steps to Backup Your Payroll Forms
You can’t backup your payroll forms in QuickBooks manually. However, to save them, you can print copies and then save them to your hard drive. The QuickBooks Enhanced Payroll users can save it in a PDF format.
Herein, if you require your accountant to modify your payroll tax forms you’ve started, then send the folder holding all your saved payroll forms.
- Launch the Start menu, and then open the File Explorer window.
- After this, search your computer to get this folder: [your company name] Tax Forms. You will see that this folder contains all your payroll data.
- Now, you need to save the entire folder and then send it to your accountant. For that, you have to send your backup company file.
- Thereon, your accountant requires you to put the Tax Forms folder into the same folder as the data file after they restore it.
- Once they are done reviewing, you need to copy and then send the Tax Forms folder back to you. Perform the same steps on your system to access the updated forms.
Second Step: Make the Necessary Adjustments to Backup Settings
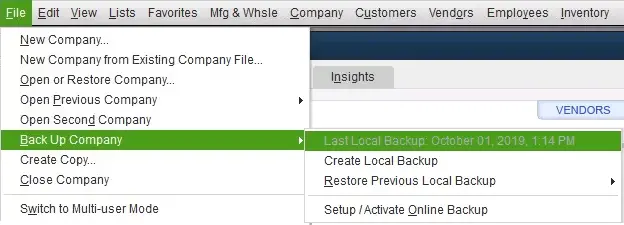
Want to know when the last time you created a backup of your data file was? For that, move to the File menu > Backup Company option. As a result, you will be able to review the date and time at the top of the menu.
If you wish to modify your backup preferences, then do as follows:
- Choose the File menu > Backup Company > Create Local backup option.
- Thereon, move to the Options tab.
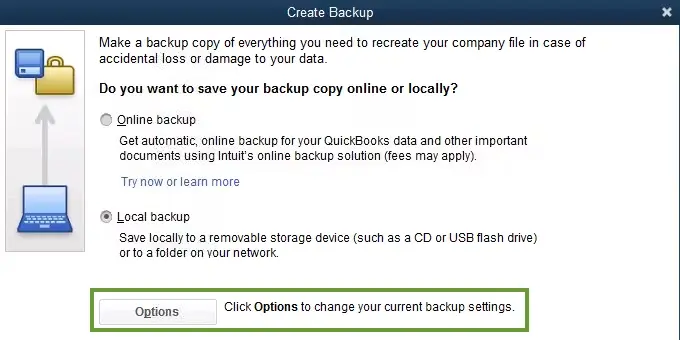
- After doing the necessary changes, hit the OK tab.
Next Steps: Restore the Backup Company File
By now, you have a backup company file that you can access to restore your data files. It will have a file name with the .qbb extension at the end of the file name.
Note: In case you store the backup of company files on external devices or a hosting service like Box, then transfer them to your local drive before restoring them.
Furthermore, perform the following steps to restore the backup company file.
- Open the QuickBooks application, move to the File menu > Open or Restore Company tab.
- Thereon, hit the Restore a backup copy > Next > Local Backup > Next option.
- Now, access your computer to store the backup company file, and it will look in this format: “[Your company name].qbb”
- Next, you must pick an appropriate folder to save your restored data file and hit the Open tab.
- To prevent overwriting, you can edit the name of the existing data file or the backup to make it unique. Otherwise, you can save the backup file to a separate folder.
- Once you are all set, hit the Save tab. If you notice any messages about overwriting your data, pick the option that is suitable for your requirements. Prevent overwriting unless you are sure you want to do it.
With this, you have a new data file on which you can work and accomplish your accounting tasks.
How to Backup & Restore Your QuickBooks Online Advanced Company ?
Herein, we have described the complete process to backup and restore the QuickBooks Online Advanced Company.
Verify Which Data You Can & Can’t Backup
You can’t backup all your company file data, but can backup a few of them. So, have a look at the data that you can or can’t backup.
Data That You Can Backup
1.1 Transaction data List data Other data
- Invoices
- Estimates
- Sales
- Receipts
- Payments
- Deposits
- Bills and bill payments
- Credit memos
- Vendor credits
- Journal entries
- Purchases and purchase orders
- Refund receipts
- Time activities
- Transfers
- Accounts
- Budgets
- Classes
- Currencies
- Customers
- Departments
- Employees (except their SSN)
- Items
- Payment methods
- Tax agencies
- Tax codes and tax rates
- Terms
- Vendors (except the Tax fields)
- Attachments
- Company Info
- Entitlements
- Exchange rates
- Preferences
- Intuit Payroll info backs up as journal entries
- Inventory shrinkage and adjustments back up as journal entries
1.2 Data that you Can’t Backup
- QuickBooks Payments for Online info
- Customer types and price rules
- Delayed credits and charges (although associated invoices are backed up)
- Recurring transactions
- Bank feeds and their links to transactions and bank rules
- Reconciliation reports
- Account-based billable expenses
- Item-based billable expenses with markup
- Custom reports
- Custom form templates
- Audit log entries
- Reconciliation reports do not move/back up
- Reconciled transactions do not remain reconciled
Verify Which Data You Can’t Restore
At the time of restoring your data, you can restore everything except the following information.
- Budgets- You have to save them in the form of a CSV file.
- Inventory- It doesn’t consist of the inventory history and inventory adjustments.
- Tax rates using expense accounts- The Online Backup & Restore app restores them to your liability accounts.
- Data backed up using the personal cloud archive feature- You can restore this data in the form of .cab format on the cloud account, say Google Drive. Currently, you won’t have the option to restore the data through a cloud archive.
How to Enable the Backup On QuickBooks Online Advanced Company?
When you enable the Online Backup and Restore app, your company file data will eventually be backed up. Once done, it will monitor the changes made to the company data. Later on, you can restore a backup at any point in time.
- Browse to the Settings menu and click the Account and Settings tab.
- Choose the Advanced tab and hit the Backup option.
- Thereon, browse to the Edit icon and enable the “Turn on Backups” option.
- When all the changes are done, tap on the Save option.
How to Disable the Backup in QuickBooks Online Advanced Company?
To turn off the backup in QuickBooks Online Advanced Company, perform the following steps.
- Initially, browse to the Settings menu and click the Account and Settings tab.
- After this, hit the Advanced > Backup > Edit menu.
- Thereon, disable the Turn on Backups option.
- When all the steps are done, choose the Save menu.
- Note: You have the option to turn backup on/off while browsing to the Settings menu and clicking the Backup company, followed by the Change Backup setting option.
How to Create a Backup of the Company File in QuickBooks Online?
You have two different options to create a backup of the company file in QuickBooks Online. Either you can create the backup manually or on the Google Drive using the instructions given below.
Know About the Limitations of Data Retention
You must consider the following points in your mind while accessing the Online Backup and Restore app.
- It saves all the backup screenshots taken throughout the last year.
- You won’t be able to retrieve the backups that are older than one year by the company.
- The users have the option to restore the company data within one previous calendar year.
Method 1: Create a One-Time Backup Manually
If you get stuck in the middle of any urgent task and you wish to save everything, then conduct a manual backup. For that, you must implement the instructions given below closely.
- Initially, choose the Settings icon and click the Backup Company option.
- After this, head to the Run Manual Backup option.
- Thereon, browse to the Full radio button and then hit the Back Up option.
Method 2: Save the Backups to Google Drive
You have the option to save your backups to Google Drive and then export them. Then, you have to connect your account to it. For that, you must carry on with the given instructions.
1. Link Your Google Drive Account
- Access the Settings menu and click the Account and Settings option.
- After this, head to the Advanced, choose the Personal Cloud backup, and then the Link Google Drive option.
- Now, insert the email address to save the backup file. Then, mark the box to give consent to create files in your drive.
2. Export Your Backup
- For exporting the backup, choose the Settings menu and click the Back Up Company option.
- After this, go to the Personal Cloud Archive > Export Backup > Google Drive radio button.
- Thereon, hit the Export Backup option.
Important Tip: It may take up to 10 minutes or more to receive the file in Google Drive. Furthermore, to complete this process, you won’t be able to use the Online Backup and Restore to get back data saved within your Personal Cloud Archive.
How to Restore the Backup of the Company File in QuickBooks Online Advanced company?
The users have two different options to restore the backup of the company file. You can either use the Restore tab or the Backups tab.
1.1 Restore your data using the Restore tab
You can use the Restore tab to restore the data from a specific date and time.
Note: Make sure not to use your company data during the Online Backup and Restore app, as it restores it. Once you are all set, its status will represent a check mark. That’s the time when you return and use this feature again.
- Initially, browse to the Settings menu and click the Backup Company option.
- Choose the Restore option > Create Restore and then pick the date you wish to restore.
- Now, hit the time drop-down menu and provide the time you wish to restore.
- Later on, click on the Next tab and then thoroughly review the instructions given on the screen.
- You must tick the checkbox of “I understand that restoring overwrites all data in my company back to the specified date.”
- When all the changes are done, hit the Start Restore option.
Important Tip: It might take around one hour to restore a backup of the data file, but usually it takes less time. The less data the company has, the faster the time it will take to restore the file.
Read More:- QuickBooks Backup Fails? Fix Intuit Data Protect Has Stopped Working
1.2 Restore your data using the Backups tab
You can use the Backups tab to restore a specific backup without manually modifying the date and time. For that, you must perform the step-by-step instructions written below.
- Primarily, move to the Settings menu > Backup company > Backups option.
- Now, choose the backup you wish to restore from the backup list by clicking the drop-down menu beside the View column.
- Thereon, hit the Restore tab, click Next, and go through the instructions given on the screen.
- After this, tick the checkbox of “I understand that restoring overwrites all data in my company back to the specified date.”
- When you are all set, hit the Start Restore option.
Conclusion
So, here we come to the end of this post, and we ensure that this guide has provided you with enough information to back up the QuickBooks company file. Thus, it would help you in keeping your sensitive data safe and secure from any loss or damage. Furthermore, if you still require any additional help, then communicate with our BizBooksAdvice professionals.
Frequently Asked Questions (FAQ’s):-
Question 1: What is a QuickBooks backup file?
Ans. The QuickBooks Backup file is the one that stores everything you have currently in your data file. It might consist of accounting data, templates, logos, letters, images, and related files.
Question 2: What is the extension of a QuickBooks backup company file?
Ans. The extension of a QuickBooks file is QBW, and QBB for the backup company file.
Question 3: Do you need to take a backup of the QBO files?
Ans. QuickBooks Online manages the data backups automatically as the data is stored on the cloud server. So, there’s no need to take a backup of the data file manually.
Question 4: How to restore a company file in QuickBooks Desktop?
Ans. To restore the company file in QuickBooks Desktop, do as follows:
- Initially, launch the QuickBooks application and open the File menu.
- After this, choose the Open or Restore Company option.
- Thereon, restore the file based on its type .qbw. Then, opt for ” Open a company file, and hit the Next option.
- Now, launch the accurate folder and pick the company file. Later on, hit the Open tab and provide the correct password.
Question 5: How to reduce the QuickBooks company file size?
Ans. To reduce the company file size in QuickBooks, go to the File menu, click Utilities, and then Condense Data. Thereon, choose the appropriate option to condense your data file and hit the Next tab. Then, pick which transactions you wish to delete, and then the Next option.
About The Author

Jonathan Browns
Jonathan Brown is a trained QuickBooks professional with 10 years of experience in the accounting sector. Moreover, he is passionate about helping businesses reduce the stress of managing accounts. Also, he is proficient in assisting entrepreneurs and small business owners to use QuickBooks and enhance their accounting experience.

QuickBooks Desktop, Payroll or Enterprise
Advanced Support for QuickBooks Desktop, Payroll & Enterprise Solutions
From payroll tax setup, direct deposit issues to Enterprise performance tuning and Desktop upgrades - our QuickBooks experts provide accurate and stepwise assistance. Get dependable support designed to minimize downtime and maximize efficiency.
Recent Posts
-
How to Troubleshoot QuickBooks Error PS038 During an Update?
-
Troubleshooting QuickBooks TLS Security Portal Errors Instantly
-
Fixing QuickBooks Script Error (Easy Troubleshooting Guide)
-
How to Create QuickBooks Portable Company File Easily?
-
QuickBooks Payroll Not Withholding Taxes? Here’s What to Do