Learning How to Import Credit Card Transactions Into QuickBooks?

- By Jonathan Browns
- Nov 04, 2025
- Accounting
- 7 min read
QuickBooks handles an array of activities that let users of QuickBooks manage their financial accounts in an efficient way. It lets the users import and export the credit card transactions, whether a single transaction, in bulk, or in batches. In this blog, we will thoroughly see the steps to Import Credit Card Transactions Into QuickBooks. Read this blog till the end to get proper insights on this topic.
How to Import Credit Card Transactions into QuickBooks Online?
In this part of the blog, we will see the steps to import credit card transactions into QuickBooks Online. Let us look at the steps.
1: Locate Your Credit Card Company In QuickBooks Online
- In the first step, in the QuickBooks Online dashboard, tap on the Banking drop-down menu beneath the left menu bar.
- If you are linking your credit card account to QuickBooks for the first time, start by tapping on the Connect Account button. Now, your credit card account is linked to QuickBooks Online.
- If your credit card account has already been linked, you will be redirected to the Banking Center. Now, click on the Link Account button in the upper-right corner of the screen.
- Now, insert your credit card company’s name to verify whether it can link with QBO.
- After you have chosen your bank name, click on the Continue button, and you will be taken to the Sign up page.
2: Sign in To Your Credit Card Account
- Now, a new window of QuickBooks will open to complete the login process of your credit card account.
- After you are done with logging in, you will receive an email from your financial institution for your confirmation.
- Now, share your bank details with Intuit along with the description of the information that needs to be shared.
- Now, click on the Agree button to give your consent. Then, click on the Suitable option from the Bank Confirmation window. Now, you will be redirected to the QuickBooks application.
3: Connect Your Credit Card Account To the Charts of Accounts
- In QuickBooks, you will get the lists of accounts associated with bank or credit card accounts.
- After this, choose the bank account or account that you want to link with the Charts of Accounts.
- Now, choose all the bank accounts you want to link with QuickBooks Online.
- If you find that you have a checking account and a credit card from the same financial institution, you can link both.
- Next, click on the An Account option and move ahead.
- Now, you will be redirected to the new window with a drop-down button listed with all bank accounts connected with the Charts of Accounts.
- If your credit card account is already added to the Charts of Accounts, choose it.
Import Credit Card Transactions into QuickBooks Desktop from Excel
In this section, we will learn how to import Credit Card Transactions into QuickBooks Desktop from Excel. The steps to do so are fairly simple. Let us have a look at the steps.
- In the first and foremost step, sign in to your bank and download the transaction. QBO file.
- Now, open the QuickBooks Desktop application and navigate to the File menu.
- Select Utilities, then Import, and then click Web Connect Files.
- Now, click the. QBO file you have saved, then go and select Open.
- Now, choose your bank account.
- Click on Continue.
- A dialogue box telling you that the data has been successfully read into QuickBooks, and now, select OK.
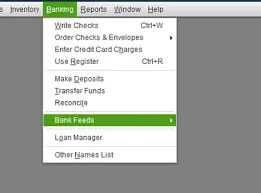
- Then, navigate to the Bank Feeds Center.
Import Credit Card Transactions into QuickBooks Online from Excel
QuickBooks can only read transactions through supported formats such as CSV, QFX, QBO, OFX, or TXT files. You can download these files from your bank.
Here are the steps to import transactions into QuickBooks Online from Excel.
- Go to the Transactions tab, then make sure to select Banking in the QuickBooks Online application.
- Click the drop-down button for the Link account section and select the option Upload from file.
- Now, select Browse and choose the. CSV file.
- Now, click on Next.
- Now, go to the QuickBooks Account where you want to upload it, and click on Next.
- Select a Date and a date format.
- Choose column 2 for description.
- Amount statement fields must be selected based on how the amounts are shown on the file.
- 1 column: both positive and negative numbers
- 2 column: separate positive and negative numbers
- Now, go and click on Next.
- Put a check mark on those transactions you want to upload and again click Next.
- Now, you have to click on Yes to import.
Final Words
We have come to the end of this blog. This blog has thoroughly covered how to import credit card transactions into QuickBooks. In case you have not understood how to Import Credit Card Transactions Into QuickBooks or you have queries about anything in general about the QuickBooks application, consider calling our BizBooks Advice experts at our toll-free number. We would be beyond pleased to help you.
Frequently Asked Questions (FAQ’s)
Q 1: What methods can I use to import credit card transactions into QuickBooks?
A: Use Bank Feeds/Direct Connect (QBO/Bank Feeds for Online), or import via CSV/IIF (Desktop) after formatting to QuickBooks-acceptable fields.
Q 2: Can I connect my credit card directly to QuickBooks Online to import transactions?
A: Yes. Connect the credit card account via Bank Feeds in QuickBooks Online to automatically download and categorize transactions.
Q 3: How do I import credit card transactions into QuickBooks Desktop from a bank file?
A: Export the CC transactions as CSV from your card issuer, map fields to QuickBooks (date, description, amount, expense/payable accounts), then convert to IIF or use the IIF Import Tool if available.
Q 4: What file formats does QuickBooks accept for credit card imports?
A: QuickBooks Online accepts bank feeds and QBO files; QuickBooks Desktop accepts IIF or properly formatted CSV that can be converted to IIF.
Q 5: Can I import credit card payments against the card account in QuickBooks?
A: Yes. Import or create the payment transactions that reduce the credit card liability, and apply them to the card account or corresponding liability/expense accounts.
Q 6 : Can I automate the import of credit card transactions?
A: In QuickBooks Online, enable automatic bank feed connections. In Desktop, you can automate via IIFScript-based imports or third-party tools that support scheduled imports.
Related Posts-
Create & File 1099s in QuickBooks For Stress-Free Tax Season
Export Chart of Accounts QuickBooks – How to Do it Effortlessly?
QuickBooks Online Payroll Subscription: A Detailed Guide
How to Fix QuickBooks Bank Error 105 Using DIY Solutions?
About The Author

Jonathan Browns
Jonathan Brown is a trained QuickBooks professional with 10 years of experience in the accounting sector. Moreover, he is passionate about helping businesses reduce the stress of managing accounts. Also, he is proficient in assisting entrepreneurs and small business owners to use QuickBooks and enhance their accounting experience.

QuickBooks Desktop, Payroll or Enterprise
Advanced Support for QuickBooks Desktop, Payroll & Enterprise Solutions
From payroll tax setup, direct deposit issues to Enterprise performance tuning and Desktop upgrades - our QuickBooks experts provide accurate and stepwise assistance. Get dependable support designed to minimize downtime and maximize efficiency.
Recent Posts
-
QuickBooks Payroll Not Withholding Taxes? Here’s What to Do
-
QuickBooks View My Paycheck: Access Pay Stubs & Payroll Info
-
QuickBooks Error 15103: Understanding Causes & How to Fix It
-
QuickBooks Not Connecting to Server: A Troubleshooting Guide
-
QuickBooks Online Advanced Login, Pricing & Feature Comparison Guide