


How to Set Up Classes in QuickBooks Online and Desktop: DIY Guide

- By Jonathan Browns
- Nov 04, 2026
- Accounting
- 7 min read
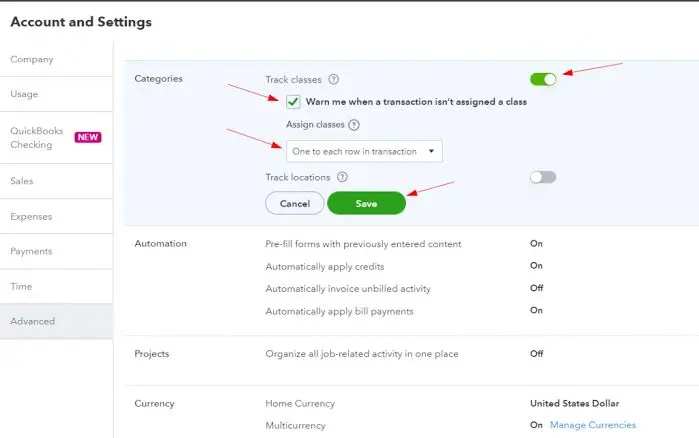
You can set up classes in QuickBooks Online by turning on class tracking via Settings ⚙ > Account and settings > Advanced > Categories. You then go to Settings ⚙ > All lists > Classes to create your class list. Class tracking is only available in QuickBooks Online Plus and QuickBooks Online Advanced. It’s not available in Simple Start or Essentials, so if you’re on one of those plans, you’ll need to upgrade.
Need QuickBooks Assistance? Talk to an Expert Today!
Need help figuring out a QuickBooks issue? Connect with our team to discuss your problem and find the next steps toward resolving it.
That’s the high-level summary. The rest of the guide then goes into the details of each step, shows you precisely how to structure your class so that it actually is going to be of use to you, and how you can use classes in your day-to-day bookkeeping and reporting. It doesn’t matter what type of business you’re in, really, whether you’re a small retail shop, a consultancy, or a business that’s growing and has a number of departments; there is a practical way through this that you can work at your own pace.
Quick Overview – How to Set Up Classes in QBO
The table gives a quick summary of how to set up classes in QuickBooks Online.
| Task | Where to find it | What you need to know |
| Check your plan | Settings ⚙ > Subscriptions and billing | Classes are available in Plus and Advanced only |
| Turn on class tracking | Settings ⚙ > Account and settings > Advanced > Categories | Switch on Track classes and choose how classes are assigned |
| Create a class | Settings ⚙ > All lists > Classes > New | Give each class a clear, short name |
| Create a sub-class | Same New class window | Select Is sub-class and choose a parent class |
| Assign a class to a transaction | Any invoice, bill, expense, or other transaction | Use the Class field in the header or on each line |
| Review class performance | Reports > Profit and Loss by Class | Compare income and expenses for each class |
| Edit or deactivate a class | Settings ⚙ > All lists > Classes | Make a class inactive instead of deleting it to keep your history |
What is Class Tracking in QuickBooks Online?
Class tracking is a feature that enables you to assign a label to your transactions to represent a particular part of your business. Intuit refers to classes as a way of representing meaningful segments of your business (e.g., store departments, product lines, revenue streams). Once you’ve applied a class to a transaction, QuickBooks can then produce reports that show the income and expenses for that class separately.
Think of your chart of accounts as telling you what kind of money has moved (i.e., rent, supplies, sales, etc.). A class tells you what part of the business that money relates to. Together they give you a far clearer picture of where you’re earning and where you’re spending.
Here are a few examples of how different businesses use classes:
- A restaurant might run classes for Dine-In, Takeout, and Catering to see which of those three is the most profitable.
- A marketing agency might run classes in Web Design, Social Media, and Consulting as a means of comparing the various service lines.
- A property manager could have one class per building to see the income and expenditure on a per-property basis.
- A not-for-profit could run classes in Programs, Fundraising, and Administration to support the reporting to donors and the board.
Note that none of those examples are in any way about one customer or one job. Classes are really best suited to broader categories that you’re going to use across a number of transactions. If you’re looking at the profitability of one customer’s job, then QuickBooks has other tools that may be more appropriate, and the section below on classes v other tracking tools will help you to make that decision.
Which QuickBooks Online Versions Have Class Tracking?
Before you go any further, just remember that your subscription has to include Class Tracking. As per the Intuit Help Center, Class Tracking is only available to QuickBooks Online Plus and QuickBooks Online Advanced admin users. It’s not available in Simple Start or Essentials.
| QuickBooks Online plan | Class tracking available? |
| Simple Start | No |
| Essentials | No |
| Plus | Yes |
| Advanced | Yes |
If you’re not sure what plan you’re on, then you can check that in a few seconds. Head to Settings (the exact wording may vary slightly depending on your account) and select Subscriptions and billing. Your plan name will be at the top of the page. If it’s Simple Start or Essentials and you’d like to use classes, then just select the option to change or upgrade your plan and come back to this guide.
If you’re using QuickBooks Online Payroll, you can also assign classes to your payroll transactions (again, class tracking will have to be enabled in your accounting settings first), which we’ll look at in a later section.
Before You Begin: Plan Your Class Structure
It’s so tempting to just jump in and start creating your classes, but a few minutes of planning will save you hours of subsequent cleanup. Intuit actually recommends that you keep your class list as simple as possible so that your reports stay easy to read, and that’s absolutely good advice.
Ask yourself these questions:
- What are the decisions that your reports need to be supporting? Are you trying to work out which product line is the most profitable? Are you trying to work out which department is blowing the budget?
- Which bits of the business are the most important? What would you actually be talking about in a management meeting? Pick the three to ten.
- Will every transaction end up in one of those classes? If the majority of your activity isn’t actually in any of the classes, then you may need to go back and rethink your structure.
- Do we need sub-classes? Sub-classes are useful if you want a summary at the top level and then the detail underneath, but they can very quickly turn a list into a nightmare.
It’s also worth speaking to your accountant before you finalize your list. They can advise you as to whether classes are actually the right way to report and can help you to avoid having overlapping or duplicate classes. If you don’t have an accountant, then Intuit can help you to find a QuickBooks ProAdvisor.
A simple rule of thumb really: if you can’t explain the difference between two classes to a new lad in one sentence, they should be in the same class.
Step 1: Turn On Class Tracking in QuickBooks Online
Class tracking is off by default, so your first job is to turn that on. You’ll need to be signed in as an admin to do so.
- Sign in to your QuickBooks Online account.
- Select Settings ⚙, then select Account and Settings.
- Select Advanced from the menu on the left-hand side.
- In the Categories section, click on Edit (the pencil icon).
- Turn on Track Classes.
- From the Assigned classes dropdown, choose how you want to assign classes. You have two options:
- One to each row in the transaction: this enables you to assign a different class to each line of the transaction. Use this where a single invoice/bill covers more than one element of your business.
- One to entire transaction: assign a single class to the whole transaction. That’s the simplest option and is quite adequate if every transaction is going to be in just one segment.
- If you want a soft nudge, then select ‘Warn me when a transaction isn’t assigned a class’. QB will then give you a warning every time you save a transaction that doesn’t have a class assigned to it. A very good way of ensuring your data is consistent.
- Just select Save, then select Done.
Once you’ve saved, QuickBooks will add a Class field to your transaction forms. If you’ve got the row-level option selected, you’ll see a Class column on each line. If you’ve got the whole transaction option selected, you’ll see a single Class drop-down in the header.
A handy tip if you’re not quite sure which assignment method to go for is ‘One to each row in the transaction’. That gives you the maximum flexibility, and you can still use a single class for each line if that’s all you need.
Step 2: Create a Class in QuickBooks Online
With class tracking turned on, you can now build your class list. Here is how to create a class:
- Select Settings ⚙, then All Lists.
- Select Classes.
- Select New in the top right-hand corner.
- In the Name field, enter a clear, descriptive name for your class (e.g., Retail Store, Consulting Services).
- Make sure the class is marked as active. In the current version of QB, there’s an option to mark the class as active, so do that.
- Select Save.
Repeat that for each class that you wish to add. If you’re adding a number of classes one after another, then use the ‘Save’ option and create another one so that you don’t have to re-open the window each time.
Here are some naming tips that will keep your list tidy:
- Use plain language: Names like East Region or Wholesale are far easier for your team to get right than the internal codes.
- Be consistent: Decide whether you’re going to use singular or plural names and stick to that.
- Don’t do duplicates: two of the classes (Online and Web Sales) will split your data, and your reports will be very difficult to trust.
- Keep the names short: Shorter names look better on the reports and the transaction forms.
Step 3: Create a Sub-Class
Sometimes a single level of classes isn’t quite enough. Sub-classes allow you to break your classes down into a hierarchy so that you can see the total at the higher level and the details at the lower level.
For example, imagine a company with a Services class. Under that, you’d have Installation and Maintenance as sub-classes. Your reports could then show the total for Services and the individual totals for each of the sub-classes.
To create a sub-class:
- Select Settings ⚙, then All Lists.
- Select Classes, then select New.
- Enter a name for the sub-class.
- Select Sub-class.
- From the dropdown, select the parent class that this sub-class is a sub-class of.
- Select Save.
Don’t go too deep, really. One level of sub-classes is quite sufficient for most small businesses, and a very layered structure can in fact slow down the entry of transactions and make them prone to error.
Step 4: Add a Class to Your Transactions
Creating the classes is only half the job, really. The real value comes in when you start labeling your transactions. Here’s how you go about adding a class to the most common transaction types.
Sales transactions
When you’re creating an invoice, sales receipt, estimate, or credit memo, look in the Class field. That will either be at the top of the form or in the line items as a column depending on what setting you’d selected earlier. Select the class from the drop-down, complete the rest of the transaction, and then select Save.
Expense transactions
The process is the same for bills, expenses, checks, purchase orders, and vendor credits. In the category details section, you can select a class for each line, or you can select one class for the whole transaction if that was the option you’d selected.
Bank and credit card transactions
When you go to review the downloaded transactions under Transactions > Bank transactions, you can open up a transaction to see its details and assign it a class prior to adding it to your books. It’s a good point at which to tag each transaction as you’re looking at the details anyway.
If you’re doing the same type of transaction over and over again, then consider setting up a bank rule to automatically apply the class. For example, you could set up a rule to automatically apply your Retail Store class to every deposit from your card processor. A massive time saver and means you won’t miss any of the categorizations.
Existing transactions
If you turn on class tracking after you’ve already got transactions in the system, then you can go in and assign a class to each of the existing transactions. For a very small number of entries, that’s absolutely trivial. If you’ve got a large number of older transactions that you want to go back and assign a class to, then you should talk to your accountant about the best way to do it, as bulk changes can have an effect on the prior reports.
Step 5: Assign Classes to Payroll
If you’re using QuickBooks Online Payroll, you can assign classes to your payroll expenses so that the labor costs end up in the correct business segment. That’s very useful if your staff is working across a number of departments.
- Ensure that class tracking is turned on in both Account and Settings (as per Step 1).
- Select Settings ⚙, then Payroll Settings.
- In the Accounting section, click Edit (the pen icon).
- In the Class Tracking section, click Edit (the pencil icon).
- Choose how you want to track classes:
- Select I use the same class for all employees if they all fall into one segment.
- Select – I use different classes for different employees and then use the dropdown to assign a class to each employee. Select Save, then select Done. Select Done again to close the Payroll Settings window.
If you don’t see the Class Tracking section, then Intuit recommends that you turn Class Tracking off in Account and Settings, sign out of QuickBooks Online, sign back in, and then turn Class Tracking on again. Once that’s done, go through the payroll steps above again.
Step 6: Track Classes with Reports
Now you can see the payoff. Once your transactions have class labels, QuickBooks can show you how your business is performing in each of its parts. To run a class-based report:
- Select Reports from the left-hand menu.
- Search for Profit and Loss by Class and then select it.
- Select the reporting period that you’d like to look at (e.g., last month, this quarter, etc.).
- Select Run report.
The report has each class in its own column so you can compare income, expenses, and net income side by side. You can also select Customize to change how the report is grouped, filter by a particular class, or alter the accounting method.
Here is what to look for when you read your report:
- Classes with high income and low profit. Those may have costs that need looking at.
- A massive “Not specified” column. Those are transactions that have no class. The larger that number is, the more incomplete your tagging is and the less reliable your report is until you get that sorted.
- Unexpected expense patterns. If one class is blowing the others out in terms of spending, it’s definitely worth a closer look.
To go one stage further, QuickBooks allows you to set budget targets for each class so you can compare actuals against your budget.
How to Edit, Deactivate, or Merge Classes in QuickBooks Online
Your business will change over time, and your class list may well need to change with it.
Edit a class
- Go to Settings ⚙ > All lists > Classes.
- Find the class you’d like to change.
- In the Action column, select Edit.
- Update the name or the parent class and then select Save.
Renaming a class will update it in all its appearances, including on past transactions.
Make a class inactive
If you no longer use a class, then make it inactive rather than deleting it. In the Action column dropdown, select ‘Make inactive,’ and it will no longer appear in your dropdown lists when creating new transactions. Your historical reports will of course still be correct. You can show inactive classes by clicking on the settings icon above the list and selecting ‘Include inactive items,’ and you can always reactivate a class should you wish to.
Merge two classes
If by some chance you’ve created two classes for the same purpose, you can merge them. Just edit one of the classes so that its name is exactly the same as the other and then confirm the merge when QuickBooks asks you. All the transactions will then be in a single class. Merging can’t be undone, so make sure the names are correct before you go ahead.
Best Practices for Using Classes in QuickBooks Online
A few simple habits if you’re using QuickBooks for your accounting will go a long way to getting you reliable results.
- Keep it short: Intuit recommends that you keep your class list as simple as possible so that your reports remain easy to read. Most small businesses will be perfectly fine with less than 10 classes.
- Be consistent with every transaction. A class report is only as good as the classes that are actually behind it. Turn on the warning that pops up when a class is missing and make it a habit to assign a class to every transaction.
- Write down your rules: create a short document that explains what each class is and when it should be used. This is particularly useful if more than one person is entering the transactions.
- Review your classes regularly (once a quarter ideally) to make sure they’re all still relevant. Are there any classes that nobody’s using at all? Are there any transactions piling up under “Not specified”? A bit of regular maintenance will go a long way to keeping your data accurate.
- Use classes for segments, not for everything. If you’re going to track everything with classes, then your list is going to explode. Pick the one or two dimensions that actually matter.
Ask your accountant. Your class structure will support tax reporting and your financial statements.
Common Problems with QuickBooks Classes and How to Fix Them
You don’t see the Categories section or the Track Classes option. That generally means your plan doesn’t have class tracking. Make sure you’ve got Plus or Advanced. If you’re on Simple Start or Essentials, you’ll need to upgrade.
- You can’t create a class; only admins can do that. Ask your account admin to either grant you the appropriate permissions or to create the class for you.
- The Class field is missing from a transaction. Go back to Account and Settings, open the Advanced tab, and ensure that Track classes are switched on. Refresh your browser and open a new transaction.
- Payroll doesn’t show the class options. Turn class tracking off, sign out, sign back in, and turn it on again as per the instructions in the payroll section above.
- Your report has a very large ‘Not specified’ column – some of the transactions don’t have a class. Open the report, click on the number in that column to see what the transactions are, and then add the classes.
Classes Versus Locations, Projects, and Products
Classes are flexible, but they’re not the only way of structuring your data. The right tool will avoid all the confusion.
| Tool | Best used for | Example |
| Classes | Segments of your business, such as departments or product lines | Retail, Wholesale, Online |
| Locations | Physical places or regions | Chicago Office, Austin Warehouse |
| Projects | Profitability of a specific customer job | Kitchen remodel for a single client |
| Products and services | Items you sell | Hourly consulting, a specific product |
In QuickBooks Online Plus and Advanced, you can use classes and locations together. For example, a business with three stores could use locations for each store and classes for each department. That gives you two views of the same data without either list becoming too long.
How to Set Up Classes in QuickBooks Desktop: Exact Steps
Some businesses and accountants will use QuickBooks Desktop rather than QuickBooks Online, so here’s a quick rundown. Class tracking is built into QuickBooks Desktop, and the process is a bit different.
Enable class tracking in QuickBooks Desktop
- Open your company file and sign in as the admin.
- Select Edit, then select Preferences.
- Select Accounting, then select the Company Preferences tab.
- Select Use class tracking for transactions.
- If you’d like a reminder, select Prompt to assign classes.
- Select OK.
Add classes in QuickBooks Desktop
- Select Lists, then select Class List.
- Select Class from the menu at the bottom of the window, then select New.
- Enter a name for the class. If it falls under another class, then select ‘Subclass of‘ and choose the parent.
- Select OK.
After that, a Class field appears on your forms, and you can run Class reports from the Reports menu. The approach is the same as in the online version really: plan your list, keep it simple, and tag every transaction.
Final Thoughts
Setting up classes in QB Online is pretty simple, and you get a real payoff very quickly. Make sure you’re on a Plus or Advanced plan, turn on class tracking in your account settings, create a sensible class list, tag your transactions consistently, and then just go through your reports on a regular basis. Over time, those little habits really do turn your books into a tool that will tell you where your business is doing well and where it’s not.
If you take one thing from this guide, take it to be this: start small. A small number of well-defined classes that the entire team understands will always be far better than a long list of classes that no one actually uses correctly. You can always add more as your business grows. If at any point you’re not sure what structure to adopt, a quick chat to your accountant or a QuickBooks ProAdvisor will go a long way to giving you the confidence to get it right.
Plan availability and menu names are subject to change as Intuit continues to update QuickBooks Online. If a screen looks any different from what is described here, check the in-product help.
Frequently Asked Questions
Which version of QuickBooks Online has class tracking?
Class tracking is part of QuickBooks Online Plus and QuickBooks Online Advanced. Those are the only two plans that allow you to turn the feature on, create a class list, and run reports by class. Simple Start and Essentials don’t have it. If you’re on one of those plans and would like to track classes, then you can upgrade from your subscription settings and then go through the setup steps in this guide.
Does QuickBooks Online Essentials have class tracking?
No, QuickBooks Online Essentials doesn’t have class tracking. Intuit’s documentation makes it clear that you can’t create classes in Simple Start or Essentials. If you go to Account and Settings in an Essentials account, you won’t see the ‘Track classes’ option in the Categories section. You’d have to upgrade to Plus or Advanced from the Subscriptions and billing page in your Account and Settings.
Does QuickBooks Simple Start have class tracking?
QuickBooks Simple Start doesn’t include class tracking. That’s purely a feature of the higher-level plans. If you’re growing and you want to be able to compare departments or product lines, then you’ll want to move up to QuickBooks Online Plus or Advanced. Once you’ve upgraded, you can turn on class tracking from the Advanced tab in your account settings.
How do I add classes in QuickBooks Desktop?
First, turn the feature on by going to Edit > Preferences > Accounting and selecting ‘Use class tracking for transactions’ on the Company Preferences tab. Then go to Lists > Class List. Select the Class menu at the bottom, select New, enter a name, and select OK. If the class is to be a subclass of another, then select ‘Subclass of’ and pick the parent before you save.
How do I enable classes in QuickBooks Desktop?
Open your company file as the admin, go to Edit and then Preferences. On the left-hand side, select Accounting and then open the Company Preferences tab. Tick the box labeled Use class tracking for transactions. You can also tick Prompt to assign classes if you want QuickBooks to prompt you when a class is missing. Click OK to save your changes, and your forms will now show the Class field.
Can I change how classes are assigned after I turn them on?
Yes, you can change your assignment method at any time. Return to Settings, select Account and settings, open the Advanced tab, and edit the Categories section. You can switch between assigning one class to each row or one class to the entire transaction. Keep in mind that this changes how new transactions look, so let your team know about the change before you make it.
About The Author

Jonathan Browns
Jonathan Brown is a trained QuickBooks professional with 10 years of experience in the accounting sector. Moreover, he is passionate about helping businesses reduce the stress of managing accounts. Also, he is proficient in assisting entrepreneurs and small business owners to use QuickBooks and enhance their accounting experience.
Recent Posts
-
Import Credit Card Transactions into QuickBooks Online & Desktop: Step-by-Step Guide
-
How to Set Up Classes in QuickBooks Online and Desktop: DIY Guide
-
QuickBooks Desktop Pro Plus 2024 and Pro: Features & Setup Guide
-
Do This If You Cannot Print Invoices in QuickBooks Desktop
-
QuickBooks Enterprise Contractor: Features, Pricing & More