Steps to Create and Send Purchase Orders in QuickBooks Online

- By Jonathan Browns
- Nov 14, 2025
- Business
- 7 min read
Now, the businesses can easily create and send purchase orders in QuickBooks Online. The Purchase Order is a legal document that contains all the necessary details about the specific items you want to buy, along with the quantity. Once the vendor accepts the purchase order and agrees on the given terms, you can include them in an expense or bill transaction in QuickBooks. As a result, it will help you in keeping the transactions connected and your books of accounts balanced.
How do Purchase Orders Work?

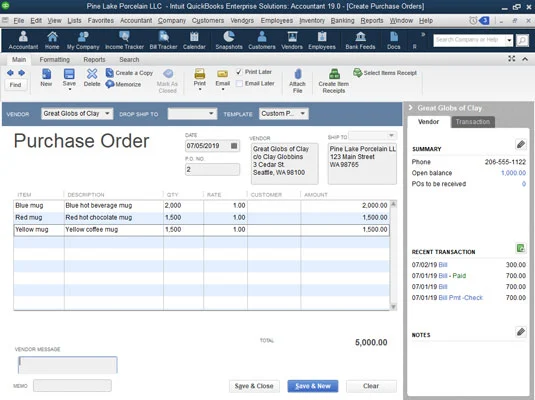
Purchase orders are basically a binding contract that is issued by one business or supplier to another for buying or selling goods or services. In short, this document is a commitment made by one party to the other to purchase the products described within the PO at a later date.
What’s Included Within the Purchase Order?
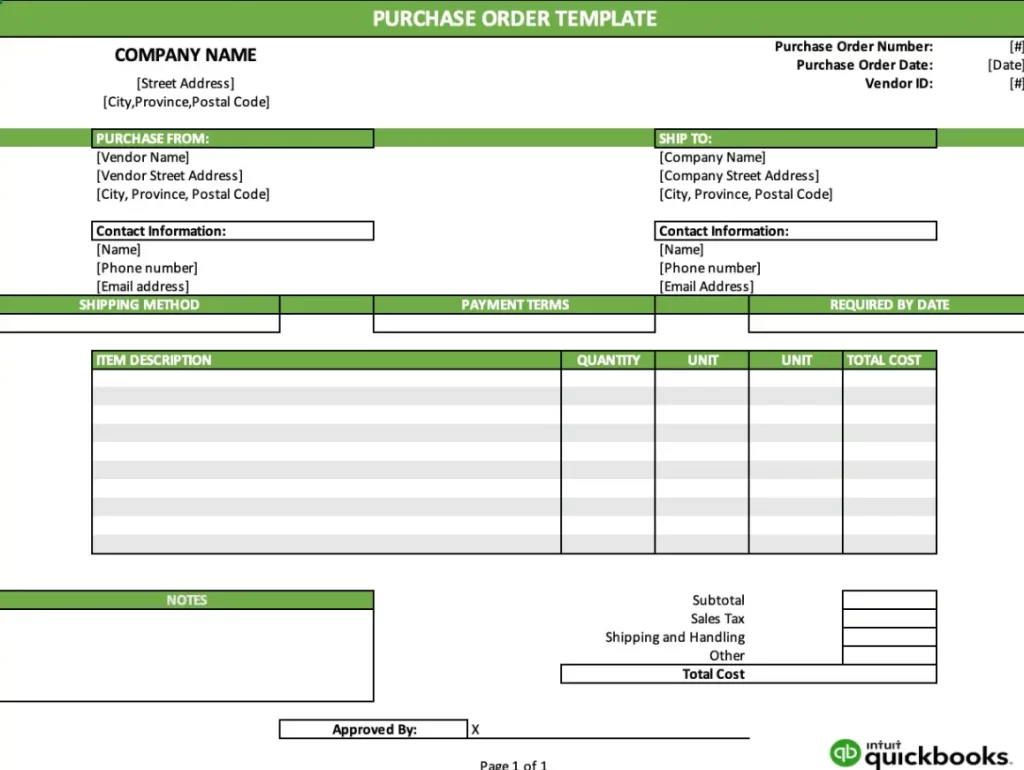
The purchase orders must contain concise and clear-cut information to give an in-depth knowledge to the supplier. The following are the things that are covered within the purchase orders, i.e;
- Purchase order number
- Product or service being purchased
- Supplier name, contact details & billing address
- Buyer’s name, contact details & and shipping address
- The quantity of the order, including the unit of measurement
- Price per unit
- Line total
- Sales taxes
- Total price
- The delivery date
- Shipping method
- Shipping terms and conditions
- Terms of payment
Simple Procedure to Create and Send Purchase Orders in QuickBooks Online
You might be thinking about how to use purchase orders in QuickBooks Online. So, for that, you must perform all the steps given below in a proper order.
Note: You can create and send the purchase orders in QuickBooks Online Plus and QuickBooks Online Advanced versions.
Stage 1: Ensure that the Purchase Order Feature is Enabled
You might be wondering how to turn on purchase orders in QuickBooks Online. So, perform the steps explained below to enable the purchase orders.
- Move to the Settings icon and then choose the Account settings option.
- Now, hit the Expenses tab.
- Under the Purchase Orders section, click the Edit icon.
- You must turn on the Use purchase orders option.
- Now, if you wish, you can add up to three custom fields and a default message for vendors. This is an optional step; you can also skip it.
- At last, tap on Save and then press Done.
Stage 2: Prepare & Send a Purchase Order
Once you enable the Purchase Order feature, you must prepare and send them to the vendor by performing the steps below.
- Initially, tap on the + New option and choose the Purchase order tab.
- Now, pick your vendor name by clicking on the Vendor drop-down menu list.
- Check the Mailing address mentioned. If any changes are required, do so at this point only.
- Choose the Ship drop-down menu for shipping the products directly to a customer, and then Ship via. Also, cross-check the shipping address provided to verify its accuracy.
- Once done, type the Purchase Order date.
- Head to the Settings menu again from the Purchase Order form. Then, opt for the link to add your own custom fields.
- Afterward, enter the products you wish to purchase under the Item details section.
- Note: You can only add products or services you marked as “I purchase this product/service from a vendor.”
- Now, select Save and close. Otherwise, you are all set to send it, tap on the Save and send drop-down.
You also have the option to send the purchase order later on. For that, locate your purchase order. Then hit the Send in from the Action column.
Read More:- QuickBooks Online Payroll Subscription
Stage 3: Refresh Your Purchase Order Status & Add Them To Your Bill
After generating the purchase order in QBO, you will notice the status as Open. Once your vendor accepts the purchase order, you may add them to an expense or bill for making the transaction official.
Herein, we have provided you with the complete steps for adding purchase orders to expenses or bills. With this, QuickBooks will eventually change the status to Closed.
Add a purchase order to an expense, bill, or check
Follow these steps after your vendor accepts the purchase order:
- Choose the + Create option and click Expense, Check, or Bill.
- After this, pick the vendor by clicking on the Payee drop-down. As a result, it will launch a window with their open purchase orders.
- Now, tap on Add for the correct purchase order. With this, it will add the items from the purchase order. Then, it will emerge within the Item details section.
- If you prefer to bill a customer for a specific item, opt for the Billable checkbox. Then mention the customer name you plan to bill in the Customer column.
- Finally, hit the Save and Close.
Learn More:- QuickBooks Online Login
Stage 4: Look Into Your Open Purchase Orders
To check the open purchase orders, you must run an Open Purchase Order List report. Then, run an Open Purchase Order Detail report, Purchases by Product/Service Detail report, or a Purchases by Vendor Detail report.
How to Run Purchase Order Reports in QuickBooks Online?
The following are the stepwise instructions you must implement to run purchase order reports in QBO.
- Visit the Reports page and then head to the Expenses and Suppliers section.
- After this, choose any of the following reports to run or customize them:
- Open Purchase Order List
- Open Purchase Order Detail
With this, now you can easily run purchase order reports.
Conclusion
With this post’s help, you can easily create and send purchase orders in QuickBooks Online. Furthermore, if you face any trouble, then connect with our BizBooksAdvice professionals for the best assistance.
Frequently Asked Questions (FAQ’s):-
Question 1: What is the difference between a purchase order and a bill in QuickBooks?
Ans. The purchase order is generated before receiving goods and services. Whereas a bill is received after the goods and services have been provided.
Question 2: Where are Purchase Orders in QuickBooks Online?
Ans. You can find existing purchase orders in QuickBooks Online using the Advanced feature. For that, perform these steps.
- Choose the Magnifying Glass icon from the top and click the Advanced Search option.
- Head to the Purchase Orders > Search and pick an appropriate date.
- Tap on the Apply option and then start looking for the existing purchase order.
Question 3: How to view Purchase Orders in QuickBooks Online?
Ans. To view purchase orders in QBO, browse to the Expenses tab. After this, choose the Vendors > Purchase Orders. Otherwise, you can also run reports via the Reports section. Thereon, you will obtain the purchase order list beneath the Expenses section.
Question 4: How to enter Purchase Orders in QuickBooks Online?
Ans. For entering Purchase Orders in QBO, hit the + New tab and choose the Purchase Order option. After this, pick a vendor name and complete the details for the purchase. Herein, you can provide ship-to addresses, dates, and messages, and then save them.
Question 5: How do I get a report of all purchase orders in QuickBooks?
Ans. You can get a report of all purchase orders in QuickBooks by performing these steps.
- Move to the Reports page and browse to the Expenses & Vendors section.
- After this, pick either the Open Purchase Order List or the Open Purchase Order Detail report.
About The Author

Jonathan Browns
Jonathan Brown is a trained QuickBooks professional with 10 years of experience in the accounting sector. Moreover, he is passionate about helping businesses reduce the stress of managing accounts. Also, he is proficient in assisting entrepreneurs and small business owners to use QuickBooks and enhance their accounting experience.

QuickBooks Desktop, Payroll or Enterprise
Advanced Support for QuickBooks Desktop, Payroll & Enterprise Solutions
From payroll tax setup, direct deposit issues to Enterprise performance tuning and Desktop upgrades - our QuickBooks experts provide accurate and stepwise assistance. Get dependable support designed to minimize downtime and maximize efficiency.
Recent Posts
-
Tried Everything? Here’s How to Fix QuickBooks Error Code 80070057
-
This QuickBooks Company File Needs to Be Updated: A to Z Guide
-
Renew QuickBooks Subscription: Desktop & Online Renewal Guide
-
QuickBooks Online Login: Sign in to Access Your QB account
-
Change EIN in QuickBooks: Complete Guide for Desktop, Online & Payroll