Learn How to Set Up & Use QuickBooks Inventory Tracking Software

- By Jonathan Browns
- Nov 12, 2025
- Accounting
- 7 min read
QuickBooks Inventory Tracking is the best software that takes care of your inventory and makes it much easier to locate the products or services. It also helps in tracking inventory on hand, receiving the stock alerts regarding the reorder levels, and obtaining information on what you buy or sell. Moreover, with this software, you can also mention the non-inventory products and services. In this post, we have explained the complete steps to set up the software and to track the inventory manually.
Features that you can access with QuickBooks Online Inventory Tracking
The following are the features that you can use by running the QuickBooks Online inventory tracking software.
1. Link Online Sales & Payments-
With the QuickBooks Inventory tracking software, you can link with Shopify. Ebay, PayPal, and other payment apps.
2. Track the stock value in real-time-
With the change in the value of your stock, the balance sheet also changes. Then, the value will be automatically adjusted throughout the day.
3. Stay on top of orders-
You must monitor what you have ordered from each supplier. Moreover, you will receive a notification when it’s time to reorder inventory with low stock alerts.
4. Check Your Quantities on Hand as stock-
Whenever the stock comes in and comes out, the QuickBooks inventory management software auto-updates your inventory. With this, you can easily see what’s selling and what you have to order.
Pricing Plan of the QuickBooks Online Inventory Tracking
Herein, we have described the pricing plan of the QuickBooks Online Inventory tracking software.
| Simple Start | Essentials | Plus | Advanced |
| US $ 9/month | US$ 14/month | US$20/month | US$38/month |
How to Set Up & Track Inventory in QuickBooks Online With Easy Steps?
Herein, we have listed the complete set of instructions for the setup and tracking of the inventory in the QBO application.
First Step- Enable the Inventory Tracking
If you haven’t enabled the inventory tracking, then first understand how to turn it on.
- Access the Settings icon and head to the Account and Settings tab.
- Browse to the Sales tab and hit the Edit icon from the Products and Services section.
- Now, enable the Show Product/Service column on sales forms.
- Also, check that you enable the “Track quantity and price/rate” and “Track inventory quantity on hand.”
- Finally, hit the Save and then the Done option.
Second Step- Include Your Inventory Products
Herein, you can include the inventory items along with the other products and services you sell using QuickBooks. This will enable you to add them as the line items along with your sales forms.
1. Add products you want to track as part of inventory
- Initially, head to the Settings icon and click the Products and Services option.
- Now, hit the New option to add a product or service. Then, choose the Inventory option.
- Next, include a Name and the SKU for what you are tracking.
- Click on the Category by hitting the Category drop-down menu.
Add your product’s quantity, re-order point, and inventory asset account.
- Include your product’s Initial quantity on hand option. Then, mention the quantity when you have begun tracking.
- Now, mention a re-order point for getting the reminder whenever it’s time to place the order again.
- Thereon, choose the Inventory asset drop-down arrow and click the Inventory Asset option. With this, QuickBooks utilizes it for monitoring all the products you have in stock.
2. Add products and services you buy or sell, but won’t consider as a part of inventory
QuickBooks doesn’t track the quantities for the following items.
Add the Service Items
These are the services that you have to sell to the customers.
- Under this process, click on New and then the Non-inventory or Service tab.
- Provide a name for the product or service and a SKU to keep track of your inventory.
- Choose the Category that tells about your product or service. Then, look for more details regarding the item categories.
- Tap on the “I sell this product/service to my customers” checkbox. If you aren’t selling the items, you can leave them unmarked.
- Provide a description, and this is exactly what your customers will notice on their sales form.
- Provide an amount within the Sales price/rate field.
- Now, pick the account you wish to track the sale by clicking the Income account drop-down arrow.
- Herein, if you wish to monitor the Tax, pick the relevant Tax from the Tax drop-down arrow.
- At last, when you are all sorted, hit the Save and then the Close tab.
Add Non-Inventory Items
The procedure to add the non-inventory items is similar to the process to add the item. These are the things that you buy or sell but won’t track as inventory.
Create Bundles
Bundles will help you group numerous products or services together. Adding the products within the bundle will save you from choosing them one after the other in invoices or receipts.
Step 3: Keep track of what sells
After the setup of the inventory products in QBO, you can now monitor when they sell. There are distinct ways for tracking what you sell:
Create an invoice
You need to create an invoice if you’ll be paid later.
- Initially, hit the +New or +Create option and then click the Invoice option.
- Pick the customer name by hitting the Add Customer drop-down arrow.
- Also, ensure that you have added the details correctly, especially if you have mentioned the email address.
- Cross-check the Invoice Date, Due Date, and Terms. Herein, provide the new dates or terms if you want to.
- Now, for every item on the invoice, pick a product or service by clicking on the drop-down arrow. Then, for including the additional line items, hit the Add product or service option.
- Provide the quantity (Qty) and rate if necessary.
- To make changes to the information or design of your invoices, hit the Manage icon. Then, pick the options from the side panel. With this, QuickBooks will remember your choices and apply them to all the existing and future invoices.
- Finally, choose the Save and then the Close option. If you wish to send the invoice, then hit the Review and Send option and carry on with the on-screen instructions to complete the process.
Learn More:- QuickBooks Invoices Not Printing Correctly
Add a Sales Receipt
You need to include a sales receipt if you paid the Customer on the spot.
- Initially, tap on +New or the + Create option.
- Choose the Sales Receipt tab and opt for the Customer by clicking on the Customer drop-down arrow.
- Provide the sales info, such as the Payment Method.
- Now, click the Select a product/service drop-down arrow to choose the product or service that you sold.
- At last, hit the Save and then the Send option to email the receipt.
After this, QuickBooks decreases what’s on hand by the amount given on the invoice or receipts.
Verify what’s on hand and what’s on order as you work.
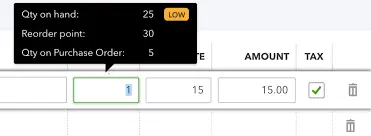
- Firstly, verify what’s in your hand and what you still have to order on an invoice, sales receipt, or another type of transaction. For that, drag your cursor over the quantity you have mentioned for an item to get more details.
- In case you set the re-order points, QuickBooks will notify you whenever the inventory is running low. If you have already set a low-stock alert, QuickBooks will also notify you when something is running low.
Fourth Step: Restock Your Inventory
QuickBooks will notify you whenever it’s time to restock the inventory. Then, you can order the inventory in QuickBooks and monitor what you get from the suppliers and what you still have to order. By doing so, the quantity on hand will eventually increase by the number of items you get.
Furthermore, perform the steps given below to reorder what’s running low or has gone out of stock.
Set Up Your Products and Re-order Points
There are two distinct ways to set up your products’ reorder points.
- Firstly, if you have new products, mention the re-order points while adding what you sell in QuickBooks.
- Secondly, if you saved products which doesn’t have re-order points, you can modify these products to include them. For that, you must use the following steps.
Edit a product to add a re-order point
- Look for the product for which you want to have a re-order point.
- Now, click the Edit icon within the Action column.
- Within the Re-order point field, mention the threshold when you re-order more inventory.
- Finally, hit the Save and then the Close tab.
Check what’s running low or out of stock
You can set the priorities by ordering those products that you need the most. After setting up the reorder points, look to see whether you have inventory items that are running low or going out of stock.
- From the top, you can get the information regarding what’s in low stock or out of stock items.
- Now, from the Low Stock or Out of Stock, hit the See all option beside the option to apply the filter for those products.
Fifth Step: Use Reports to Verify the Status of your Inventory
You can access the reports to get the information regarding your best sellers, what’s on hand, cost of goods, etc.
Follow the steps below to use the reports to view the inventory status and performance.
Check What’s in Stock
You must visit the Sales and Customers group of reports. Then, run the reports to understand what’s on hand so that you always have that inventory in stock that your customers want.
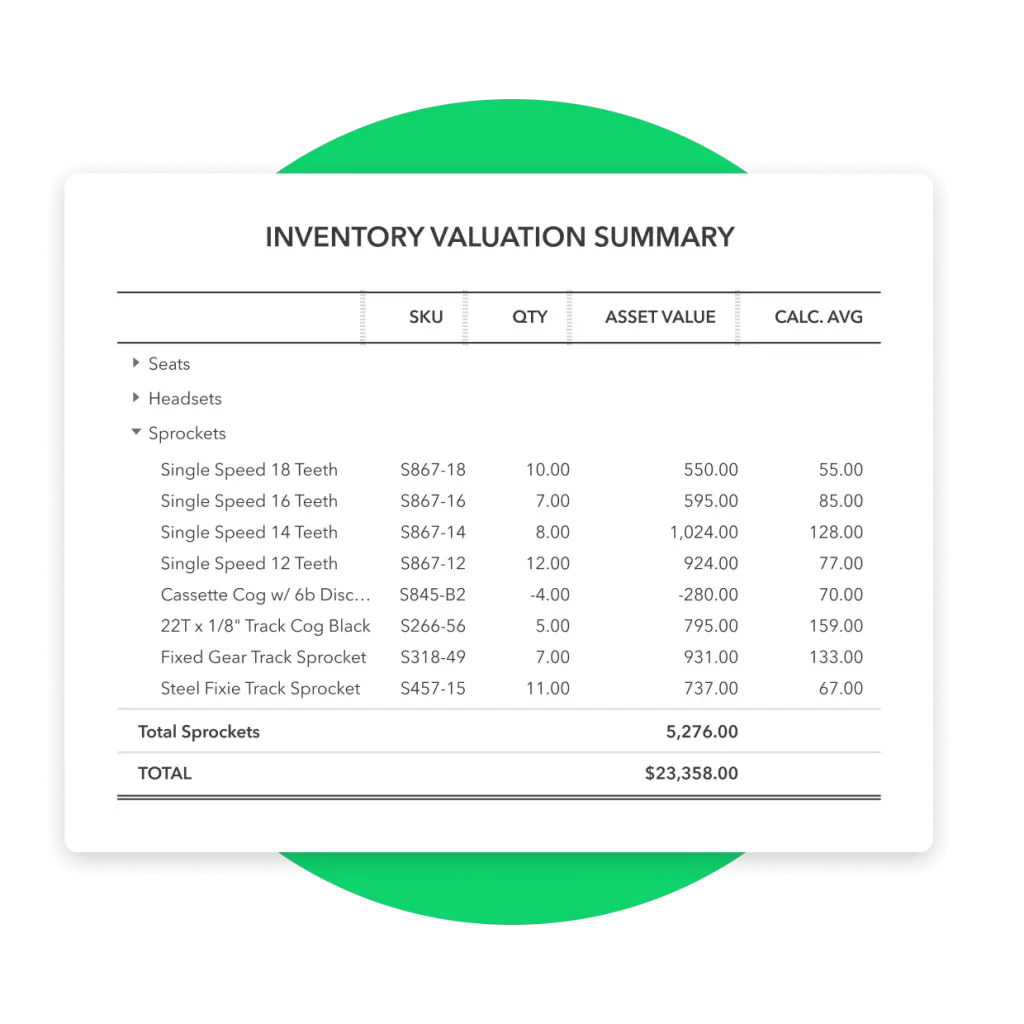
- Inventory Valuation Summary – This report will tell you the quantity on hand, value, and average cost for each product.
- Inventory Valuation Detail- You will get to know about the transactions for each inventory item and how they affect quantity on hand, value, and cost.
- Stock Take Worksheet- Herein, you will notice your inventory items with space to input your physical count, to tally them with the quantity on hand in QuickBooks.
Check What’s Still On Order
You must access the Expenses and Suppliers group from the group of reports. Then, start running the Open Purchase Order Detail report. With this, it shows how many items are still on order and how many you have received till now.
How to Track Inventory in QuickBooks Online Application?
The inventor features are available in the QuickBooks Online Plus and Advanced versions. You can also track the value of inventory assets in QuickBooks Online Essentials and QuickBooks Online Simple Start versions.
Create an account to track your inventory value
- Initially, choose the Settings icon and click the Charts of Accounts option.
- After this, hit the New tab and then tap on the Current Assets option.
- Choose the Detail Type drop-down arrow and opt for Other current assets.
- (Optional) Provide a Unique Name, Description, Default Tax Code, and Balance for the account.
- Thereon, hit the Save and Close tab.
- (Optional) Generate an account for each type of inventory.
Create an account to track your cost of goods sold.
- Choose the Settings option and click the Charts of Accounts > New option.
- After this, click the Account Type drop-down arrow to opt for the Cost of Goods Sold option.
- Now, pick the closest type of Cost of Goods Sold that matches your situation. If you aren’t sure, pick the Other Costs of Service – COS.
- (Optional) Insert a Unique Name, Description, and Default Tax Code for the Costs of Goods Sold item.
- Finally, hit the Save and then the Close option.
When you purchase inventory (using Checks, Bills, or Expenses)
You can utilize the asset account that you have recently generated to track the value from the Account field. By this, you can transfer the money directly to the asset account, which will enhance the value of your inventory.
When you sell inventory
- For selling the inventory, click the +Create and then the Journal Entry option.
- Now, on one line, mention a Debit to your cost of goods sold account for your original cost of the product you sold. Herein, you must avoid using the sales price.
- Within the next line, provide a Credit for the inventory asset account for the original cost of goods sold.
- At last, when you made all the changes, hit the Save tab.
With this, the Journal Entry will reduce the value of your inventory and increase your Cost of Sales.
Conclusion
We hope that with the help of this informative blog, you can easily use the QuickBooks inventory tracking software to keep track of how much stock you have and what’s still to order. Moreover, it also helps you send the alert notifications whenever the stock is low and you need to restock it. Furthermore, if you still require any additional help in using this software, then connect with our BizBooksAdvice professionals for help.
Frequently Asked Questions (FAQ’s):-
Question 1: How do I enter inventory in QuickBooks?
Ans.To add items to QuickBooks inventory, enable the feature for both inventory and non-inventory items. Include product name, SKU, and category when adding products or services. After adding the product’s initial quantity in hand, list the reorder point to receive the alerts when it’s time to re-order.
Question 2: How do I turn off inventory tracking in QuickBooks Online?
Ans. Follow these steps to turn off inventory tracking in the QuickBooks Online application.
- Tap on the Gear icon from the top-right corner of the screen and hit the Account and Settings option.
- After this, choose the Sales option and head to the Products and Services tab. Then, unmark the checkbox of “Track Inventory quantity on hand”.
- Finally, hit the Save and then click the Done option.
Question 3: What inventory method does QuickBooks Online use?
Ans. The QuickBooks Online application uses the first-in, first-out method.
Question 4: What are the three major inventory management techniques?
Ans. The three major inventory management techniques are ABC analysis, Just In Time, and the Economic Order Quantity method.
Question 5: What is the main purpose of stock management software?
Ans. The main role of the stock management software is to maintain the stock at the minimum levels. Moreover, it is done to make sure that you have a continuous supply of materials for the manufacturing process to fulfill the customer demand on time.
About The Author

Jonathan Browns
Jonathan Brown is a trained QuickBooks professional with 10 years of experience in the accounting sector. Moreover, he is passionate about helping businesses reduce the stress of managing accounts. Also, he is proficient in assisting entrepreneurs and small business owners to use QuickBooks and enhance their accounting experience.

QuickBooks Desktop, Payroll or Enterprise
Advanced Support for QuickBooks Desktop, Payroll & Enterprise Solutions
From payroll tax setup, direct deposit issues to Enterprise performance tuning and Desktop upgrades - our QuickBooks experts provide accurate and stepwise assistance. Get dependable support designed to minimize downtime and maximize efficiency.
Recent Posts
-
QuickBooks Not Connecting to Server: A Troubleshooting Guide
-
How to Fix QuickBooks Self-Employed Login Issue Easily?
-
QuickBooks Script Error? Here's How to Fix It Fast
-
How to Migrate from QuickBooks Desktop to Online - Step-by-Step Guide
-
QuickBooks Online Advanced Login, Pricing & Feature Comparison Guide