How to Add an Accountant in QuickBooks Online Efficiently?

- By Jonathan Browns
- Feb 10, 2026
- QuickBooks Online
- 7 min read
QuickBooks Online is cloud-based financial software enables you to manage your business finances anywhere, anytime. However, adding an accountant to QuickBooks Online will give access to your company file so that they can help you with bookkeeping and prepare for taxes. If you are looking for the step-by-step instructions to understand how to add an accountant in QuickBooks Online, we have got you covered. In this guide, you will learn about the detailed procedure to invite the accountant.
Need help adding an accountant in QuickBooks Online? Call Us : +1-866-408-0444 to speak directly with a certified QuickBooks professional.
Why should you Add an Accountant in QuickBooks Online?
Adding an Accountant in QuickBooks Online will give the businesses a clear insight into ensuring accurate bookkeeping. Moreover, they also help in simplifying tax preparation and unlock specialized tools for reconciling accounts. It is also helpful in the following ways:
- Review and adjust the financial reports
- Helps collaborate with you in real-time
- Resolve Bookkeeping issues
- Accountants help with initial setup, customizing charts of accounts & training on the software
How to invite An Accountant User in QuickBooks Online?
Before sending an invite to your accountant, make sure to have a primary admin or company admin access to the QBO account. Furthermore, if you are looking How to Invite Accountant to QuickBooks Online, use the following steps.
- Log in to your QuickBooks Online account as a primary or company admin.
- Move to the Settings > Manage Users > Accountants or Accounting Firms tab.
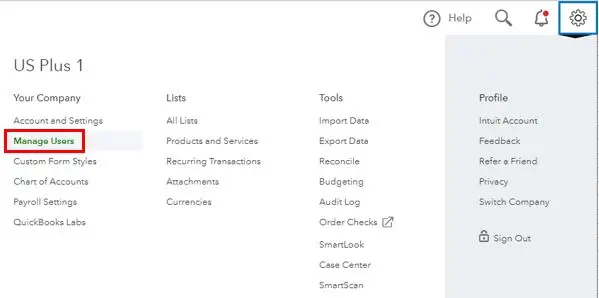
- Choose the Invite firm option.
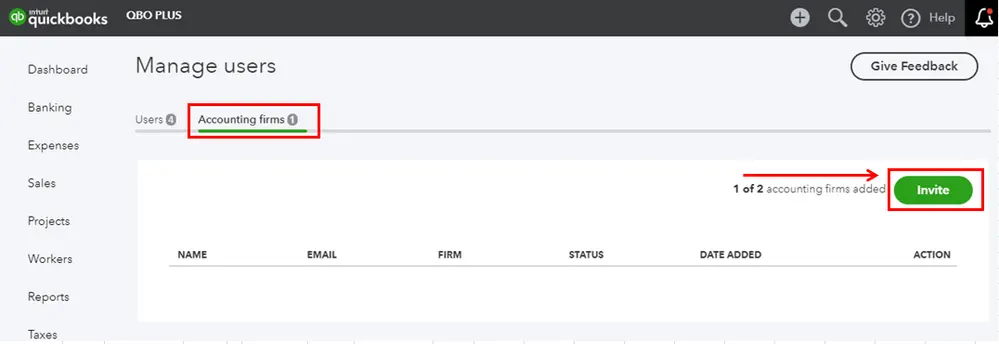
- Provide your accountant’s email address or their firm’s user ID.
- Finally, head to the Send the invitation option.
Result
After sending the invitation, your accountant will get an email invitation to use the QuickBooks Online company. Once your invite is accepted, your status will automatically change from Invited to Active.
Next Steps
- Invitation email: Your accountant will get an email inviting them to use the QuickBooks Online company.
- Acceptance: If they don’t have a QuickBooks Online accountant, then send the email along with a link to sign up. Once the invitation is accepted, they can start working on their books of accounts.
- Status Update: Once your accountant accepts the invite, you will get the status on the Manage Users page. It will change the status from Invite to Active.
How do I Add and Manage Users in QuickBooks Online?
Perform the following instructions to add and manage users in QuickBooks Online.
Steps to Add a New User
Depending upon your subscription level, it will help you identify how many users you can add to QBO.
- Move to the Settings menu and click the Manage Users tab.
- Choose the Add User and then provide the user’s name and email address.

- Important tip: Make sure not to use special characters other than a period in the user’s name. For the email section, only @ and a period character are allowed.
- Tap on the Roles drop-down list and pick the role you want to assign to the user.
- Check the features this role provides access to. Herein, you can expand each section.
- Pick the Account Management settings that you wish to manage.
- Finally, go with the Send Invitation link.
Steps to Add a new user to multiple entities in Intuit Enterprise Suite
If you are running Intuit Enterprise Suite with multiple entities, perform the following steps to add and manage users.
Important Tip: Only the admin who has access to multiple entities can add users to multiple entities at one time. Herein, the admin can only add users to the entities that have the admin rights.
- Move to Settings > Manage Users. By default, your manage users page will show the entity in which you have logged in.
- Click Add User and mention the complete user name and email address.
- Pick one or more companies you have to add the users to and tap on Add Company.
- You will get the list of companies you choose below. For each company, pick the role you want to assign to the user. There are some features you won’t be able to access, such as time tracking.
- (Optional) To check the features assigned by each role, click View permissions. Herein, you can expand each section to check more detailed permissions.
- For allotting the same role to multiple companies, tick the checkbox beside each company. Pick the Assign role option from the actions menu bar.
- Once you review and assign roles for each company, hit the Send Invitation. Then, choose the Send invite from the Confirmation window to send the invite to the user.
How to Manage User Roles and Permissions to Add an Accountant?
Perform the following steps to manage user roles and permissions to add an accountant in QBO and Intuit Enterprise Suite.
In QuickBooks Online
- Click on the Settings icon and choose the Manage Users option.
- Look for the user you need to edit and tap on Edit from the Action section.
- Herein, you can edit the user role by clicking the Roles drop-down arrow.
- Important Tip: You can’t edit the time tracking roles. However, to edit them, delete the user first and then re-add them using the correct role.
- After this, pick the account management settings you wish to manage.
- Finally, click the Save tab.
Now, prompt your user to log out and log back in again to QBO to review the updates.
In Intuit Enterprise Suite
Using the Intuit Enterprise Suite, you have the option to add and manage users across multiple entities without logging in.
- Tap on the Settings menu > Manage Users. By default, the user list will show the entity in which you have logged in.
- After this, click the Users and Roles and pick a company. Then, you can manage users and roles for that company.
- Now, pick the user who wants to edit and click the Edit option.
- You have the option to modify the user role by clicking the Roles drop-down menu list.
- To update the view, create, edit, and delete the permissions for list management and inter-company transactions, click Manage consolidated view permissions. Do the required changes and click Continue to save and return to the Edit screen.
- Once you are done, hit the Save option.
For adding and managing custom roles, move to the Roles tab.
Delete a user
Once you delete a user, it will be deleted permanently. But you can still check them in your history in the audit log.
- Move to the Settings menu and click Manage User.
- Choose the ellipsis icon on the user you wish to delete and click the Delete option.
- At last, hit the Delete user option from the pop-up window for confirmation.
Conclusion
So, now we hope that you have understood how to add an accountant in QuickBooks Online. Thus, it will help you manage your finances easily without any hindrance. Furthermore, if you still need any help, then have a conversation with our BizBooksAdvice professionals for reliable support.
Frequently Asked Questions (FAQ’s):-
Question 1: How many accountant users can you have in QuickBooks Online?
Ans. 5 Accountant users for billable users and 2 accountant firm users for non-billable users.
Question 2: Can you have two accountants in QuickBooks Online?
Ans. QuickBooks Online allows up to 5 accountant users for billable accounts and 2 accountant firm users for non-billable accounts, depending on your subscription.
Question 3: How do I give my accountant access to FreeAgent?
Ans. To give an accountant access to FreeAgent,
- Go to the Settings > Users and click the Add New User option.
- Choose the accountant for the role and mention their details.
- For full access, set the permission level to 8.
Question 4: Does QuickBooks Online Simple Start allow accountant access?
Ans. Yes, you have the option to invite up to two accountants to use the QuickBooks Online Simple Start. This will let you review and make the necessary adjustments to monitor your finances accurately.
Question 5: Can I be my own accountant in QuickBooks Online?
Ans. If you have an existing User ID, you can generate a QuickBooks Online Accountant firm from it. For that, move to your website, log in to your user ID and password, and hit the Create firm option.
Question 6: How to remove an Accountant user in QuickBooks Online?
Ans. If you don’t want your accountant to access your company file any longer, you can remove them using the following steps.
- Log in to your account as a primary admin and click on the Settings icon.
- Choose the Manage Users > Accountants or Accounting Firms tab.
- Look for the accountant you wish to delete and click the Delete option.
- Once again, click the Delete option for confirmation.
Question 7: How to remove the accountant’s copy restriction from QuickBooks Online?
Ans. To remove the accountant’s copy restriction from QuickBooks Online:
- Move to the File menu > Send Company File > Accountant’s copy > Client Activities.
- Choose the Remove Restrictions option.
- Click the Yes, I want to remove the Accountant’s Copy Restriction and hit OK.
About The Author

Jonathan Browns
Jonathan Brown is a trained QuickBooks professional with 10 years of experience in the accounting sector. Moreover, he is passionate about helping businesses reduce the stress of managing accounts. Also, he is proficient in assisting entrepreneurs and small business owners to use QuickBooks and enhance their accounting experience.

QuickBooks Desktop, Payroll or Enterprise
Advanced Support for QuickBooks Desktop, Payroll & Enterprise Solutions
From payroll tax setup, direct deposit issues to Enterprise performance tuning and Desktop upgrades - our QuickBooks experts provide accurate and stepwise assistance. Get dependable support designed to minimize downtime and maximize efficiency.
Recent Posts
-
QuickBooks Bookkeeping: The Practical Way to Keep Your Books in Order
-
QuickBooks Merchant Services: Everything You Need to Know Before You Sign Up
-
QuickBooks Payroll Assisted: Everything You Need to Know
-
How to Contact QuickBooks Online Customer Service Team 2026
-
QuickBooks Online Login: Sign in to Access your QB account