QuickBooks Invoices Not Printing Correctly? Solve It Now

- By Jonathan Browns
- Jul 10, 2025
- Accounting
- 7 min read
Most often, users might experience QuickBooks invoices not printing correctly due to incorrect printer settings. In other instances, it may appear while running the old version of Adobe Acrobat. Unfortunately, this issue stop the users from printing the invoices. Thus, it results to delay in the day-to-day business operations. Therefore, it is essential to rectify the issue so that you can resume printing invoices without any hassle. So, let’s stick to this blog and grab all the essential details required to troubleshoot this issue completely.
Why Does QuickBooks Invoice Printing Problems Occur?
QuickBooks Invoice printing problems might take place due to several reasons. So, to give you a clear insight regarding this issue we have summarized all the possible causes. Check them out.
- Issues with the QBPrint.QBP files might prevent the users from printing the invoices.
- Operating the old or damaged Adobe Acrobat or Reader.
- Insufficient temp folder permissions may also cause trouble printing invoices.
- Another possible reason is the improper setup of the printer settings in QuickBooks.
- You might be running the old version of the Adobe Reader or Acrobat.
Simple Methods to Eliminate QuickBooks Invoices Not Printing Correctly Issue
In this blog’s section, we have provided you with the list of all the possible solutions required to troubleshoot the QuickBooks Invoices not printing correctly issue.
Solution 1: Changing the Name of the QBPrint.QBP File
The following are the instructions you must implement to change the name of the QBPrint.QBP file.

- In the beginning, search for the QBPrint.Qbp file. For instance if you are operating Windows 10, 8.1 or 8 operating system then access the C:\ProgramData\Intuit\QuickBooks 20xx.
- Whereas, for the Windows Server 2008 and Server 2012, you must browse to the following data path C:\Program Data\Intuit\QuickBooks YEAR and C:\Users*remote user*\AppData\Roaming\Intuit\ YEAR VERSION\TSPrinterSettings.
- Afterwards, right-click on the file named as Qbprint.QBP file according to your QuickBooks version. Then, you must opt for the Rename tab.
- Now, it is essential to include “OLD” at the back side of the file name to make it different from the old file name.
- Next, you must launch the QuickBooks application and head to the File menu.
- Thereon, pick the Printer Setup tab and choose any transaction from the Form Name list. Then, hit the OK tab, and it will eventually generate a new QBPrint.QBP file on your system.
- Once you are all set, launch the invoice and then try to email or print to see of the issue still persists.
Solution 2: Re-establishing the Temp Folder Permissions
To modify the temp folder permissions in QuickBooks, you must perform the instructions given below.

- Initially, bring up the Run Command window by hitting the Windows + R keys and then insert “%temp%” in the text box.
- After this, tap on the Properties tab and then browse to the Security tab.
- Now, you must check that all the usernames and groups in the Security Settings have full control.
- Once you have assigned the full control permissions, try to save it in the PDF form again in QuickBooks.
Solution 3: Update or Repair the Damages With Adobe Acrobat Reader
Follow the procedure below to update or repair the Adobe Acrobat Reader.
Automatic Adobe Reader And Acrobat Updates
- In the first step, launch the Adobe Reader or Acrobat.
- Afterwards, you must tap on the Help menu and then choose the Check for Updates tab.
- Thereon, you must download and install the latest updates by using the instructions given on the screen.
Read More:- Update QuickBooks Desktop to the Latest Release
Update the Adobe Reader on the Web Browser
- In the beginning, launch Adobe Reader and then hit the Help menu > About Adobe Reader. Then, you must note down the product version.
- Now, start accessing the Adobe Reader Downloads page. With this, you will notice that the webpage will provide the details regarding your OS and Reader version itself.
- Next, if you see that the web page identifies that a new version is available, hit the Install Now tab.
- After this, click on the downloaded file and then do it as per the instructions on the screen.
Configure the Damages With the Adobe Acrobat Reader
Even after updating the Adobe Reader/Acrobat to the latest version available, your issue won’t be resolved; repair the issues with the Adobe installation.
- Start the process by shutting down Acrobat/Adobe Reader and opening any web browser.
- After this, hit the Start button from the taskbar located at the bottom left.
- Now, include the Control Panel and then hit the Enter key.
- Next, the users must hit the Programs and Features > Acrobat or Adobe Reader > Uninstall/Change tab.
- Subsequently, within the Setup Dialog box, you have to hit the Next tab.
- Following this, choose the Repair tab, click the Next tab, and then hit the Install option.
- Afterwards, when the process is over, hit the Finish tab.
- Relaunch your system and then try connecting to the QuickBooks Online application and try printing invoices again.
Solution 4: Verify that the Printer is Setup Properly
To modify the printer settings properly, you must follow the steps below.
Step 1: Checking that the Printer is set accurately
- The users must shut down the Printer and then start them again.
- After that, make sure that the paper tray has included papers in it and see that no paper is stuck.
- Thereon, hit the Start menu and launch the Control Panel.
- Now, you must tap on the Printers and Faxes tab to move further.
- If you notice that the Printer shows to be offline, hit the Printer icon and then the Use Printer Online tab.

- Thereon, move to the Printer tab again and choose the Cancel all Documents tab.
- Subsequently, shut down the window and right-click the Printer.
- Following this, choose the Properties tab and then go with the Print Test Page option.
Step 2: Check That the Right Printer Name is Chosen
To verify that you have picked the correct printer name, do the following:
- Start the process by hitting the File tab and then select the Printer Setup tab.

- Afterwards, you must choose the invoice that you wish to print.
- Thereon, verify that the printer name of the screen tallies with the one you are operating. If the name of the Printer won’t tally then correct the setup through the Printer’s Setup first to move further.
- Now, hit the Help menu to get additional assistance regarding these settings.
Step 3: Try Printing Through a Different Printer
If you are still facing any issues, then try printing the invoices through another printer to check whether the problem lies with QuickBooks or the printer setup.
- Launch the QuickBooks application and then move to the File menu > Printer Setup tab.
- After that, pick the invoice that you wish to print from the list of options.
- Thereon, choose another printer name, say Microsoft XP Printer.
- Now, you must hit the Help menu to get more help regarding these settings.
Learn More:- Print W-2 And W-3 Forms in QuickBooks
Solution 5: Utilize the Print & PDF Repair Tool From QB Tool Hub
Print & PDF is a great tool that comes with the QB Tool Hub to rectify printing issues in QuickBooks. Thus, by running this tool, you can rectify the QuickBooks invoices that are not printing correctly.
- Initially, you must download and install the latest QuickBooks Tool Hub.
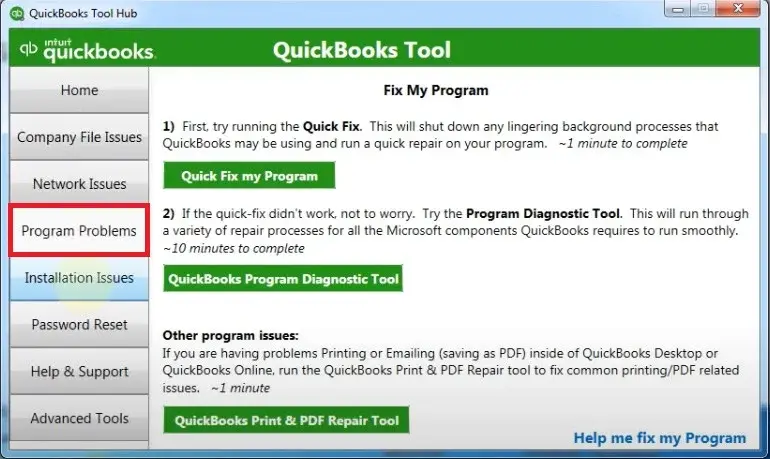
- After that, launch the Tool Hub and choose the Program Problems tab.
- Thereon, browse to the QuickBooks PDF & Print Repair Tool tab. After clicking this tab, you will have to wait for some time until the process is complete.
- Complete the entire process by trying to print the invoices in QuickBooks to see if the issue still exists.
Solution 6: Rectify the Issues With the QuickBooks Program
The Quick Fix My Program in QuickBooks is used to shut down the background running processes so that you can resume your printing operations easily. So, to rectify the issue, you must follow the instructions below carefully.
- To begin with, launch the QuickBooks Tool Hub on your workstation and then hit the Program Problems tab.
- After this, pick the Quick Fix My Program tab.
- Thereon, open the QuickBooks Desktop and then try opening the data file again.
Utilize the QuickBooks Install Diagnostic Tool
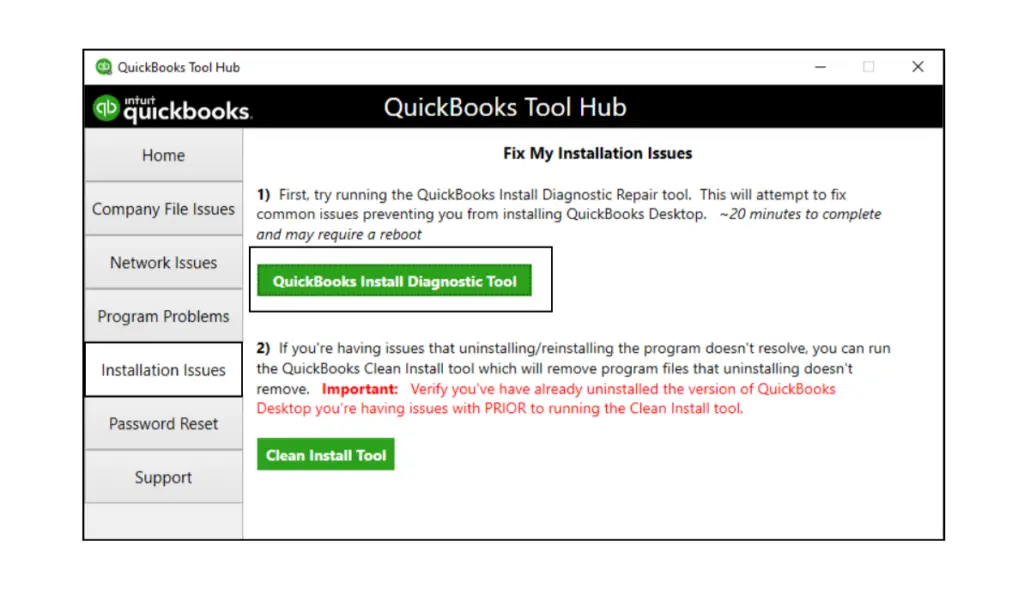
If you experience anything wrong with the installation, it may cause trouble while performing the QuickBooks tasks like printing invoices, emails etc. Therefore, to correct the issue you must run the QB Install Diagnostic Tool.
Solution 7: Perform the Re-Installation of the QuickBooks Desktop
Installing the QuickBooks Desktop again will remove the old program files by changing their names and fixing the related issues. So, we have provided the complete procedure for removing and installing the QuickBooks application again.
- Before installing the QB Desktop again, remove the old version that was installed. For that, perform the steps below.
- Firstly, launchaFTERWARDS, the Start menu, and then mention Control Panel in the search area.
- After this, move to the Programs and Features tab. You can also simply choose the Uninstall a Program tab.
- Now, pick the QuickBooks version that you wish to delete.
- Later on, tap on Uninstall/Change, Remove, and then click the Next tab.
- Afterwards, start searching for the QuickBooks.exe file and double-tap on it.
- Furthermore, choose the installation type between Express Install or Custom and Network Options.
- Thereon, tap on the Next tab and then the Install tab.
- Now, when everything is set, you must hit the Open QuickBooks tab.
Conclusion
QuickBooks invoices not printing correctly issue might appear due to the incorrect printer setup or damage in QBPrint.QBP file. Thus, it might create trouble printing the invoices. You can rectify the issue by implementing the solutions given above. If still you require any additional help, you can connect with our QB experts for immediate help.
About The Author

Jonathan Browns
Jonathan Brown is a trained QuickBooks professional with 10 years of experience in the accounting sector. Moreover, he is passionate about helping businesses reduce the stress of managing accounts. Also, he is proficient in assisting entrepreneurs and small business owners to use QuickBooks and enhance their accounting experience.

QuickBooks Desktop, Payroll or Enterprise
Advanced Support for QuickBooks Desktop, Payroll & Enterprise Solutions
From payroll tax setup, direct deposit issues to Enterprise performance tuning and Desktop upgrades - our QuickBooks experts provide accurate and stepwise assistance. Get dependable support designed to minimize downtime and maximize efficiency.
Recent Posts
-
QuickBooks Bookkeeping: The Practical Way to Keep Your Books in Order
-
QuickBooks Merchant Services: Everything You Need to Know Before You Sign Up
-
QuickBooks Payroll Assisted: Everything You Need to Know
-
How to Contact QuickBooks Online Customer Service Team 2026
-
QuickBooks Online Login: Sign in to Access your QB account