How to Setup QuickBooks Install Diagnostic Tool in Easy Steps?

- By Jonathan Browns
- Mar 19, 2026
- Accounting
- 7 min read
Running into installation issues while trying to set up QuickBooks can be a bit frustrating, especially when we get stuck in the middle of an important task. There comes a time when the QuickBooks Install Diagnostic Tool helps to automatically detect and troubleshoot common installation issues. Also, this tool helps to troubleshoot the problems associated with.NET Framework, MSXML, and C++ components.
Here, we will walk you through the QuickBooks Install Diagnostic download and installation process to address the errors quickly.
You can run the QuickBooks Install Diagnostic Tool from the QuickBooks Tool Hub and resolve installation issues such as Error 1603, 1904, and damaged Microsoft components.
What is QuickBooks Install Diagnostic Tool?
The QuickBooks Install Diagnostic is a free utility within the QuickBooks Tool Hub designed to diagnose and quickly resolve installation issues. This tool is mainly used to fix the issues with Microsoft core components, including MSXML, C++, and .NET Framework. In short, it is a one-stop shop where you can get your installation issues resolved.
It has a stand-alone version of the utility, which was available until 2022, but now it has been integrated with QuickBooks Tool Hub. So, to use this tool, you first need to get the latest version of the QuickBooks Tool Hub (1.6.0.8).
Common Errors Fixed By QuickBooks Desktop Install Diagnostic Tool
The QuickBooks Desktop Install Diagnostic tool is used to troubleshoot the common installation issues. Let’s know about all those installation errors that are hampering the ongoing work and causing delays in accomplishing your accounting task.
| Error Code 1402 | QuickBooks Error 1935 | QuickBooks Error 1904 |
| QuickBooks Error 1603 | QuickBooks Error 1903 | Error 1334 |
| Unrecoverable Desktop Error in QuickBooks | ABS PDF Driver errors | Error 1712 |
| QuickBooks has stopped working | Errors about verifying your subscription | Subscription Verification Errors |
| QuickBooks Error 1618 | QuickBooks Error 12029 | Error 1628 |
| QuickBooks Crashing | MSXML damage errors | Damaged C++ Related Errors |
How to Download, Install & Run the Install Diagnostic Tool For QuickBooks?
Perform the step-by-step instructions outlined below to download, install, and run the Install Diagnostic tool for QuickBooks.
A. Download & Install the QuickBooks Tool Hub
Before running the QuickBooks Install Diagnostic Tool, you first need to set up and run the latest QuickBooks Tool Hub (1.6.0.8).
B. Run Quick Fix My Program
Running the Quick Fix My Program will end all the background running processes that QuickBooks uses. As a result, it will run a quick repair on your program.
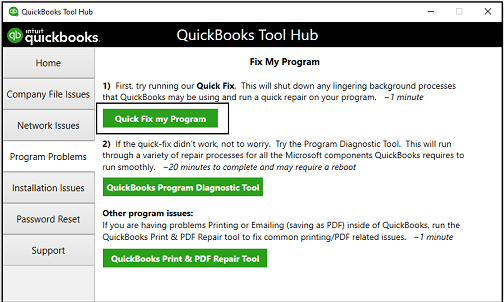
- Launch the QuickBooks Tool Hub and choose the Program Problems tab.
- After this, click the Quick Fix My Program option.
- At last, launch the QuickBooks Desktop and then launch your data file.
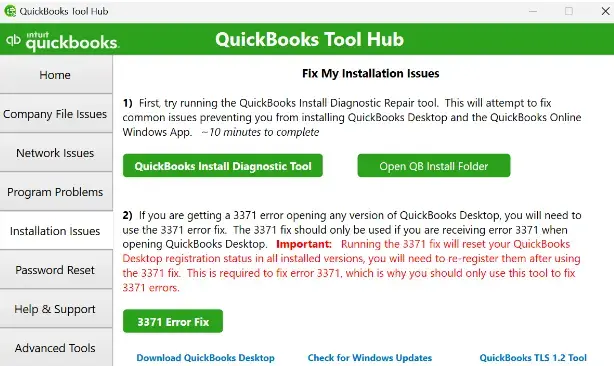
C. Run the QuickBooks Install Diagnostic Tool
If you notice that something goes wrong while installing QuickBooks, it may create issues while accessing the software. Therefore, it’s essential to run the QuickBooks Desktop Install Diagnostic Tool to put an end to the installation issues.
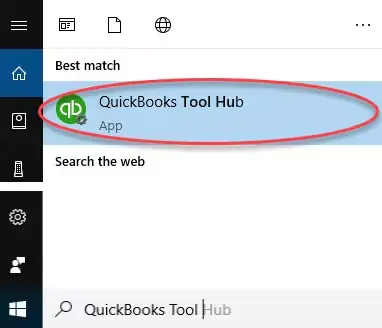
- Firstly, launch the latest version of QuickBooks Tool Hub installed on your system.
- Choose the Installation Issues tab and click the QuickBooks Install Diagnostic Tool. The Tool will take around 20 minutes to run, so wait until it scans and fixes issues.
- Relaunch your computer after you complete running the QuickBooks Install Diagnostic Tool, and then start the QuickBooks Desktop application. Then, try to access your company file.
- At last, update QuickBooks Desktop to the latest release. As a result, it will ensure that you have the most recent fixes and security updates.
How to Resolve Error 1628 While Installing Tool Hub?
If you are facing Error 1628 while installing the QuickBooks Tool Hub, make sure to use the Windows account with admin privileges. This is so because the standard account has limited access rights, but by running the admin account, you can address the issue easily. You may also face this error if Tool Hub is incompatible with the operating system. Therefore, to fix the issue, right-click the Tool Hub icon and click the Troubleshoot Compatibility option. At times, renaming the Install Shield also resolves the error 1628.
What Should You Do If the QuickBooks Install Diagnostic Tool Fails to Fix Errors?
If the QuickBooks Install Diagnostic tool fails to address the installation issues, then perform the following troubleshooting methods to fix it.
Solution 1: Fix the Windows Components Manually
You can try repairing the specific Windows components when the QuickBooks Install Diagnostic Tool fails to run properly.
Windows 10 & Latest Versions
- Exit all the open programs on your computer.
- Launch the Start menu, type “Control Panel” in the search console.
- Now, open the Control Panel and head to Programs and Features.
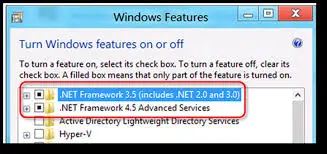
- Hit the Uninstall a Program and click Turn Windows Features On or Off.
- Search for the .NET Framework from the list of options.
Test the settings for both .NETFramework 4.5 (later) and .NETFramework 3.5 SPI.
Check .NETFramework 4.5 (or later)
Case 1: If the .NET Framework 4.5 (or later) checkbox isn’t selected;
- Circle the checkbox to turn on .NET Framework 4.5 (or later).
- Click OK to restore the changes.
- Relaunch your computer to save the changes.
Case 2: If the .NET Framework 4.5 (or later) checkbox is previously selected;
- Circle the checkbox to disable .NET Framework 4.5 (or later).
- Hit the OK tab to restore the necessary changes.
- Relaunch your PC and then log back in to Windows. Then, use the steps to enable the .NET Framework 4.5 again.
Check NET Framework 3.5 SP1
Case 1: If the .NET Framework 3.5 SP1 checkbox isn’t selected;
- Circle the checkbox to enable the .NET Framework 3.5 SPI.
- Next, hit the OK tab to restore the changes.
- When necessary changes are done, relaunch your PC.
Case 2: If the .NET Framework 3.5 SPI checkbox is previously marked;
- Circle the checkbox to enable the .NET Framework 3.5 SPI.
- Thereon, hit OK to restore the changes.
- Relaunch your computer, and once you log back in to Windows, use the steps to enable .NET Framework 3.5 SPI once again.
Repair Microsoft MSXML Components
For registering the MSXML components on a 64-bit operating system
- Initially, click the Start menu and type ” cmd in the search console.
- Right-click on the CMD and choose the Run as Administrator option.
- When the C: prompt screen opens, type cd\windows\syswow64.
- Now, type regsvr32 MSXML6.dll and hit the Enter key.
- Finally, try to install the QuickBooks Desktop application.
For registering the MSXML components on a 32-bit operating system
- Launch the Run window and insert cmd in the search box.
- When the Command window appears, type regsvr32 MSXML6.dll and hit the Enter key.
- Try to install the QuickBooks Desktop to see if the issue exists.
Solution 2: Update Windows to the Latest Version
Installing the latest Windows updates may prevent and fix the installation errors. So, to update Windows, use the following steps.
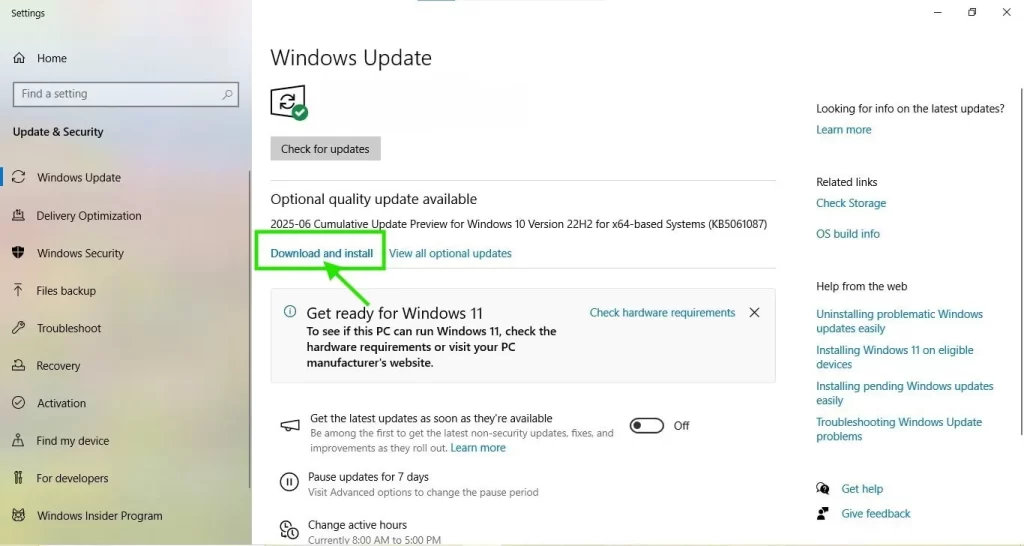
- Press the Windows icon to open the Start menu.
- Move to the Settings of your operating system and hit Windows Update.
- Now, head to the Check for Update tab.
- With this, it will show the available Windows updates.
- You need to click on the update available and then hit the Download & Install tab.
- Relaunch your PC once you are done installing the latest Windows updates.
- Launch the QuickBooks Desktop and try installing QuickBooks to review whether the issue is resolved.
Solution 3: Use the Selective Startup Mode
Switching to the selective startup mode in QuickBooks will block third-party apps from interrupting the installation. Here’s how to switch to selective startup mode.
- Initially, launch the Run window and type msconfig in the search console.
- Move to the General tab, tap on Selective Startup, and Load System services.
- When in the Services tab, opt for the Hide all Microsoft Services.
- Hit the Disable All and unmark the Hide All Microsoft Services.
- Choose the Windows Installer from the available list of options and click OK.
- Opt for the Restart option from the System Configuration window.
- Next, reinstall the QuickBooks Desktop.
- Again, go to the Run window and type msconfig.
- From the General tab, browse to the Normal Startup option.
- Click OK and then choose Restart from the System Configuration window.
Solution 4: Uninstall & Then Reinstall the Latest QuickBooks Desktop
Perform the following instructions to uninstall and reinstall the latest version of QuickBooks Desktop.
First Step: Remove QuickBooks from your computer
- Hit the Windows key to open the Start menu.
- Choose the Control Panel to open it and head to Programs and Features or Uninstall a Program.
- Now, pick the QuickBooks Desktop version that you want to delete from your device.
- At last, tap on the Uninstall/Change option and click Remove > Next tab.
Second Step: Reinstall QuickBooks Desktop
- Open the Run window, type msconfig, and click OK.
- Choose the Selective Startup and Load System Services.
- Now, opt for the Hide All Microsoft Services option and click Disable All.
- Make sure to unmark the Hide all Microsoft Services option.
- Next, pick the Windows Installer from the available options.
- Click OK and then restart when the System Configuration window appears.
Final Insights
QuickBooks Install Diagnostic Tool plays a crucial role, especially when users get stuck while installing the QuickBooks Desktop application. Using this comprehensive guide, you can easily download, install, and run the Install Diagnostic Tool in QuickBooks to troubleshoot installation errors.
Furthermore, if you still require any guidance to run the Install Diagnostic Tool in QuickBooks, you can take help from our BizBooksadvice professionals.
Frequently Asked Questions (FAQ’s):-
Question 1: Do I need admin rights to run the QuickBooks Install Diagnostic Tool?
Ans. Yes, it’s necessary to have sufficient admin rights to run the QuickBooks Install Diagnostic Tool.
Question 2: Is the QuickBooks Install Diagnostic Tool free?
Ans. Yes, you can download the QuickBooks Install Diagnostic Tool for free from the QuickBooks Tool Hub.
Question 3: How long does it take to run the QuickBooks Install Diagnostic Tool?
Ans. The QuickBooks Install Diagnostic Tool will take around 15-20 minutes to run, depending on your system performance and the number of components being repaired.
Question 4: What if the QuickBooks Desktop Install Diagnostic Tool doesn’t fix my installation issue?
Ans. If you won’t be able to run the QuickBooks Desktop Install Diagnostic tool, then repair the installation manually or reinstall Microsoft components .NETFramework, MSXML, or Visual C++.
About The Author

Jonathan Browns
Jonathan Brown is a trained QuickBooks professional with 10 years of experience in the accounting sector. Moreover, he is passionate about helping businesses reduce the stress of managing accounts. Also, he is proficient in assisting entrepreneurs and small business owners to use QuickBooks and enhance their accounting experience.

QuickBooks Desktop, Payroll or Enterprise
Advanced Support for QuickBooks Desktop, Payroll & Enterprise Solutions
From payroll tax setup, direct deposit issues to Enterprise performance tuning and Desktop upgrades - our QuickBooks experts provide accurate and stepwise assistance. Get dependable support designed to minimize downtime and maximize efficiency.
Recent Posts
-
How to Troubleshoot QuickBooks Error PS038 During an Update?
-
Troubleshooting QuickBooks TLS Security Portal Errors Instantly
-
Fixing QuickBooks Script Error (Easy Troubleshooting Guide)
-
How to Create QuickBooks Portable Company File Easily?
-
QuickBooks Payroll Not Withholding Taxes? Here’s What to Do