A Step-by-Step Guide to Import IIF Files into QuickBooks

- By Jonathan Browns
- Feb 12, 2026
- QuickBooks Online
- QuickBooks Desktop
- 7 min read
Managing accounting data efficiently is essential for businesses that rely on QuickBooks Desktop for daily financial operations. When large volumes of transactions or list data need to be transferred quickly, many users choose to Import IIF files into QuickBooks as a practical solution.
This method allows you to bring in journal entries, invoices, bills, lists, and other records without manual entry, saving time and reducing errors. However, importing IIF files requires careful preparation, as even small formatting issues can cause failed imports or data inconsistencies.
In this guide, you’ll learn what IIF files are, when to use them, and how to import them correctly into QuickBooks Desktop with confidence today.
What is IIF Files in QuickBooks?
An IIF file (Intuit Interchange Format) is a tab-delimited text file used by QuickBooks Desktop to import and export lists such as customers, vendors, chart of accounts, and transactions. It helps transfer data between company files, although it’s now considered a legacy format. IIF files are well suited for large-volume data imports but demand accurate and strict formatting to work correctly.
Learn How to Import IIF Files into QuickBooks Desktop
This guide provides a clear, beginner-friendly walkthrough for importing IIF files into QuickBooks Desktop while highlighting key considerations for a successful import.
Learn about IIF import and export limitations
- You can bring transactions into QuickBooks, but exporting them isn’t supported. Below are the types of lists and transactions that can be imported.
| Chart of Accounts | Employees | Vendor types |
| Items | Shipping Methods | To dos |
| Notes | Sales tax codes | Customers and customer:jobs |
| Other names | Classes | Payment terms |
| Customer messages | Sales reps | Vendors |
| Customer and job types | Payment methods | Budgets |
| Price levels | Account beginning balances | Cash sales to customers |
| Checks | Deposits | Invoices |
| Account transfers of funds | Vendor bills | Cash refunds to customers |
| Credit card transactions | Estimates | Payments from customers |
| Vendor bill refunds | Credit card refunds to customers | Credit memos to customers |
| General journal entries | Purchase orders |
- There’s a limit on how many list records you can import. Check the maximum list entry limits for details.
- Importing IIF files doesn’t automatically connect related transactions. For instance, invoices and their payments must be linked manually after import. You can do this in the Receive Payments or Pay Bills window, or by using third-party tools that handle linking.
- When importing assembly items, values in custom item fields aren’t brought in.
- Price levels created on an individual item basis can’t be imported or exported.
- Payroll data can only be exported via IIF files from Core, Premium, and Elite Standalone Payroll.
- IIF files can’t be imported or exported between different country versions of QuickBooks (for example, U.S. to Canada).
- When building an IIF import file in Excel, numbers with leading zeros aren’t accepted. As a workaround, set the column format to Custom.
QuickBooks Desktop for Windows
Export IIFs
- Sign in to your company file as an admin. Note: If you’re in Multi-user mode, go to the File menu, then select Switch to Single-user Mode.
- Go to the File menu, then select Utilities.
- Select Export, then select Lists to IIF Files.
- Select the lists you want to export, then select OK.
- In the Save in dropdown, select a location to save your IIF file into.
- Enter a file name, then select Save.
Read More:- QuickBooks Multi-User Mode Not Working
Import IIFs
Before importing an IIF file, make sure to create a backup of your company file. If anything goes wrong during the import, the backup will allow you to restore your data.
- Log in to the company file using an admin account.
- If you’re working in Multi-user mode, open the File menu and switch to Single-user Mode.
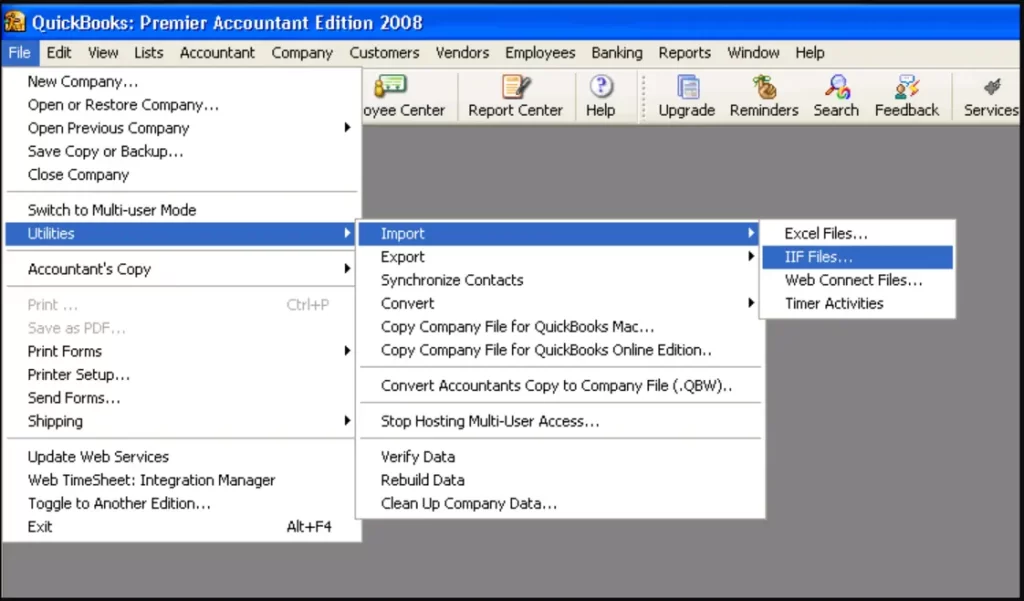
- Open the File menu and choose Utilities.
- Click Import, then select Import IIF.
- Locate and choose the IIF file you want to bring in, then click Open.
- Confirm the import by selecting OK.
Edit an IIF file
- Open Microsoft Excel, then go to File > Open.
- From the file type list, choose All Files.
- Select the IIF file and click Open.
- When the Text Import Wizard appears, click Next twice, then Finish.
- Edit the file as needed.
- Go to File > Save, and confirm by selecting Yes.
- Close Excel. When prompted to save again, choose Don’t Save.
QuickBooks Desktop for Mac
Export IIFs
- Sign in to your company file with all the admin rights.
- Navigate to File and then choose Export.
- Click on Lists to IIF File, then select the file you wish to export.
- Now, hit OK and then enter a name for the IIF file.
- Choose a location to save your IIF file into under the Where dropdown and click Save.
Learn More:- QuickBooks for Mac
Import IIFs
Important: Make sure to back up your company file before importing IIF files. If any issues come up, you can restore your data using the backup.
- Sign in to your company file as an admin.
- Go to File at the top and select Import.
- Choose From IIF Files, then export your IIF file.
Can I Import IIF Files in QuickBooks Online?
You can import IIF files into QuickBooks Online by using an IIF importer or a third-party application. QuickBooks Online does not support direct IIF file imports. Instead, you’ll need to convert the IIF file into a supported format such as CSV, XLS/XLSX, or Google Sheets before importing it.
To convert IIF files, you can use online file-conversion tools available on the web. Once converted, the file can be uploaded using QuickBooks Online’s standard import options.
Alternatively, you can use a third-party importer that allows you to import IIF files directly into QuickBooks Online. These tools are available through the QuickBooks App Market or the Apps menu within your QuickBooks Online account.
Here’s how to find an importer app:
- Go to the Apps menu in QuickBooks Online.
- Select the Find Apps tab.
- Enter a relevant keyword in the search bar or browse categories to explore available tools.
- You will the IIFImporter. Download, install and set it up to get started.
This approach is especially helpful if you’re new to QuickBooks Online and need advanced import capabilities not supported natively.
Conclusion
Learning how to import IIF files into QuickBooks Desktop & Online can greatly streamline data entry and improve the accuracy of your accounting records. Properly handled IIF imports support smoother bookkeeping processes and more efficient financial management.
However, if you encounter difficulties, reaching out to certified experts at BizBooksAdvice can help ensure the issue is resolved quickly and correctly. Call Us : +1-866-408-0444 to connect with a QuickBooks ProAdvisor now!
Frequently Asked Questions (FAQ’s)
1. Can I import IIF files into QuickBooks Online?
Ans. Yes, you can import IIF files into QuickBooks Online (QBO), but not directly through the standard, built-in “Import Data” tool. Because IIF is a QuickBooks Desktop format, you must use third-party apps like Zed Axis or IIFImporter from the QuickBooks App Store to properly import, map, and process transactions, lists, and payroll data.
2. How to import an IIF file?
Ans. To import an IIF file into QuickBooks Desktop, sign in as an admin in single-user mode, go to File > Utilities > Import > IIF Files, and select your file. It is critical to back up your company file first to prevent data corruption.
3. Can I convert IIF to CSV?
Ans. Yes, you can convert QuickBooks IIF (Intuit Interchange Format) files to CSV, either by opening them in Excel and saving as a .csv file.
4. Can iifimporter be used with QuickBooks Online?
Ans. Yes, various importer tools, such as Business Importer and Transaction Pro, work directly with QuickBooks Online to import invoices, bills, journal entries, and lists (customers/vendors) from Excel, CSV, or Google Sheets.
5. How do I import data from QuickBooks Desktop to QuickBooks Online?
Ans. To import data from QuickBooks Desktop to QuickBooks Online (QBO), use the Export Company File to QuickBooks Online feature in the ‘Company‘ menu as an administrator, ensuring your QBO account is less than 60 days old.
About The Author

Jonathan Browns
Jonathan Brown is a trained QuickBooks professional with 10 years of experience in the accounting sector. Moreover, he is passionate about helping businesses reduce the stress of managing accounts. Also, he is proficient in assisting entrepreneurs and small business owners to use QuickBooks and enhance their accounting experience.

QuickBooks Desktop, Payroll or Enterprise
Advanced Support for QuickBooks Desktop, Payroll & Enterprise Solutions
From payroll tax setup, direct deposit issues to Enterprise performance tuning and Desktop upgrades - our QuickBooks experts provide accurate and stepwise assistance. Get dependable support designed to minimize downtime and maximize efficiency.
Recent Posts
-
QuickBooks Online Forecasting Tool: Plan Cash Flow & Business Growth
-
Here’s the Step-by-Step Guide For QuickBooks ETSY Integration
-
How to Migrate From QuickBooks Desktop to QuickBooks Online
-
QuickBooks Enterprise Latest Version (2026): Everything You Need to Know
-
How to Troubleshoot QuickBooks Error PS038 During an Update?