
 Bookkeeping
For every businessman, keeping their QuickBooks data file safe from any unauthorized access is important as it contains crucial business data. But, sometimes, the users fail to access their data files due to damage or corruption. Here comes a time when they need to fix the issues to continue with their ongoing business task. At that time, verify and rebuild data in QuickBooks Desktop came into the picture, which helped fix the damages.
However, if you want complete stepwise instructions to use the Verify and Rebuild Data in QuickBooks Desktop, continue reading this post.
Want to get more details regarding how to utilize, verify and rebuild data in QuickBooks Desktop? Dial Call Us : +1-866-408-0444 and communicate with our professionals to get assistance in the best possible manner.
What is the Benefit of Using QuickBooks Verify & Rebuild Data Utility Tool?
With the help of the QuickBooks Verify and Rebuild Data Utility tool, you can resolve numerous issues. Therefore, to update you regarding all of them, we have described some of them below.
- You can utilize the QuickBooks Verify and Rebuild Data Utility to find the missing names or transactions within the list data.
- Fatal errors that the users might encounter while using QuickBooks Desktop.
- Discrepancies are the main reason that generates a negative balance to reflect in the invoice as well as bills report.
- If you won’t get all the accounts within the balance sheet of your company data.
- Already deposited payments emerge as payments to be deposited.
Read More- QuickBooks Error Skipped 111
Pre-Requisites Before You Run Verify & Rebuild Data Utility in QuickBooks
Before initiating with the QuickBooks rebuilding data file not responding, it is essential you must consider the following things in mind.
- Ensure that you are running the upgraded version of QuickBooks Desktop.
- Shut down all the applications running on the Windows.
How to Utilize Verify and Rebuild Data Utility Tool in QuickBooks Desktop?
Below, we have described the proper instructions to use the verify and rebuild data utility tool in QBDT to repair the damaged data file.
Steps to Verify Your Company Data
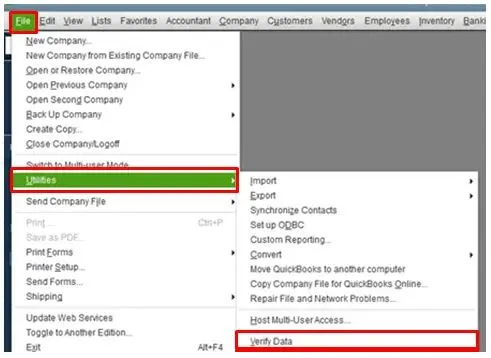
- Primarily, hit the Windows key from your keyboard and then tap on the Close All option.
- After this, go to the File menu followed by Utilities.
- Next, you must choose the Verify Data option when you see:
- QuickBooks detected no problem with your data – it reflects that your data is clean and you won’t have to perform any other step.
- An Error Message:- You must look for the error message on the QuickBooks Desktop support site to know how to resolve the error.
- Your Data has Lost Integrity:- You might find the data damage in your file. Thus, you are required to rebuild the data to resolve the issue.
Note: For the Assisted Payroll users, it has been advised that they must consult with the Assisted Payroll before trying to rebuild your data.
Read Here- Delete & Free Up Space in QuickBooks Desktop
Steps to Rebuild Your Company File Data
Go through the instructions given below to know more details on how to rebuild company data.
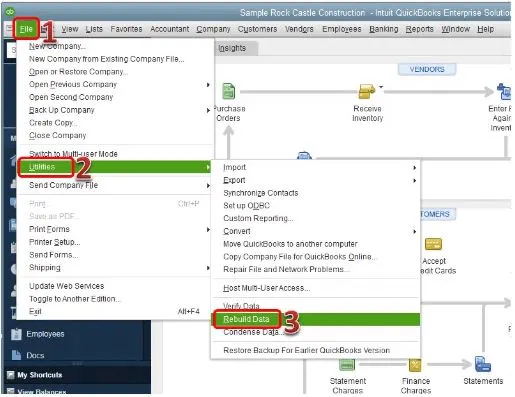
- In the initial stage, move to the File menu > Utilities > Rebuild Data option.
- As a result, QuickBooks will prompt you to generate a backup to the company data. Later on, hit the OK button. A backup is mandatory before you can rebuild.
- Now, you must pick the appropriate location where you wish to store the backup and hit the OK button. For this, you won’t have to replace the backup file. All you need to do is to insert a new name in the File Name column and click the Save button to proceed further.
- opt for the OK button when you see the message on your screen stating Rebuild was completed.
- Thereafter, again move to the File > Utilities > Verify Data to verify for the additional damage.
- For instance, if the users finds out more damage, in that case you have to fix it manually. After this, look for the errors in the qbwin.log file on the QuickBooks Desktop support site for how to rectify it.
- If you are unable to find the error, you can restore the recent backup. After this, move to the File menu and then choose Open or Restore Company.
Note: You won’t have to replace your present data file. All you have to do is to add all the relevant details into your data file once again since the backup was created.
Learn More- QuickBooks Missing Name List Problem
What should Be Done to Run Verify And Rebuild Data in QuickBooks Desktop For Mac?
Below, we have described some simple steps to verify and rebuild data in QuickBooks Desktop For Mac. Check them out.
Steps to Verify Your Company File Data
Before you move further by rebuilding your data file, you must utilize the verify tool in QuickBooks Desktop for Mac. using which you can easily scan your data file for errors or data damage.
- In the initial stage, move to the File menu and opt for the Utilities option.
- Soon after this, choose the Verify Data and hit the OK button to shut down all the windows. If you get the error message on your screen reflecting “Your data has failed the integrity check”, you are supposed to rebuild your file. If you don’t find any problems with your data, it reflects that everything is good.
Steps to Rebuild Your Company File Data
After doing the verification of your data, you can rebuild your data file to resolve any errors or data damages that are found.
- Firstly, move to the File menu followed by the Utilities option.
- After this, choose the Rebuild Data option and hit the OK button to shut down all the Windows.
- As a result, QuickBooks will prompt you to generate a backup before trying to rebuild your data file and click OK. If you don’t wish to generate the backup, tap on Cancel to proceed further with the process of rebuilding your data file.
- In case you haven’t scheduled any backup preferences, QuickBooks will prompt you to update the same. Then, hit the Backup Preferences option and make the necessary changes as per your requirement. Later on. Tap on the OK button.
- Once the backup is over, choose the Show in Finder to look for the backup. Otherwise, choose OK if you have completed.
- After the successful completion of the rebuild process, hit the OK button.
To ensure that your file doesn’t contain any errors or data damage, review your company file once again. If you still found any damages in your file, you are supposed to rebuild once again.
What are the Reasons That Trigger QuickBooks Rebuild Errors?
Most often, the users might get stuck with the QuickBooks Rebuild error due to the following causes. Have a look at the root causes listed below to get a proper idea about them in detail.
- There might be the possibility that you have inserted an expired date without the credit card number.
- In other cases, it may evoke when transactions aren’t linked accurately.
- Sometimes, the QuickBooks Rebuild error might arise when the total targets crosses 350,000 in QuickBooks.
- The QuickBooks Desktop application shut down abruptly without giving any prior notification.
- At times, the users might see this error when the encrypted data stored in a customer is deactivated.
QuickBooks Rebuild Data Error? Try These 6 Proven Fixes
Following are the resolution methods to eliminate Rebuild data in QuickBooks.
1. Try Running the Rebuild Data Utility Again
Sometimes, running the Rebuild Data Utility again might rectify the temporary glitch and help you run the utility smoothly on your device.
- Initiate the process by tapping the File menu and Utilities option.
- Afterwards, navigate to the Rebuild Data and hit the OK button to shut down the previously opened windows.
- Consequently, you will see that QuickBooks will ask you to initiate the backup process before rebuilding. Then, go with the OK option to begin the backup process. However, hit the Cancel button if you don’t want to schedule the backup.
- If you haven’t changed the backup preferences, QuickBooks will ask you to set them up. For that, hit the Backup Preferences option and make the mandatory adjustments by hitting the OK button.
- Once you are done with the backup part, select the “Show in Finder” option to search for the data file. Otherwise, click the OK button to end the step.
- Finally, to assure that your file is free from errors or data damage, verify your data file once again. If you see that the errors still exist, then you must try to resume the file-rebuilding process.
2. Condense Data To Minimize the Total Targets in QuickBooks
For instance, if you notice that the total targets in QuickBooks are more than 350,000 for QuickBooks Plus or 750,000 for QuickBooks Online Advanced then you might face an issue while rebuilding data. So, looking into the number of targets in QuickBooks is essential to rectify the QuickBooks Rebuild error.
- Open the QuickBooks application and hit the F2 key to bring up the Product Information window on your screen.
- After this, if you notice that the total targets go beyond the limit, move further to condense the data.
- Thereon, navigate to the File menu > Utilities > Condense Data option.
- When you see the following notification on the screen: “Budget data may be moved during clean up. Do you want to continue anyway?” hit the Yes button.
- Furthermore, pick the Transactions before a specific date option and then choose the appropriate date from the Date field.
- Once you have opted for the method to summarize the transactions, hit the Next button.
- End the process by hitting the Begin Condense to condense the data file to minimize the number of targets.
If you spot that condensing the data won’t work out in dealing with the QuickBooks rebuild error, try to construct a portable data file.
- To start the process, hit the File menu and go with the Create Copy option.
- Afterwards, navigate to the Portable Company File option and click Next.
- You are supposed to pick the appropriate location on the local storage to save the portable data file. Later on, when you see that the QuickBooks prompts you to shut down the data file, hit the OK button.
3. Try Re-checking the Rebuild Report
- Start the process by opening the QuickBooks Desktop application and then your data file on your device.
- After this, hit the F2 key from the keyboard to launch the Product Information window.
- In the next step, go with the Review last Verify/Rebuild option and go through the Verify/Rebuild process. Later on, hit the Expand All option to review that QuickBooks has identified any errors thoroughly.
- However, if you spot any QuickBooks Rebuild error in your final report, try using any other resolution method.
Learn Here- QuickBooks Company File Needs to Be Updated
4. Install the Latest QuickBooks Desktop Updates Available
To install the newly launched version of the QuickBooks Desktop, you must carry on with the following steps.
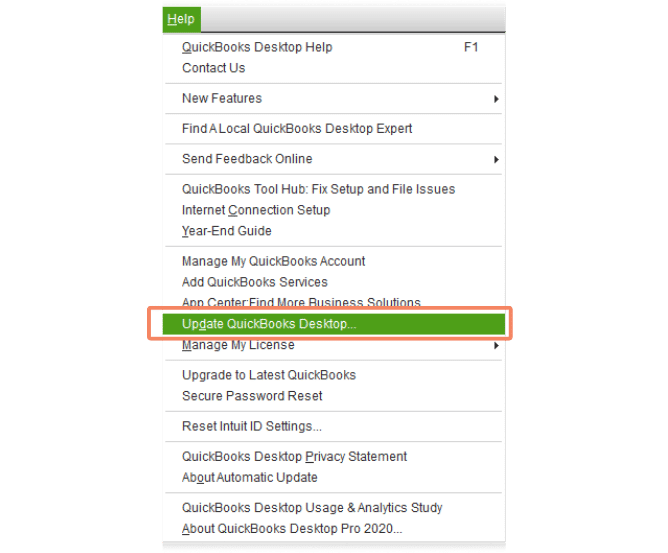
- Start the process by hitting the QuickBooks Help menu and then using the Update QuickBooks Desktop option.
- After this, choose the Update Now option and then proceed further.
- Thereon, hit the Get Updates option and wait till the updates get installed on your device.
- End the entire procedure by relaunching your QuickBooks application and checking if the issue is resolved.
5. Rectify Errors Via Transaction Log Numbers (For Mac)
- Begin the process by holding the Command key from the keyboard and then hit the Go button.
- After this, choose the Library option, double-tap on the Logs folder, and tap the QuickBooks.log file twice.
- Thereon, you will see that adding a QuickBooks.log file will cause QuickBooks to represent the record number seen as RefNum and RecNum. With this, you will get the details representing the internal record numbers accessed by QuickBooks Desktop users.
- In case you see that the error reflects the message stating, “Verify Employee YTD Bal: ytd out of balance. Name= Han T. Miller. Ref = 40”. Also, check that the record number will be 40 so that you can rebuild data in QuickBooks Desktop.
6. Thoroughly Review Your Company File
With the help of the verification process, you can determine whether there are any existing data integrity issues.
- Begin the process by hitting the File menu > Utilities option.
- Afterwards, navigate to the Verify Data and hit the OK button to shut down all Windows.
- However, it will become difficult for the users to rebuild the data when they are confronted with “Your data has failed the integrity check.”
- If you find no issues while rebuilding, it states that your issue is resolved.
Conclusion
We hope that you can now easily fix the damage or corruption in the data file by running the verify and rebuild data in QuickBooks Desktop. If you are facing any issues while running this tool, then communicate with our bizbooksadvice professionals anytime for quick resolution at Call Us : +1-866-408-0444 They will assist you with the proper resolution methods to overcome the issue right away.
