Try These Quick Fixes to Rectify QuickBooks Error Code 6069

- By Jonathan Browns
- Dec 30, 2025
- Accounting
- 7 min read
QuickBooks Error Code 6069 is the most common company file error, which usually appears while opening, creating, or modifying the file. This error mainly occurs due to the corruption or damage of the data file. Unfortunately, this error reflects the message stating “QuickBooks has encountered a problem and needs to close. We are sorry for the inconvenience.” If you, too, are experiencing the issue, then read this entire post to learn more about the causes and solutions to resolve QuickBooks Error Code 6069.
Reasons Why Users Come Across QuickBooks Error 6069
The following are the root causes that might result in QuickBooks Error 6069.
- You might experience this error due to the presence of damage in the Windows Registry.
- Bad sectors present in the Windows hard drive might prevent users from opening the QuickBooks company file.
- Insufficient disk space may also create issues while opening the data files.
- An incomplete installation of the QuickBooks Desktop may trigger QuickBooks Error 6069.
Discussing How to Rectify Error Code 6069 in QuickBooks Quickly
Once you understand the causes behind Error Code 6069 in QuickBooks, you can easily rectify the issue.
Solution 1: Update QuickBooks Desktop to the Latest Version
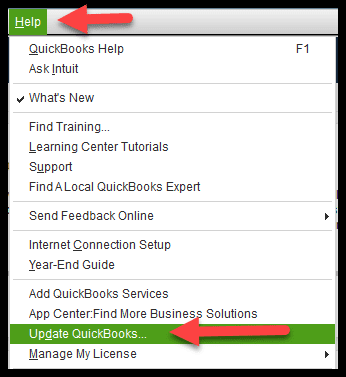
Operating an older version of the QuickBooks Desktop might result in QB Error 6069. Therefore, to resolve the issue, you must update QuickBooks to the new version.
Solution 2: Start Accessing the Intuit Sync Manager
To address the QuickBooks Desktop Error 6069, you must run the Intuit Sync Manager by following the above steps.
- In the beginning, sign in to your computer with the proper administrative credentials.
- After this, launch the Intuit Sync Manager and browse to the Options tab.
- Now, browse to the Show Details tab and pick the data file that is creating the issue. Then, right-click on the company file.
- Now, pick the Company Info tab by clicking the drop-down menu list.
- In the next step, start verifying the path listed as the location is accurate.
- Once you are all set, transfer your company folder again and replace the copy or backup file with the original company file that was moved.
Solution 3: Examine the Extension of QuickBooks Data File
If you notice that the extension of your QuickBooks company file is inaccurate, then check it by performing the steps below.
- Primarily, launch the Windows File Manager and browse to the QuickBooks installation directory.
- You might obtain the company file in the following location, i.e, “C: \ Users \ Public \Documents \ Intuit \ QuickBooks \ Company files folder.”
- Now, you must ensure that the data file contains the .qbw file extension.
- If you see that the file has a distinct file extension, right-click on the file name and choose Rename.
- All you require is to replace the existing extension with .qbw and then save the data file.
- At last, try launching the QuickBooks data file and verify if you are still encountering the error.
Solution 4: Modify the Name of the.Nd and .TLG files
.ND and .TLG are the important configuration files that help to run the data files smoothly. In case the data file gets corrupted or damaged, then you have to rename the file.
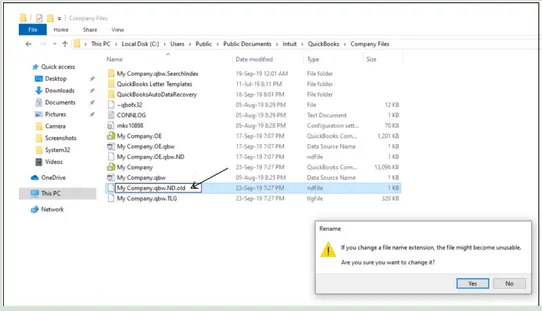
- Initially, launch the folder that contains your data file and have the same extension.ND and TLG files.
- After this, start looking for the.TLG and ND files, and right-click on them one by one. You will see that the data file name will look like these: companyfilename.qbw.tlg and companyfilename.qbw.nd.
- Thereon, right-click on the.ND and TLG files one by one and choose the Rename tab.
- In the next stage, include.OLD at the end of the file names and then save it.
- Now, you must access QuickBooks once again and see if you are able to access the data file.
Solution 5: Start Running the QuickBooks Database Server Manager
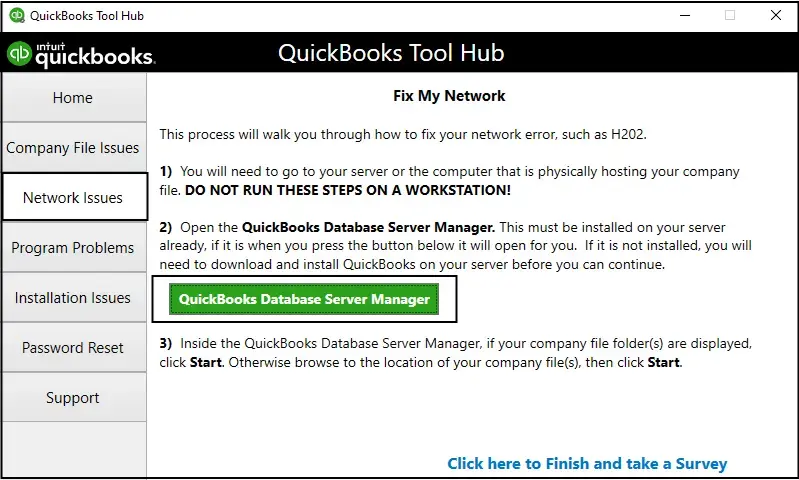
The following are the stepwise instructions you must implement to run the QuickBooks Database Server Manager.
- Commence the procedure by clicking the Start menu, selecting Database, and then hitting the Enter key.
- After this, from the search results, choose the QuickBooks Database Server Manager. Alternatively, you may launch the All Programs option.
- Thereon, move to the Scan Folders tab and hit the Add Folder tab if no folders are present.
- Now, you must highlight those folders that contain the data files and tap on the Scan option.
- Next, from the middle of the screen, confirm the data file.
- Complete the process by trying to access the data file and log in to verify if the data file is free from errors.
Solution 6: Remove the Temporary Files
- In the beginning, insert “command” into the search box of the Start menu.
- After this, hit the Ctrl + Shift keys together to bring up the Command prompt window.
- Thereon, a dialog box will appear wherein you must hit the Yes tab.
- Now, into the search box, insert “cleanmgr” and press the Enter key.
- As a result, the Disk Cleanup process will begin scanning temporary files.
- Furthermore, hit the Temporary Files option and then move further.
- Once the process is over, you will notice that the temporary files and folders have been found.
- At last, hit OK to remove the temp files and folders.
Solution 7: Allow QuickBooks Via AVG Firewall
If the above solutions won’t help you resolve the QuickBooks Company File Error 6069, then allow QuickBooks through the AVG firewall. For that, you must do as per the instructions outlined below.
- Initially, run the AVG antivirus on your system, and then move to the Firewall.
- After this, pick the Applications from the Settings.
- You must choose the AVG firewall program option from the search results and look for the QuickBooks option.
- If you notice that the status of the application is set as Block, then edit it to Allow.
- On the other side, if you spot that QuickBooks isn’t mentioned within the program list, hit the Add button.
- Now, you must search for the QB program file in the QB installation directory.
- Following this, pick the Create and then the OK tab to proceed further.
- Once you are done making the necessary changes, hit the Yes tab.
- At last, you must try running the QuickBooks application again and then see if you are still encountering the error.
Solution 8: Cleaning up the Temp Files
Sometimes, cleaning up the temp files might create some storage space, which makes it possible to run the company file seamlessly. Thus, it will also help in rectifying QuickBooks Desktop Error 6069.
- Begin the process by accessing the Start menu and then hit the Ctrl + Shift keys altogether.
- Afterwards, you will see that a permission box will open up wherein you must hit the Yes tab.
- Thereon, a black box will emerge, wherein insert “cleanmgr” and then press the Enter key.
- As a result, you will encounter that the Disk Cleanup will begin scanning.
- Now, choose the Temporary Files option and hit OK to clean up the temp files.
Solution 9: Perform the Clean Install in Selective Startup Mode
By switching to the Selective Startup mode in QuickBooks, you can avoid the third-party interruptions. For that, you must perform the instructions outlined below.
- Start the process by entering msconfig in the Run window. You can press the Windows logo key + R keys to access the Run window.
- Afterwards, you will see a dialog box emerge. Herein, you must undertake the activities with an admin user.
- Now, move to the selective startup mode in the General tab and hit the Load System Services tab.
- Thereon, look beneath the Services section and verify that the checkbox of Hide all Microsoft Services is marked.
- Next, pick the Windows Installer from the options available and leave the checkbox of Hide All Microsoft Services unmarked.
- Now, save these settings and then relaunch the system from the configuration window.
Furthermore, back up your files before uninstalling QB. Later on, access the license details and other details via the Product Information window. Now, you can open the system in Selective Startup Mode. You can initiate the clean installation process by performing the steps given below.
- First of all, access the Control Panel window and then browse to the Programs and Features section. Herein, you will get the Uninstall a Program tab.
- Afterwards, you will obtain a window where you will obtain a complete list of programs which is installed on your computer.
- Herein, start searching for the QuickBooks application from the options available, and then uninstall it.
- Later, carry on with the instructions given on the screen to wind up the process.
- Once you are all set, remove all the spaces, including the junk spaces.
Begin running the clean install tool, and then install the QB Desktop again.
- Initially, locate the latest version of the QuickBooks Desktop and then download it on your PC.
- Afterwards, extract the installation files and apply the steps given on the computer screen.
- Thereon, give your consent by agreeing to the terms and conditions for the smooth setup of QuickBooks.
- At last, you are all set to operate the QuickBooks application and access the data file easily.
Solution 10: Start Running Verify & Rebuild Data Utility
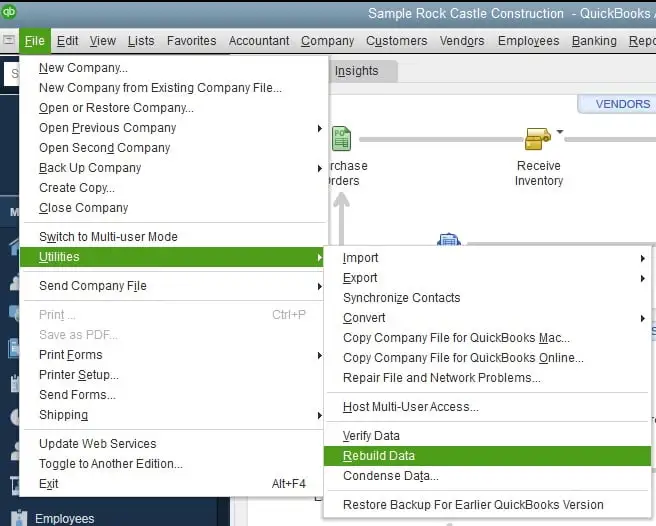
You can also troubleshoot the issues going on with your company file by running the Verify and rebuild data utility. This tool will scan for the issues present in the company file and then run the Rebuild Data Utility to repair the damage within the file. As a result, it will help in resolving the QuickBooks Error 6069.
Conclusion
Now, by applying the above solutions, you can easily rectify QuickBooks Error Code 6069. Thus, it will let you access the company file without any further hindrance. Furthermore, if you are still encountering any issues, then get in touch with our QB professionals for quick assistance.
Frequently Asked Questions (FAQ’s)
1. What is QuickBooks Error Code 6069?
QuickBooks Error Code 6069 is a runtime error that usually occurs when the QuickBooks company file is damaged or when a required system component is missing or corrupted. It often appears while opening QuickBooks or accessing a company file.
2. What causes QuickBooks Error 6069?
Common causes include corrupted QuickBooks installation files, damaged company files, malware or virus infections, incomplete QuickBooks installation, or Windows system file corruption.
3. What are the common symptoms of Error Code 6069?
Users may experience QuickBooks crashing, freezing, slow system performance, error messages popping up repeatedly, or difficulty opening the company file.
4. How can I fix QuickBooks Error Code 6069?
You can resolve this error by running QuickBooks File Doctor, repairing the QuickBooks installation, updating QuickBooks to the latest version, scanning the system for malware, or performing a clean reinstall of QuickBooks.
5. Can Error 6069 cause data loss?
The error itself does not directly delete data, but if the company file is corrupted and not repaired properly, there is a risk of data loss. It is strongly recommended to back up your company file before troubleshooting.
About The Author

Jonathan Browns
Jonathan Brown is a trained QuickBooks professional with 10 years of experience in the accounting sector. Moreover, he is passionate about helping businesses reduce the stress of managing accounts. Also, he is proficient in assisting entrepreneurs and small business owners to use QuickBooks and enhance their accounting experience.

QuickBooks Desktop, Payroll or Enterprise
Advanced Support for QuickBooks Desktop, Payroll & Enterprise Solutions
From payroll tax setup, direct deposit issues to Enterprise performance tuning and Desktop upgrades - our QuickBooks experts provide accurate and stepwise assistance. Get dependable support designed to minimize downtime and maximize efficiency.
Recent Posts
-
Fix QuickBooks Error PS032 | QB Payroll Update Error
-
How to Fix QuickBooks Error 12031 (Network Timeout Issue)
-
QuickBooks Error PS036: Causes, Fixes, and Prevention
-
Converting from QuickBooks Desktop to QuickBooks Online: A Complete Guide
-
Tried Everything? Here’s How to Fix QuickBooks Error Code 80070057