Why & How to Run Verify and Rebuild Data in QuickBooks Desktop?

- By Jonathan Browns
- Oct 28, 2025
- Bookkeeping
- 7 min read
Are you facing issues while accessing your company file or detecting data damage? Here comes a time when you need to verify and Rebuild Data in QuickBooks Desktop. This is a great utility that scans for data damage and then runs a repair to address that damage. As a result, it might help you in carrying out your daily business operations. In this post, we have described all the stepwise instructions to run and use the verify and rebuild data utility in QuickBooks.
Which Errors Can You Fix With the Verify and Rebuild Data Utility in QuickBooks?
By running the Verify and Rebuild Data Utility in QuickBooks, you can overcome data corruption, company file access issues, and fatal errors. Below, we have discussed all the errors that you can fix with this utility.
1. Company File Issues-
Problems faced while opening the company file, crashing issues, and errors, including QuickBooks Error 6189 and 6073.
2. Data Integrity Issues-
Missing transactions, incorrect report balances, and negative inventory.
3. Fatal Errors-
Fatal errors in the application and unexpected crashing of the QuickBooks application.
4. Update & Performance Problems-
Problems faced while trying to get the QuickBooks payroll updates and general performance issues.
How to Use Verify and Rebuild Data in QuickBooks Desktop?
You can run the Verify and Rebuild Data utility in both QuickBooks Desktop for Windows and Mac. So, let’s explore how to run this tool and repair the data damage.
For Windows
Step 1: Verify Your Company File Data
- Press the Windows logo key to access the Start menu and click on the Close All option.
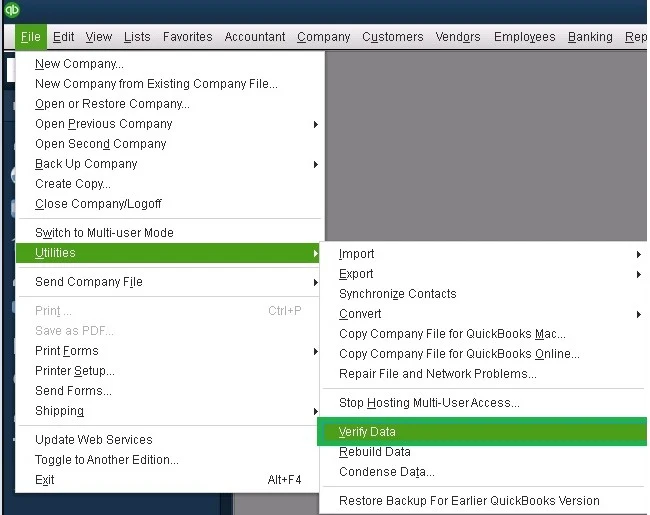
- Now, choose the File menu and hit the Utilities option.
- Next, you must choose the Verify Data option when you see:
- QuickBooks detected no problem with your data – it reflects that your data is clean and you won’t have to perform any other step.
- An Error Message – You must look for the error message on the QuickBooks Desktop support site to know how to resolve the error.
- Your Data has Lost Integrity – You might find the data damage in your file. Thus, you are required to rebuild the data to resolve the issue.
Note: For the Assisted Payroll users, it has been advised that they must consult with the Assisted Payroll before trying to rebuild your data.
Step 2: Rebuild Your Data Damage In Your Company File
- Choose the File menu from the top, click Utilities, and then the Rebuild Data option.
- Next, QuickBooks will prompt you to generate a backup of the company data. Herein, tap on the OK button. You mainly require the before you can rebuild.
- Pick an appropriate location to save the backup copy of your data file and click the OK button. Herein, make sure not to replace it with any other backup file. Then, mention a new name in the File Name column and click the Save button.
- Now, hit the OK tab after receiving the message Rebuild was completed.
- Once again, move to the file> Utilities > Verify Data to verify for additional damage.
- For instance, if the users find out more damage, you need to fix it manually. After this, look for the errors in the qbwin.log file on the QuickBooks Desktop support site for how to rectify them.
- If the error can’t be detected, you can restore the recent backup. After this, move to the File menu and then choose Open or Restore
- Company.
For Mac
Step 1: Verify Your Company File Data
Before rebuilding the company file, it is essential to run the verify tool in QuickBooks Desktop for Mac. By this, it will scan your data file for errors or data damage.
- Choose the File menu from the top and click the Utilities option.
- Now, hit the Verify Data and hit the OK button to exit from all the windows. Then, if you receive the error message stating “Your data has failed the integrity check”, you have to rebuild your file. If you don’t find any problems with your data, you are all good.
Step 2: Rebuild Your Damaged Company File
After scanning for the damaged company file data, run the rebuild data utility. For that, you must carry on with the steps instructed below.
- Choose the File menu and hit the Utilities tab.
- After this, tap on the Rebuild Data tab and browse to the OK tab to exit all windows.
- QuickBooks will then prompt you to take a backup before rebuilding the data file, and click OK. If you don’t wish to generate the backup, browse to the Cancel tab to resume rebuilding your data file.
- If you haven’t fixed any backup preferences, QuickBooks will prompt you to update them. Then, hit the Backup Preferences and do the changes as required, and click OK.
- Once the backup is over, pick the Show in Finder to search for the backup. Else, hit OK once you are all sorted.
- Finally, when you are done rebuilding the company file, tap on OK.
To ensure that your file doesn’t contain any errors or data damage, review your company file once again. If you still find any damage in your file, you are supposed to rebuild it.
Taking Everything Into Consideration
We hope that you may find this post informative and help you repair the data damage with Verify and Rebuild Data in QuickBooks Desktop. Thus, it will let you resume with your ongoing work without any hassle. Furthermore, if you still find any data damage in the company file, then feel free to connect with our BizBooksAdvice professionals for help.
Frequently Asked Questions (FAQ’s):-
Question 1: What Does Rebuild Data do in QuickBooks?
Ans. The QuickBooks Rebuild data is an inbuilt feature available in QuickBooks Desktop used to address the data integrity issues by reorganizing the data in the company file.
Question 2: How long does it take to rebuild a QuickBooks data file?
Ans. Once the backup process is complete, the rebuild process starts immediately. The small company file may take a few minutes to repair the data. Whereas the large company file or the file that is badly damaged may take a lot of time.
Question 3: Can you explain the difference between data verification and data rebuilding in QuickBooks?
Ans. The Verify Data Utility in QuickBooks mainly looks at whether your company file has any integrity issues or spots any issues with the file. In contrast, the Rebuild Data Utility is used to fix the damage in the data file. Moreover, it is used to repair the data integrity issues detected by Verify Data Utility.
Question 4: Can a third-party application interrupt the rebuild data utility process?
Ans. Yes, sometimes third-party applications like antivirus software or firewalls might interrupt during the data-rebuilding process. So, switching off the applications or adding QuickBooks as an exception might help to deal with the issues.
Question 5: Are there any precautions I should take before verifying and rebuilding data?
Ans. Before you run the verify and rebuild data utility in QuickBooks, you must ensure that you have generated a backup of the data file. Doing so will help you keep your data secure from damage or loss.
Related Posts-
Create QuickBooks Portable Company File: Move QB Data Easily
QuickBooks Running Slow? Here’s How to Improve Its Performance
QuickBooks Has Stopped Working? Fix It Now
Latest Facts About QuickBooks Desktop 2024 You Must Know
About The Author

Jonathan Browns
Jonathan Brown is a trained QuickBooks professional with 10 years of experience in the accounting sector. Moreover, he is passionate about helping businesses reduce the stress of managing accounts. Also, he is proficient in assisting entrepreneurs and small business owners to use QuickBooks and enhance their accounting experience.

QuickBooks Desktop, Payroll or Enterprise
Advanced Support for QuickBooks Desktop, Payroll & Enterprise Solutions
From payroll tax setup, direct deposit issues to Enterprise performance tuning and Desktop upgrades - our QuickBooks experts provide accurate and stepwise assistance. Get dependable support designed to minimize downtime and maximize efficiency.
Recent Posts
-
QuickBooks Error 15103: Understanding Causes & How to Fix It
-
QuickBooks Not Connecting to Server: A Troubleshooting Guide
-
QuickBooks Online Advanced Login, Pricing & Feature Comparison Guide
-
QuickBooks Bookkeeping: The Practical Way to Keep Your Books in Order
-
QuickBooks Merchant Services: Everything You Need to Know Before You Sign Up