QuickBooks Journal Entry: How to Create, Delete, or Manage It?

- By Jonathan Browns
- May 16, 2026
- Accounting
- 7 min read
Journal entries is crucial part of accounting that help businesses record transactions, monitor debits and credits. Also, it ensures to keep your financial statements accurate to make an informed business decision. Now, the businesses can also create, manage, and print their QuickBooks Journal Entry in both the Desktop and Online versions.
This guide provides step-by-step instructions to make a general journal entry in QuickBooks, ensuring your accounts stay up-to-date and accurate
What is a Journal Entry in QuickBooks?
A journal entry in QuickBooks is a manual process to record financial transactions by debiting and crediting specific amounts. Moreover, it also ensures that the debit balance is equal to the credit balance and is commonly used for:
- making adjustments,
- Correcting errors
- Recording depreciations
- Transferring funds between accounts.
Above all, the general journal entries in QuickBooks help maintain accurate financial reporting and up-to-date business records.
How to Create a Journal Entry In QuickBooks Online With Easy Steps?
Journal entries record a transaction without accessing a standard form, such as an invoice or bill. Make sure that the total credit balance of the journal entry is equal to the total debit balance. Moreover, you can access the General journal entry for monitoring income or expenses, or for transferring money from another account into an income or expense account.
Important Tip: Before you generate a journal entry, you must have basic knowledge of debits and credits in accounting. In case you are not sure about it, then have a conversation with your accountant to prevent certain accounting errors.
Steps to Perform For Creating a Journal Entry
Herein, we have described how to make a journal entry in QuickBooks Online. Let’s check them out.
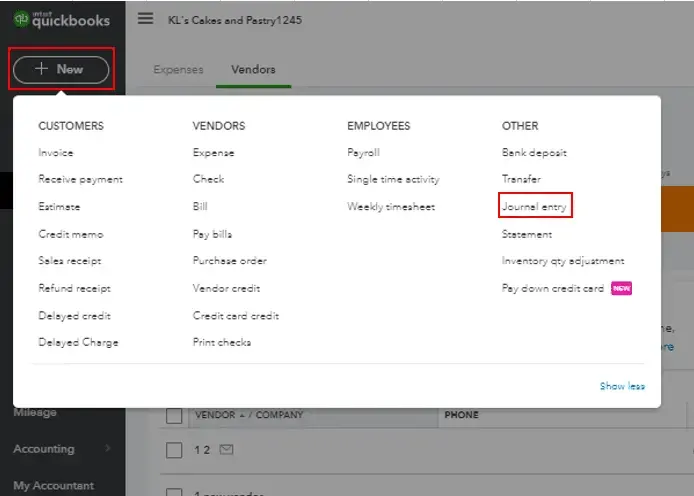
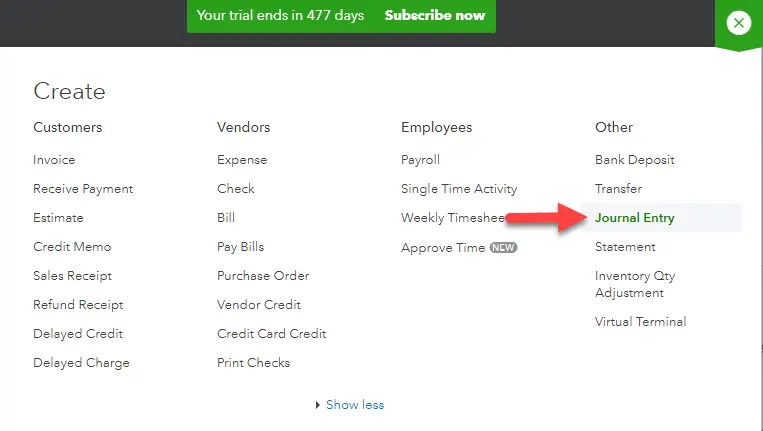
- Initially, hit the + New or + Create option and choose the Journal Entry.
- From the first line, pick an account from the Accounts field and mention the amount either in the Debits or the Credits column.
- Now, on the next line, opt for the other account in which you are moving the money.
- You must add the same amount within the opposite column to balance the debits and credits.
- Note: Your system will mention the same amount in the opposite column on the other line.
- Repeat the same steps as required and verify that you balance the debits and credits between the accounts.
- Next, include a description in the Memo section to describe the reason behind the journal entry.
- Complete the process by clicking the Save and New or Save and Close option.
Result
Once you save the journal entry, your transaction will get recorded in the accounts you choose. Moreover, you can also check the entry in the account history or run a Journal report to verify all the journal entries.
How to Delete a Journal Entry in QuickBooks Online?
You need to delete a journal entry in QuickBooks Online if you have created the entry accidentally. Before permanently deleting the journal entry, you must be quite confident about it, as it may unbalance your accounts. Furthermore, read the steps given below to delete a journal entry.
- Browse to the Settings menu and tap on the Charts of Accounts option.
- After this, search for the account for which you have generated the journal entry and click the Account History option.
- Start searching for the journal entry from the account register. Herein, you will see that the word “Journal” must reflect in the Ref No or Type column.
- Next, pick the journal entry to expand its view and click the Delete option.
- Finally, hit the Yes tab to confirm that you wish to delete it permanently.
How to Reverse a Journal Entry in QuickBooks Online?
If you have to assign a transaction between two accounting periods or fix a debit or credit error, you must use the following steps. As a result, it will reverse the debits and credits. Moreover, it won’t delete the original journal entry.
- Primarily, hit the Settings menu and click the Chart of Accounts option.
- Look for the account for which you wish to create the journal entry and tap on the Account History option.
- Start searching for the journal entry from the account register. Check that the word “Journal” must be present in the Ref No or Type Column.
- Now, pick the journal entry to expand the view and hit the Expand tab.
- At last, click the Save and then the Reverse option.
Once you reverse a journal entry, QuickBooks will prepare a new journal entry for balancing it. It is basically a record of the changes that you have made, and it contains a bit of different information:
- In the new journal entry, it will store the original no and include the letter R. It means that your transactions are reconciled.
- Also, the new journal entry is dated as the first day of the month following the original journal entry date.
- The new journal entry stores all the same details, including Account, Name, and Description, as its original journal entry.
How to Import Journal Entries in QuickBooks Online With Easy Steps?
You can use the QuickBooks Import feature to import the journal entry into QuickBooks Online.
First Step: Get Ready With Your Spreadsheet
Before importing your journal entries, verify that everything is accurate in the spreadsheet.
- Be prepared that your file must contain the following details:
- Journal No
- Journal Date
- Debits
- Credits
- Journal/Description
- Account Name
- After this, if your spreadsheets have new accounts, verify that they are included in your charts of accounts before importing.
- In case you have enabled, Warn if duplicate journal number is used on the Journal Entry form, it may prevent you from uploading some entries with existing numbers. So, for that, you need to unmark that preference on the journal entry before you import.
Second Step: Import Your Journal Entries
Important Tip: You must enable the class tracking and location tracking features for importing journal entries with classes and locations.
- Primarily, browse to the Settings icon and hit the Import Data option.
- After this, go to the Journal Entries, and when you are on the Download page, opt for the Browse option.
- Now, start looking for your CSV file and click on it. Then, choose the Open and tap on the Next option.
- Begin mapping your information. Herein, your field reflects the header on your spreadsheet. However, from every small arrow icon, pick any one that tallies with a field present in QBO.
- Once again, hit the Next tab, and if the error exists, edit the file.
- Next, tap on the Start Scan option and click the Done tab.
When the process is complete, access the search function to verify and edit the journal entries.
How to create a journal entry in QuickBooks Desktop for Windows?
Journal entries are the last resort for inserting the transactions. However, go through the following steps to add, edit, reverse, or delete a journal entry in QuickBooks Desktop for Windows.
Instructions to Add a Journal Entry
In this section, we have described how to make a journal entry in QuickBooks Desktop.
- To create a journal entry, move to the Company Menu.
- After this, hit the Make General Journal Entries option.
- Now, complete the fields to generate your journal entry. Also, verify that your debit balance is equal to your credits once you are all set.
- Finally, choose the Save or Save & Close tab.
Instructions to Edit a Journal Entry
For editing a journal entry in QuickBooks Desktop, perform these steps:
- Primarily, move to the Company menu and tap on the Make General Journal Entries.
- After this, look for the journal entry that you wish to edit:
- QuickBooks for Windows: Choose the Find option, and provide the Name, Date, Entry No, or Amount in the respective text field. Then, hit the Find option.
- QuickBooks For Mac: Locate and pick the journal entry from the list on the left side of the Make General Journal Entries window.
- Next, double-tap on the journal entry that requires updating. Once you are all set, hit the Save or Save & Close tab.
- Finally, for recording the necessary changes, tap on the Yes option.
Instructions to Reverse a Journal Entry
Herein, we have described the steps to reverse a journal entry in QuickBooks Desktop.
- Primarily, move to the Company menu and click the Make General Journal Entries option.
- Now, locate and pick the journal entry that you wish to reverse:
- QuickBooks For Windows: Tap on the Find option and mention the Name, Date, Entry No, or Amount. Then, click the Find option.
- QuickBooks For Mac: You must locate and choose the journal entry you need to reverse from the left side of the Make General Journal Entries window.
- After this, hit the Reverse option and then the Save or Save & Close option.
You will notice that the reversed journal entry will reflect “R” beside the entry number. Also, if there are any credit or debit amounts, then they will eventually be reversed. Moreover, you will also see the new entry dated as the first day of the next month, following the original transaction date.
Instructions to Delete a Journal Entry
Wondering how to delete a journal entry in QuickBooks Online? Perform the step-by-step instructions listed below:
- Firstly, browse to the Company menu and hit the Make General Journal Entries option.
- Afterwards, locate and then pick the journal entry you need to delete:
- QuickBooks For Windows: Click the Find option and provide the Name, Date, Entry No, or Amount. Later on, choose the Find option.
- QuickBooks For Mac: You must locate and pick the journal entry that you prefer to reverse from the list on the left side of the Make General Journal Entries window.
- Now, to delete the journal entry, do as follows:
- QuickBooks For Windows: You first need to double-tap on the journal entry and then tap on Delete or Void. Later on, browse to the OK tab.
- QuickBooks For Mac: Move to the Edit menu and then tap on the Delete Journal Entry option.
- Finally, choose the Save & Close option to complete the process.
How to Print a Journal Entry Report in QuickBooks Online?
In case you are accessing journal entries for recording the transactions, you can create and print a report with a single journal entry. However, you may also print multiple journal entries to customize the journal report.
Steps to Print a Single Journal Entry
- Initially, hit the Search icon and click the Go to transactions search option.
- After this, tap on the Journal Entries by clicking the drop-down arrow beside the Search option.
- Now, choose the Search option and pick the desired Journal Entry.
- You must opt for the More menu and hit the Transaction Journal tab.
- Furthermore, if your report is opened in:
- Classic View: Tap on the Print icon.
- New Enhanced Experience: Choose the Export/Print drop-down arrow and click the Print/Save as PDF.
- Note: You can alter the Report Print Settings option before printing.
- Finally, when you are all set, hit the Print option.
Steps to Print Multiple Journal Entries in One Report
- You must perform the steps in this link to accomplish the steps within the product.
- After this, pick the Journal option from the Find report by name drop-down arrow.
- Now, make the necessary customization.
- Choose the accurate date range by clicking the Report period drop-down arrow.
- Thereon, hit the Filter option.
- Opt for the Transaction Type by clicking the Filter drop-down arrow.
- Next, hit the equals option from the Options drop-down arrow.
- Choose the Journal Entry by hitting the Value drop-down arrow.
- Pick the General options to alter the header/footer details or number format if required.
- Move to the Columns and then drag and drop columns to rearrange them according to your convenience. Note: If you are a QuickBooks Online Advanced user, tap on the Reorder tab to see these options. However, you may also remove or add columns as per the requirement.
- Make sure that you unmark the Name option.
- Choose the Custom full name, Employee, or Supplier.
- Next, hit the Save As option for saving the current filters.
- Important Tip: You may also modify the journal report at any time. Use this link to finish the steps in the product and then move to the Custom Reports tab.
- Furthermore, opt for the Save As tab for saving the current filters.
- Important Tip: You may also alter the Report Print Settings from printing.
- Finally, choose the Print option for printing the journal entry in QuickBooks.
Final Thoughts
QuickBooks journal entry plays a vital role as it helps in recording financial transactions in both QuickBooks Online and Desktop versions. We hope that this guide has helped you to create, delete, make, and import the journal entry to maintain your financial statements. However, regularly checking the journal entries helps in identifying the discrepancies so that you can fix them instantly to avoid further issues.
If you are still facing any issues while managing the journal entry in QuickBooks Online or Desktop, connect with our BizBooksAdvice experts. They will help you in fixing all your complex issues quickly.
Frequently Asked Questions (FAQ’s):-
Question 1: Where are my journal entries in QuickBooks?
Ans. You can locate your journal entries in QuickBooks by browsing to the Standard tab. After this, scroll down to the “For my accountant” section and tap on the Journal option. As a result, it will launch the list of your journal entries.
Question 2: How to find past journal entries in QuickBooks Desktop?
Ans. The Reports menu acts as a primary access point for the journal entries. Move to the Company & Financial section, and you will get different report options that will reflect your journal entries.
Question 3: How to open a journal entry in QuickBooks Desktop?
Ans. To launch the journal entry in QuickBooks Desktop, carry on with the steps instructed below.
- Initially, move to the Reports menu from the top and hit the Accountant & Taxes option.
- Choose the Journal tab and alter the report by its date range. You can pick the account type to narrow down the search.
- At last, hit the Run Report tab to see all journal entries.
Question 4: How to memorize a journal entry in QuickBooks Desktop?
Ans. To memorize a journal entry in QuickBooks Desktop, do as follows:
- Generate or launch the transaction that you wish to memorize. Then, complete the transaction details and move to the Edit menu.
- Afterwards, tap on the Memorize option and then set up the details for the memorized transaction.
Question 5: What is the point of a journal entry in QuickBooks?
Ans. The main purpose of a journal entry in QuickBooks is to record every business transaction properly in the general ledger. Moreover, it is necessary to maintain the integrity of financial statements, which may hamper the business’s financial health.
About The Author

Jonathan Browns
Jonathan Brown is a trained QuickBooks professional with 10 years of experience in the accounting sector. Moreover, he is passionate about helping businesses reduce the stress of managing accounts. Also, he is proficient in assisting entrepreneurs and small business owners to use QuickBooks and enhance their accounting experience.

QuickBooks Desktop, Payroll or Enterprise
Advanced Support for QuickBooks Desktop, Payroll & Enterprise Solutions
From payroll tax setup, direct deposit issues to Enterprise performance tuning and Desktop upgrades - our QuickBooks experts provide accurate and stepwise assistance. Get dependable support designed to minimize downtime and maximize efficiency.
Recent Posts
-
Fix QuickBooks Error PS032 | QB Payroll Update Error
-
How to Fix QuickBooks Error 12031 (Network Timeout Issue)
-
QuickBooks Error PS036: Causes, Fixes, and Prevention
-
Converting from QuickBooks Desktop to QuickBooks Online: A Complete Guide
-
Tried Everything? Here’s How to Fix QuickBooks Error Code 80070057