Learn How to Create, Edit, or Delete Memorized Transactions in QuickBooks

- By Jonathan Browns
- Dec 12, 2025
- Accounting
- 7 min read
While running a business, it becomes a bit challenging to keep track of every transaction, and it may prevent you from maintaining accurate financial records. So, to overcome such challenges, you can use the feature of memorized transactions in QuickBooks, which memorizes all the financial transactions on its own. Moreover, it also auto-fills the required information for the recurring transactions, which reduces the human time and effort. Also, it reminds you when the transactions are due to avoid any further discrepancies.
Read this entire post to understand more about how to create, edit, or delete the memorized transactions in QuickBooks.
What Does You Mean By Memorized Transactions in QuickBooks?
The Memorized transactions are an in-built feature that is available in QuickBooks Desktop. You can use this feature for automating repetitive entries, including rent, subscriptions, or invoices, by generating the templates. Thus, it also reduces the errors that may occur while manually adding the transactions. You can save the details that will remain the same every time, and QuickBooks will then use that template whenever the bill is due.
How to Manually Change the Number of Memorized Transactions in QuickBooks Desktop?
For manually changing the number of memorized transactions in QuickBooks Desktop, perform the following steps.
- Access the QuickBooks Desktop application and choose the Lists menu.
- Move to the Memorized Transactions List menu and search for the group where the transactions are assigned.
- Now, double-tap on the transaction that you wish to open.
- When the transaction is open, modify the entry amount and click the Memorize button.
- Following this, head to the Replace tab to confirm the changes and prevent double-entry.
Here’s How to Create, Edit, or Delete Memorized Transactions in QuickBooks Desktop Easily
Now, you don’t have to worry about missing the transactions. QuickBooks will memorize it on your behalf and will send you a reminder whenever it’s due. Moreover, QuickBooks can also automatically enter your memorized transactions, which will save your precious time.
A. QuickBooks Desktop For Windows
Herein, you have the option to see your memorized transaction at any time. For that, browse to the Lists menu, tap on the Memorized Transaction lists option.
Create a Memorized Transaction
- Initially, provide the transaction the way you wish to see it every month. Herein, no need to click on Save. If you see the field contains the data that needs to be changed, leave it blank.
- Now, head to the Edit menu and from there choose the Memorize [Transaction Name].

- After this, provide a Name and pick how you wish QuickBooks to handle them.
- Add to my Reminders List.
- The transaction must be added to the Memorized Transactions section of your reminders list. If you go with this option, complete the “How Often” field to move further.
- Do not remind me
- The Transaction will not be added to your reminders list or added automatically. You can access it as a form of template for transactions that may repeat over time.
- Automate Transaction Entry
- The Transaction will be added when it’s due. If you pick this option, don’t forget to complete the How Often and Next Date Fields.
Important Points:
- In case you set up an automatic schedule for a transaction, check that your Next Date is set as per the day in the future.
- Once you complete the Number Remaining field, ensure that you include the Next Date transaction.
- Now, provide any other information that you want to add and hit the OK tab.
- Finally, choose the Save & Close or Save & Next, whichever is available.
Create a Memorized Transaction Group
In case you are having transactions with the same due date, you need to create a memorized transaction group. To do so, perform the stepwise instructions outlined below.
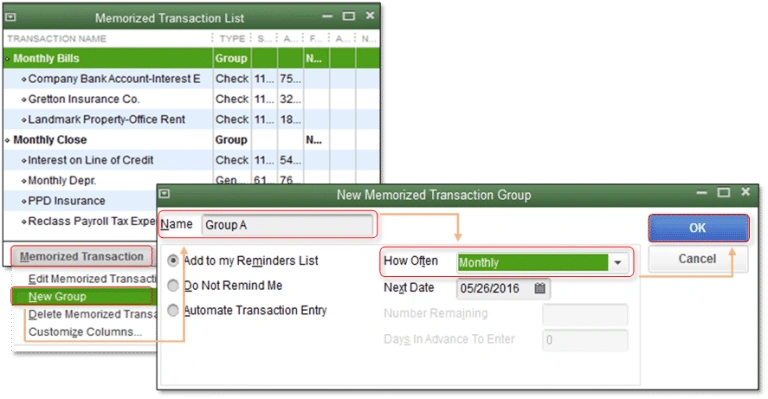
- Choose the Memorized Transaction List menu from the Lists menu.
- Next, tap on the Memorized Transaction drop-down menu list to pick the New Group option.
- Provide the details in the group name and frequency fields.
- Finally, choose the OK tab.
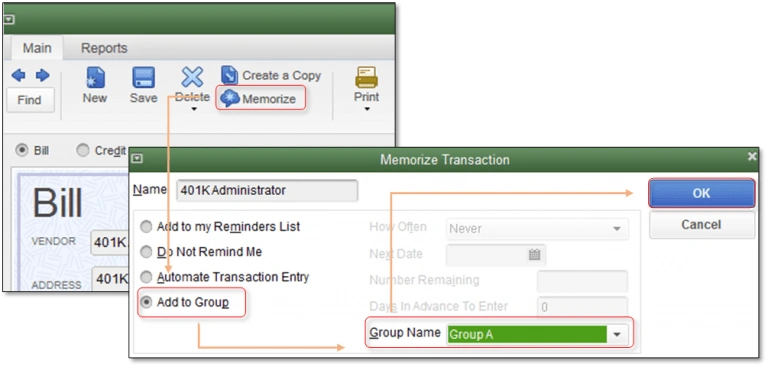
Add a Transaction to a Memorized Transaction Group
- To begin with, launch or create a transaction that you wish QuickBooks to memorize.
- After this, hit the Memorize tab and tap on Add to Group > Group Name.
- At last, tap on the OK tab.
Add a Transaction you Already Memorized to a Group
- Go to the Lists menu and pick the Memorized Transaction List option.
- After this, right-click on the memorized transaction and hit the Edit Memorized Transaction option.
- Head to the Add to Group option and click the Group Name tab.
- Conclude the process by hitting the OK tab.
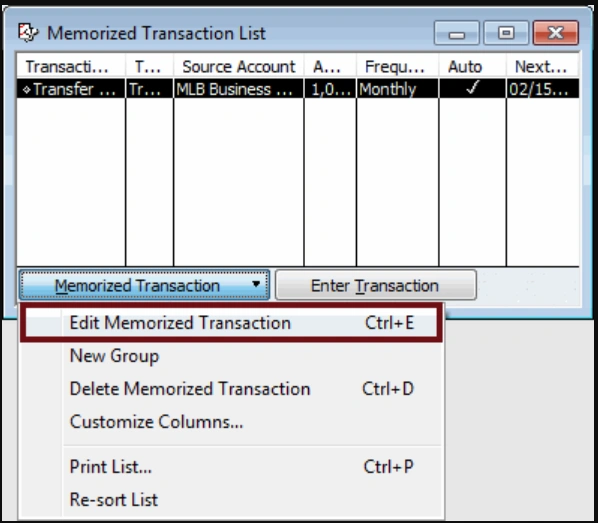
Edit a Memorized Transaction
- Under this process, go to the Lists menu > Memorized Transaction List option.
- After this, tap twice on the memorized transaction you wish to edit and make the necessary changes.
- Next, hit the Memorize option from the top and click Replace to update the transaction.
- Thereon, choose the Add option to generate a new transaction.
- Finally, tap on the Save & Close or Save & Next option.
Delete a Memorized Transaction
- Firstly, browse to the Lists menu and click the Memorized Transaction List option.
- After that, pick the transaction that you wish to delete.
- Now, choose the Memorized Transaction drop-down menu list and go with the Delete Memorized Transaction option.
- Finally, choose the OK tab to complete the process.
B. QuickBooks Desktop for Mac
Perform the stepwise instructions below to create, edit, delete, or add a transaction to a memorized transaction group.
Create a Memorized Transaction
- Primarily, create or launch the transaction you wish QuickBooks to memorize and fill in all the transaction details.
- After that, choose the Edit menu and tap on the Memorize option.
- Now, begin setting up the details for your memorized transaction.
- How Often: Herein, you need to mention how many times you wish QuickBooks to alert you about the transaction.
- Add to my Reminders List: Adding up the transaction with your Reminders List.
- Automatically Enter: QuickBooks will automatically record the transaction every time it’s due.
- Starts: Herein, mention the date on which the transaction is due next month.
- Day/Week of month: You need to schedule one specific day of the week or week of the month for the transaction.
- Ends: In the column, you need to set an end date or the Number of times you wish to record the transaction.
- Days in Advance: Insert the Number of days in advance you wish to insert the transaction.
- With Transactions in Group and Group Name: Add the transaction along with the memorized transaction group.
- Automatically Assign Transaction Number: You need to automatically mention the transaction number field. Otherwise, you can leave the column blank if disabled. This option is only available in QuickBooks 2024 for Mac R11 and later.
To use a memorized transaction:
- Start the process by choosing the Lists menu and clicking the Memorized Transactions option.
- Now, choose the memorized transaction and go to the Settings menu.
- Thereon, tap on the Use option and make the necessary changes.
- When all the changes are done, choose the Save option.
Edit or Delete a Memorized Transaction
- Initially, browse to the Lists menu and hit the Memorized Transactions option.
- After that, pick the memorized transactions and head to the Edit menu.
- Choose the Edit Memorized transaction and make the necessary changes to the transaction details. Later on, tap on the Save option.
- If you wish to remove the transaction, click the Delete Memorized Transaction option.
Create a Memorized Transaction Group
You have the option to group the memorized transactions that have the same due date.
- Move to the Lists menu and choose the Memorized Transactions option.
- After that, tap on the Create + option and provide the group name. Also, verify that you include “group” in the name.
- You need to set up the details regarding your transaction group and tap on OK.
Add a transaction to a Memorized Transaction Group
- Initially, choose the Lists menu > Memorized Transactions option.
- Thereon, you must pick the memorized transaction.
- Switch to the Edit menu and click the Edit Memorized Transaction option.
- Now, pick the With Transactions in Group option.
- Furthermore, click on the Group Name drop-down menu and choose the group to which you want to add them.
- Finally, hit the OK tab.
Can you memorize transactions in QuickBooks Online?
The memorized transactions are unavailable in the QuickBooks Online version and are only available in QuickBooks Desktop. However, if you are using the QuickBooks Online Plus and Essentials edition, you can set the recurring transactions for the customers and vendors, like checks, bills, sales receipts, estimates, invoices, etc.
To create a recurring template, do the following:
- Initially, browse to the Gear icon and below the Lists section, choose the Recurring Transactions option.
- After that, hit the New option and pick the type of transaction you wish to create. Later on, opt for the OK tab.
- Provide a Template name and then select a type- Scheduled, unscheduled, or reminder.
- Now, mention the necessary details in the respective text fields.
- Once you are all set, hit the Save Template option.
Conclusion
By now, we hope that you can easily create, edit, or modify the Memorized transactions in QuickBooks Desktop. Using the memorized transactions, you can easily handle the recurring transactions, which help save time and reduce errors to keep financial records accurate. Furthermore, if you still need any help, then have a one-to-one consultation with our BizBooksAdvice professionals for better guidance.
Frequently Asked Questions (FAQ’s):-
Question 1: What is a memorized transaction in QuickBooks?
Ans. A memorized transaction in QuickBooks is basically a saved template for the recurring entries that include rent, salaries, or subscriptions. Also, it automates the data entry by letting you set transactions to post automatically. Moreover, they also notify you when to post those transactions.
Question 2: What type of transactions can be memorized in QuickBooks?
Ans. You can memorize the invoices, bills, checks, credit memos, estimates, purchase orders, and journal entries in QuickBooks.
Question 3: What are the three recurring transaction types in QuickBooks Online?
Ans. The three different recurring transaction types in QuickBooks Online include Scheduled, Reminder, and Unscheduled.
Question 4: How do I stop QuickBooks from entering a memorized transaction automatically?
Ans. You need to edit the transaction setting and then modify the frequency to Do Not Automate or delete the entry from a memorized transaction.
Question 5: How do memorized transactions work in QuickBooks?
Ans. QuickBooks can automatically mention your memorized transaction, which will help save your time. To check the memorized transaction, move to the Lists menu > Memorized Transaction List. Then, you can insert the transaction in the same manner you wish to show up every month.
About The Author

Jonathan Browns
Jonathan Brown is a trained QuickBooks professional with 10 years of experience in the accounting sector. Moreover, he is passionate about helping businesses reduce the stress of managing accounts. Also, he is proficient in assisting entrepreneurs and small business owners to use QuickBooks and enhance their accounting experience.

QuickBooks Desktop, Payroll or Enterprise
Advanced Support for QuickBooks Desktop, Payroll & Enterprise Solutions
From payroll tax setup, direct deposit issues to Enterprise performance tuning and Desktop upgrades - our QuickBooks experts provide accurate and stepwise assistance. Get dependable support designed to minimize downtime and maximize efficiency.
Recent Posts
-
QuickBooks Payroll Assisted: Everything You Need to Know
-
How to Contact QuickBooks Online Customer Service Team 2026
-
QuickBooks Online Login: Sign in to Access your QB account
-
QuickBooks Desktop Enterprise: Features, Pricing, and How to Install and Set Up
-
How to Copy and Paste Multiple Lines in QuickBooks Online: Step-by-Step Guide