How to Resolve QuickBooks Hosting Mode Is Off With Expert Tips?

- By Jonathan Browns
- Apr 07, 2026
- Accounting
- 7 min read
Users often complain about getting the “QuickBooks hosting mode is off” issue while trying to access their company file. This issue mainly indicates that your server computer isn’t configured to share the company file, preventing multi-user access.
In this detailed post, we will describe all the causes that trigger QuickBooks Desktop hosting mode to be off and the troubleshooting methods to fix it.
The QuickBooks Hosting Mode is off issue mainly triggers while trying to open the company file. Therefore, to fix the issue, you must turn on the hosting mode.
What are the major reasons behind the QuickBooks Hosting Mode is Off Error?
The following are the reasons why the QuickBooks Hosting mode is off, and an error occurs.
- Incorrect installation of the QuickBooks Database Server Manager.
- Improper configuration of multi-user settings on the server or workstations.
- Interference from Windows Firewall or an antivirus program is blocking communication between the server and workstations.
- Incorrect Windows file permissions.
- Network issues are preventing workstations from connecting to the server.
- This issue may arise if the server system isn’t added to the Windows host file.
Important Considerations Before You Turn on Hosting Mode in QuickBooks
Before turning on the hosting mode in QuickBooks, consider the following:
- System Configuration-
Verify that the QuickBooks Desktop installed on the server and workstations meets the minimum system requirements. If not, update the system configurations accordingly.
- Check if the Workstation is hosting the company file
On your server computer
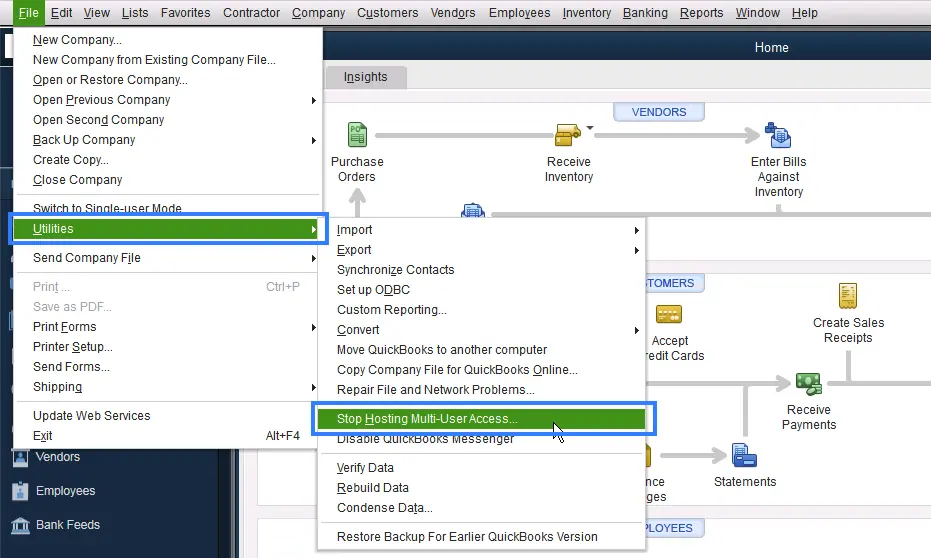
- Open the QuickBooks software and then click the File menu.
- From the drop-down list, hit the Utilities tab.
- If the Host Multi-User Access option is visible, tap on it. In case the Stop Hosting Multi-User Access option is visible, avoid choosing it.
On Your Workstation
- Open the QuickBooks application and click the File menu.
- Choose the Utilities option and move further.
- If the Host Multi-User Access option is visible, don’t tap on it.
- Select the Stop Hosting Multi-User access option and resume the same steps for all workstations.
Fix “QuickBooks Desktop hosting mode is off” issue with Instant Solutions
After identifying the causes, follow these methods to fix the QuickBooks Desktop hosting mode is off issue.
Method 1: Configure Hosting Settings On Your Server
If you get error H101, H303, or H505, one or more of the workstations is set to be the server for QuickBooks. These are mainly the computers on your network that don’t host your company’s files. Make sure that your server computer is the only one hosting.
- Launch the QuickBooks application on any workstation where you get H101, H303, or H505.
- Make sure not to open the company file. Instead, move to the File > Utilities option.
- Avoid choosing the Host Multi-User Access option and move towards the next Workstation. This one is the system that’s exactly causing the problem.
- If you see the Stop Hosting Multi-User Access option, click it.
- Resume the same steps on all of your workstations that are causing the Error H101, H303, or H505.
After looking into your workstations, browse to your server computer. This is basically the computer that is hosting your company’s files.
- Launch QuickBooks on your server PC and launch the File menu.
- Click the Utilities tab and then hit the Host Multi-User Access option. Make sure not to choose the Stop Hosting Multi-User access option.
Method 2: Create a Windows User and Give Admin Rights
If QuickBooks hosting mode is off, then try logging in as a Windows administrator. You may require the Windows admin rights to modify or reconfigure firewall settings and folder permissions on the server.
First Step: Create a Windows User With Administrator Rights
Perform the following steps to create a local user and change the account to a Windows admin account.
Create a Local User account
- Open the Start menu and move to the Settings option.
- Head to the Accounts option and choose the Family & Other Users option.
- Click to Add someone else to This PC and select the “I Don’t have this person’s sign-in information” option.
- When you are on a new page, browse to the “Add a User without a Microsoft account”. Then, provide an username and password.
- Herein, you can also include a password hint or pick a security question. Then, hit the Next option.
Change the Local account to an administrator account
- Initially, hit the Start menu, click the Settings, and then the Accounts option.
- From the Family & Other Users, pick the account owner’s name. To locate it, check “Local Account” below the name and tap on the Change Account Type option.
- Below the Account Type, pick the Administrator option.
- At last, hit the OK and then log in with the new administrator account.
Second Step: Assign Admin Rights to Access QuickBooks Components
Whenever you install the Database Server Manager, QuickBooks will automatically create a new Windows user. So, the new user must have sufficient admin rights to host the company file in multi-user mode. Here’s how to grant the QuickBooks application or Windows users admin rights.
- Exit from the QuickBooks software and click on the Start menu.
- Launch the Control Panel and move to the User Accounts.
- After that, look for the QBDataServiceUserXX for your QuickBooks Desktop version.
- Thereon, browse to the Change Account Type and hit the Administrator option.
- At last, move to the Change Account Type and click Apply to save the necessary changes.
If you use QuickBooks Database Server Manager for multiple versions, repeat these steps for each version.
After creating a Windows admin user and assigning admin privileges to both QB services, open QuickBooks and if the issue continues try the next solution.
Method 3: Verify the Folder & Windows Access Permissions
Ensure that all users have proper permissions to access folders in multi-user mode. If not, then ensure you have set up Windows file and folder permissions accurately.
Method 4: Run QuickBooks File Doctor Tool
QuickBooks File Doctor is a useful tool that helps to address the company file and network connectivity issues on the server computer. Also, it helps the users fix the QuickBooks Desktop hosting mode is off issue.
Method 5: Rename the .ND and .TLG Files
Users often end up with the hosting mode off in QuickBooks due to damage .ND and .TLG files. So, to repair the damage with these files, you must rename them by performing the following steps.
A. Renaming .ND and .TLG Files
- Access the QB folder where your File is saved.
- Search for the file name having .ND and .TLG file extensions. The file name will look like these:
- company_file.qbw.nd
- company_file.qbw.tlg
- Now, right-click on each file and hit the Rename option. Then, change the name of the file by adding .OLD at the end of the file name.
- If the error persists, then move further to the next step.
B. Run the QuickBooks Database Server Manager
At times, the issue may also arise when the QuickBooks Database Server Manager isn’t running on the server that enables you to host the company file on the network. So, to fix the issue, you must run the QuickBooks Database Server Manager and then scan for the .ND and .TLG files.
Method 6: Check the Services running on your server computer
Important for the Full Program: If you are accessing the full-version of QuickBooks on your server computer, turn on multi-user hosting.
- Launch the QuickBooks on your server computer. After this, head to the File menu > Utilities > Host Multi-User Access option. Don’t choose the Stop Hosting Multi-User Access option.
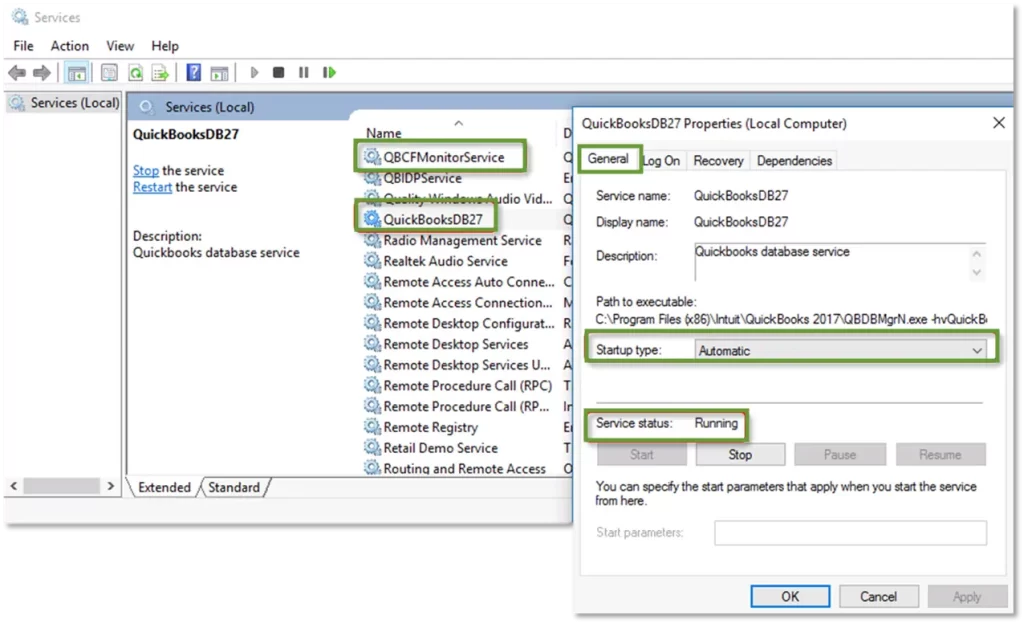
It’s essential to ensure that QuickBooks services are running on your server computer. Perform the following steps to check QuickBooksDBXX and then repeat the same steps for QBCFMonitorService.
- From your server PC, open the Start menu and type Run in the search bar.
- Open the Run window, and type “services.msc” to access the Services window.
- Now, locate and double-tap on QuickBooksDBXX from the list. The XX here indicates the version of QuickBooks plus 10.
- Choose the Automatic option as Startup Type and Service status must be set to Running or Started. If none of them is chosen, go with the Start option.
- Head to the Recovery tab and click Restart the Services from the following drop-down menus.
- First Failure
- Second Failure
- Subsequent Failure
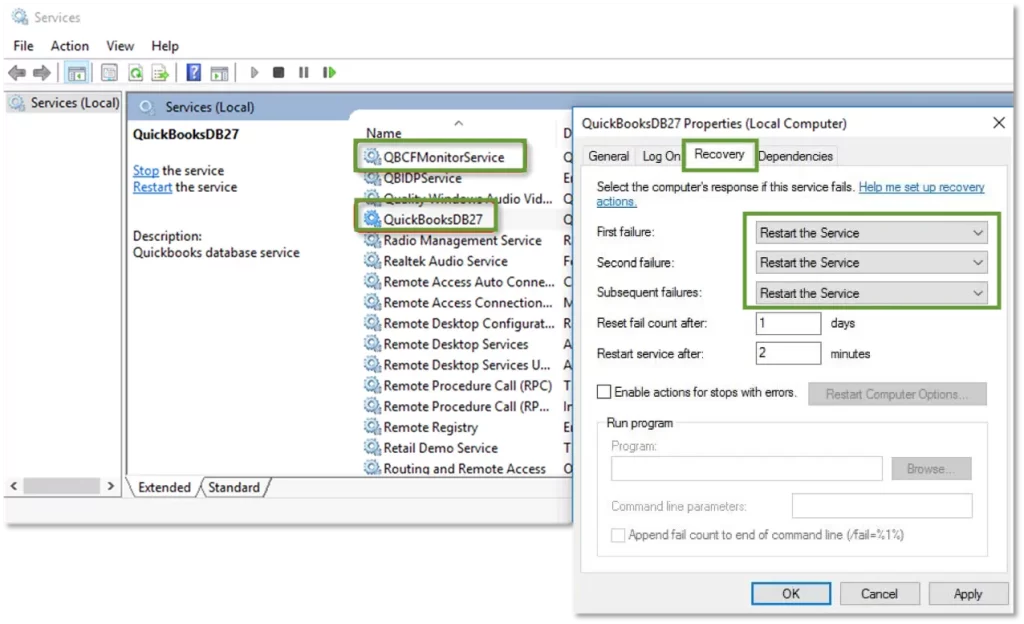
- Now, hit the Apply followed by the OK option to save the changes.
- At last, repeat the same steps for QBCFMonitorService.
Once done, launch QuickBooks, browse to the File menu > Switch to Multi-User Mode. If you are able to open everything properly, it means that the issue is fixed.
Method 7: Ping Your Server from a workstation
Users need to ping their server from a workstation to test the internet connectivity. Try this on every Workstation where you are experiencing the QuickBooks hosting mode is off error.
First Step: Turn on Network Discovery on the server computer and workstations
- Launch the Start menu on the server and workstations, getting the hosting mode is off issue.
- Insert “Network” into the search box and launch the Network and Sharing Center.
- Head to the Change Advanced sharing settings option.
- At last, be sure that the “Turn on network discovery” checkbox is marked in the Network Discovery and File and Printer sharing sections.
Second Step: Get your server name from your server
- Launch the Start menu on the server PC and open the Run window.
- After that, insert “cmd” in the search console and click OK.
- When the Command Prompt screen opens, type “ipconfig/all” and hit the Enter key.
- Look for the Host name from the section named Windows IP Configuration. The server name is written on the right side.
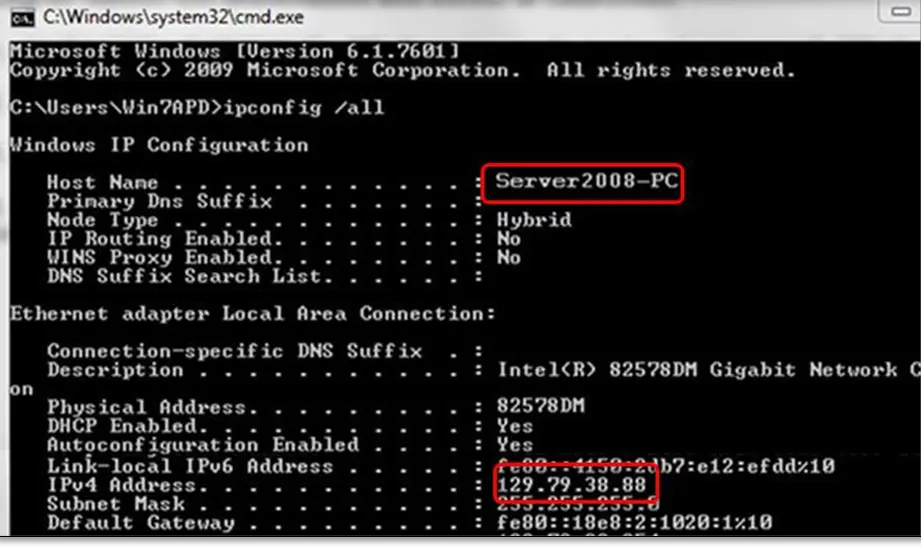
- Now, note down the hostname. Otherwise, you can copy it to a Word document from where it can be accessed easily.
Third Step: Return to your Workstation to test the server
If you are encountering any issues while performing these steps, you can take help from your IT Expert.
- Launch the Start menu from a workstation and open the Run window.
- Insert “cmd” in the search panel and click OK to open the Command Prompt window.
- Now, type “ping [your server name]”, and hit the Enter key. Make sure not to place any brackets next to your server name.
- Resume the same steps for each workstation that is facing the hosting mode off issue in QuickBooks.
If you notice that the reply for each packet is received with no loss, it shows that your server is working absolutely fine.
If there’s a packet loss or a very slow reply, it simply says to “Stop”.Then, reach out to an IT expert for help to fix the network issue.
Method 8: Configure your Windows Firewall settings on your server
Windows Firewall is a security application that blocks access to unknown sites, files, or folders to safeguard your device. However, configuring the firewall settings helps resolve the QuickBooks hosting mode is off issue by letting QuickBooks executable files and necessary TCP/UDP ports bypass security restrictions. As a result, it ensures that the QBDBMgrN can communicate with the workstation computers that enable multi-user mode to work without getting blocked as unauthorized network activity.
Method 9: Reinstall QuickBooks Desktop
If nothing works, try reinstalling QuickBooks Desktop to address the QuickBooks Desktop hosting mode is off issue. However, by reinstalling the QB software will remove the technical bugs from the application and perform a fresh download to run the hosting mode easily.
Final Words
QuickBooks Hosting mode is off is a complex issue that restricts multi-user access, especially in multi-user environments. However, by configuring hosting settings, verifying server permissions, and ensuring proper network connectivity, you can resolve the issue.
Also, check that only the server system hosts the company file & all workstations are configured accurately. If the issue still continues, then take the help of our BizBooksAdvice experts to regain access to multi-user mode.
Frequently Asked Questions (FAQ’s):-
Question 1: What is QuickBooks hosting mode?
Ans. QuickBooks Hosting mode let multiple users to access the company file simultaneously, enhancing collaboration and efficiency in financial management.
Question 2: How do I enable hosting mode in QuickBooks Desktop?
Ans. To enable hosting mode, follow these steps:
- Launch QuickBooks on your computer and hit the File menu.
- Choose the Utilities option and tap on Enable Hosting Mode.
- If you see that the Host Multi-User Access option is already enabled, then avoid choosing it.
Question 3: What causes the QuickBooks Database Server Manager hosting mode is off issue?
Ans. Users often face the QuickBooks Database Server Manager hosting mode is off issue because of incorrect installation, firewall restrictions, disabled services, or improper network configuration.
About The Author

Jonathan Browns
Jonathan Brown is a trained QuickBooks professional with 10 years of experience in the accounting sector. Moreover, he is passionate about helping businesses reduce the stress of managing accounts. Also, he is proficient in assisting entrepreneurs and small business owners to use QuickBooks and enhance their accounting experience.

QuickBooks Desktop, Payroll or Enterprise
Advanced Support for QuickBooks Desktop, Payroll & Enterprise Solutions
From payroll tax setup, direct deposit issues to Enterprise performance tuning and Desktop upgrades - our QuickBooks experts provide accurate and stepwise assistance. Get dependable support designed to minimize downtime and maximize efficiency.
Recent Posts
-
QuickBooks Bookkeeping: The Practical Way to Keep Your Books in Order
-
QuickBooks Merchant Services: Everything You Need to Know Before You Sign Up
-
QuickBooks Payroll Assisted: Everything You Need to Know
-
How to Contact QuickBooks Online Customer Service Team 2026
-
QuickBooks Online Login: Sign in to Access your QB account