Why & How to Update QuickBooks Company File Safely? (Easy Guide)

- By Jonathan Browns
- Apr 08, 2026
- Accounting
- 7 min read
Just like updating the QuickBooks Desktop software, it’s equally important to update QuickBooks company file. However, the main reason for updating is that an older company file won’t open in a new version of QuickBooks Desktop. Moreover, updating enables the file to use the enhanced features, improvements & tools available in the new version.
If you’re also wondering how to update a QuickBooks company file, this guide will walk you through everything you need to know. Whether you’re dealing with QuickBooks Desktop prompts to update your company file or planning to upgrade your company file to its latest version, following the right steps is crucial to avoid errors and data loss.
Update QuickBooks company file to the latest version and keep your accounting data safe and secure. Updating will also fix the compatibility issues and bugs that may arise while running an older company file.
Why You Need to Update QuickBooks Company file?
Updating your QuickBooks company file ensures that your file is compatible with the latest version of QuickBooks Desktop. As a result, it will keep your financial data secure, enhance software stability, and prevent bugs. Other reasons for updating QB company files are described below.
- With the latest QuickBooks company file updates, you can get important security fixes to safeguard your data from potential threats.
- Moreover, upgrading also helps fix data issue and reduces the chances of system crashes.
- Updates also introduce new features designed to enhance productivity.
Considerations Before You Update your company file to a newer QuickBooks version
Before updating the QuickBooks company file to the latest version, keep these pointers in mind.
- Users must have administrative rights to update the QuickBooks Company file.
- Avoid using the file while the update is in progress. Ensure a stable internet connection.
- Always create a backup before upgrading your company file.
Company file limitations when upgrading
If you plan to upgrade your company file, you must understand the following limitations:
| Product | You can open the Premier company files in Pro and vice versa without doing any modifications in the file. Also, you can upgrade your Pro or Premier company files to Enterprise Solutions (ES), but ES company files can’t be accessed in Pro or Premier edition. |
| Version | You can’t open the company file in another region’s QuickBooks Desktop version. For example, you will get This file was not created with a US version of QuickBooks if you try to open a company file that was created in a QuickBooks Canada version in a QuickBooks US version.You can upgrade your file from an older to a newer version of QuickBooks but you can’t use the upgraded file in the older version. The exception to this rule is if you are using QuickBooks Desktop Accountant and working in an Accountant’s Copy. For more information, see Accountant’s copy overview. When you open your company file in a newer version, QuickBooks asks if you want to upgrade or convert the QuickBooks company file. Generally, a new version will update and convert an older QuickBooks company file, such as from 2018 to 2019. In a few instances, if the QuickBooks company file won’t upgrade to the new version, you may need to step the company file through an intermediate version of QuickBooks Desktop. |
| Edition | The file which is created in one edition (Retail, Manufacturing & Wholesale, Accountant, etc) can be opened with any other edition without hampering the data. |
How to Update Your Company Files to a New Version of QuickBooks Desktop?
If you are upgrading to the latest version of QuickBooks Desktop, it’s also important to update company file in QuickBooks. You only need to update your company file once. Follow these step-by-step instructions to update your older company file to a newer version of QuickBooks Desktop.
First Step: Prep Your Company File
- First of all, launch the original version of QuickBooks. Also, open the company file that you wish to update.
- Hit the F2 key to launch the Product Information Window.
- Access the File Information section. Also, write down the location where you save your company file on your computer.
Important: Do you place your company file on the server? If yes, then move your company file to your computer’s local hard drive. After this, you can move it back after opening it in the new version of QuickBooks Desktop.
Second Step: Update Your Company File
Note: QuickBooks Desktop 2024 and Enterprise 24.0 offer enhanced security to protect your company data. After you update your company file, all non-admin user passwords must be reset to temporary ones. When users log in, they’ll be prompted to create a new permanent password.
- Before proceeding, ensure all users log out of your company file.
- After this, access the new version of QuickBooks Desktop.
- Go to the File menu > Open or Restore Company > Open a company file > Next.
- If you have a backup company file (QBB) instead of a company file (QBW), hit the Restore a backup copy.
- Look for your company file, click on it, and choose the Open option.
- Important Tip: If you couldn’t locate your company file, open the Start menu and launch the File Explorer. Then, locate your company file by its name or by having a .qbw file extension. If it’s still unavailable, ensure that it’s not hidden.
- After that, log in to your company file as the admin user and click the Update Now tab.
- Once QuickBooks finishes, then hit the Done tab.
- Important Tip: If you fail to move your company file, restore the backup and then try again later. If you fail to move, then connect with the customer support.
What to Do When “This Company File Needs to be Updated” Doesn’t Resolve?
Users often complained about getting the “This company file needs to be updated” issue while accessing the company file after upgrading the QuickBooks application. However, when the error appears, it shows the message saying “QuickBooks needs to update your company file.” You can fix the error by updating the company file, but if the issue still persists, then follow the troubleshooting methods listed below.
Solution 1: Run the Verify & Rebuild Data Utility
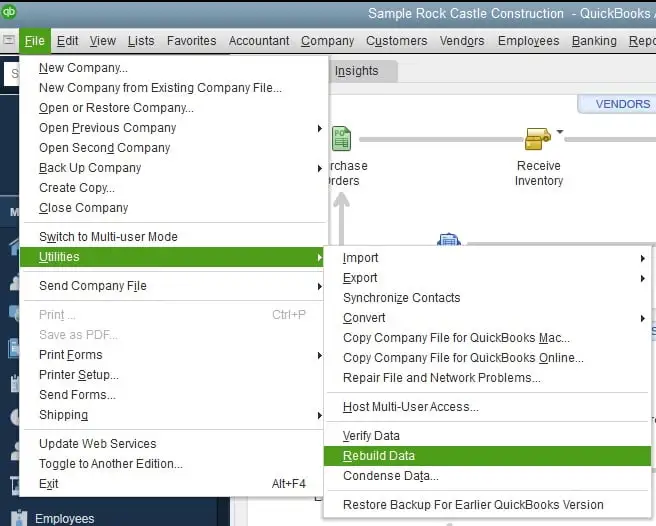
The Verify and Rebuild Data Tool is used to fix the damage present in the QuickBooks company file data. The Verify tool will diagnose the possible damages in your company file, and then the Rebuild Data tool repairs those damages.
Solution 2: Run the QuickBooks File Doctor Tool
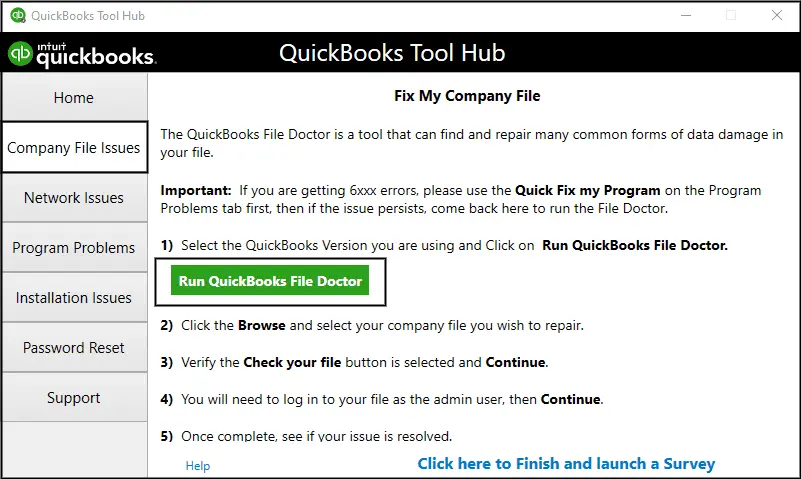
If you are still facing issues while updating the QuickBooks company file, then run the QuickBooks File Doctor Tool. This utility is specifically designed to recover the damaged company files and continue working with the QuickBooks Desktop software.
Solution 3: Re-Registering the Reboot.bat file
Re-registration of the reboot.bat file is also important while updating the company file to the latest version. Follow these steps to re-register your reboot.bat file.
- First of all, open the Run window by hitting the Windows + R keys.
- After that, type “cmd” in the search box and click OK to open the Command Prompt window.
- Now, type “cd C: \ Program Files (x86) \ Common Files \ Intuit \ QuickBooks” in the Command Prompt window and hit the Enter key.
- Insert “reboot.bat” and again hit the Enter key to run the file.
- Next, wait for some time to complete the process.
Conclusion
Update QuickBooks Company file to access the latest features and maintain data security. Properly upgrading your company file ensures smooth performance and compatibility with newer versions.
If QuickBooks Desktop needs to update your company file and errors persist, consider professional assistance for faster resolution.
Frequently Asked Questions (FAQ’s):-
Question 1: Where are the QuickBooks update files stored?
Ans. The default location for the QuickBooks company file is C:\Users\Public\Public Documents \ Intuit\ QuickBooks\Company Files.
Question 2: How to update the QuickBooks company file?
Ans. For updating the QuickBooks company file, log in to the new version of QuickBooks Desktop as an administrator. After this, choose the Open or Restore Company from the File menu to initiate the automatic upgrade process.
Question 3: How do I move a QuickBooks company file?
Ans. To move a QuickBooks company file, right-click on the company file folder and click Copy. After this, open the external device you use to move the files. Otherwise, you can also launch the new location on your hard drive. Later on, hit the Paste option.
Question 4: What is a company file in QuickBooks?
Ans. The company file is the one that stores all your financial details. However, in QuickBooks, you can store multiple company files for multiple businesses. It is important that each business has its own company file.
About The Author

Jonathan Browns
Jonathan Brown is a trained QuickBooks professional with 10 years of experience in the accounting sector. Moreover, he is passionate about helping businesses reduce the stress of managing accounts. Also, he is proficient in assisting entrepreneurs and small business owners to use QuickBooks and enhance their accounting experience.

QuickBooks Desktop, Payroll or Enterprise
Advanced Support for QuickBooks Desktop, Payroll & Enterprise Solutions
From payroll tax setup, direct deposit issues to Enterprise performance tuning and Desktop upgrades - our QuickBooks experts provide accurate and stepwise assistance. Get dependable support designed to minimize downtime and maximize efficiency.
Recent Posts
-
This QuickBooks Company File Needs to Be Updated: A to Z Guide
-
Renew QuickBooks Subscription: Desktop & Online Renewal Guide
-
QuickBooks Online Login: Sign in to Access Your QB account
-
Change EIN in QuickBooks: Complete Guide for Desktop, Online & Payroll
-
How to Fix QuickBooks Error 15241 During Payroll Update