Simple Procedure to Void An Invoice in QuickBooks

- By Jonathan Browns
- Sep 05, 2025
- Accounting
- 7 min read
Creating and managing invoices plays a crucial role while operating a successful business. But sometimes users might generate an invoice by mistake, or make certain errors in the amount of the invoice. Here comes a time when the users need to void an invoice in QuickBooks. When you void an invoice, it will initially cancel it, but it still keeps the record in your computer. Thus, the amount of the invoice will convert to zero. As a result, performing this action will hamper your accounts receivable as well as your balance sheet.
Read the entire post attentively and gather the necessary details for voiding an invoice in QuickBooks Desktop and Online.
Difference Between Voiding & Deleting the Invoices In QuickBooks
The users often get confused between voiding and deleting the invoices in QuickBooks. Therefore, to clarify the doubt, we discussed the major differences between them below.
Voiding an Invoice
Whenever you void an invoice, it means you are cancelling it, but it will remain in your system. However, your invoice amount will eventually change to zero, which indicates the invoices will remain on your reports. Eventually, this action will automatically hamper the accounts receivable and balance sheet. But, the benefit of voiding an invoice is that you can collect the history of the transaction. It is a good idea whether you wish to stop a payment process by monitoring what exactly happened.
Deleting an Invoice
On the other side, if you delete an invoice, it means you are removing it permanently from your records. However, you may find this process simple, but it might create problems in monitoring the finances and disrupt the inventory/stock. Therefore, you must be very attentive while making a decision, as deleting the invoice will entirely remove it. Thus, it might delete the entire data without keeping any records, which might be of further use.
Read More- QuickBooks Invoices Not Printing Correctly
Detailed Steps For QuickBooks Void Invoice From Previous Year
Herein, we have described the stepwise instructions to void an invoice in QuickBooks from the previous year.
- In the beginning, launch QuickBooks Desktop and head to the Customers menu.
- After this, you must choose the name of the customer and then start searching for the invoice.
- Now, double-tap on the transaction that you wish to access and click the Delete drop-down arrow next to the Save option.
- Afterwards, choose the Delete or Void tab and then hit the OK button for confirmation.
Here’s How To Find Voided Invoices in QuickBooks Easily
Follow the steps below closely to look for voided invoices in QuickBooks.
- Initially, launch the QuickBooks Online application and tap on the Gear icon.
- After this, choose the Tools menu followed by the Audit Log tab.
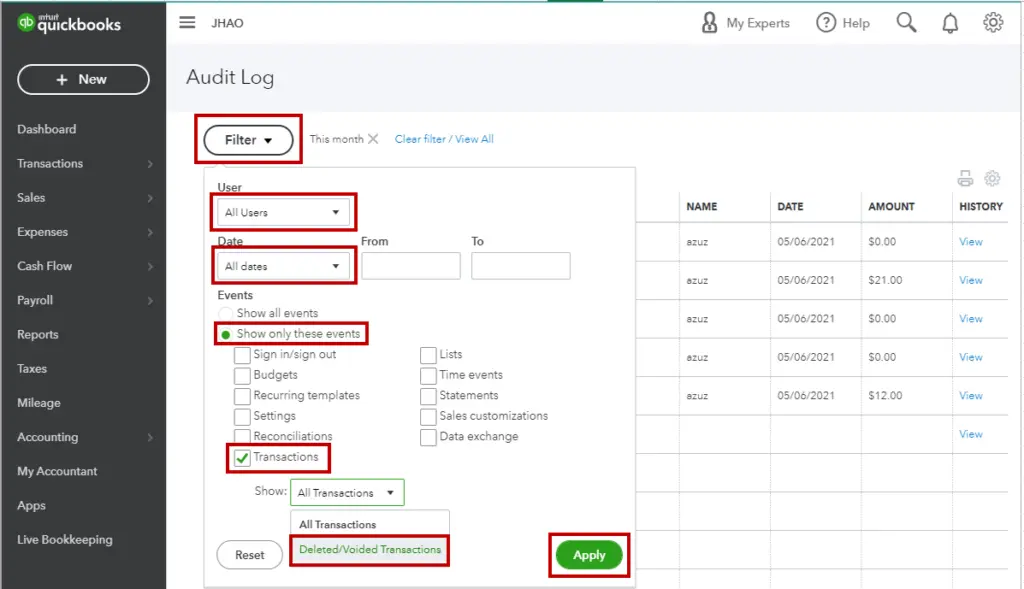
- Now, head to the Filter tab and choose the correct User, Date, and Event. Then, hit the Search tab to move further.
- At last, you must start looking for the voided invoice and tap on View from the History section to look for the details.
Learn More- QuickBooks Tool Hub Download
Voiding an Invoice in QuickBooks Desktop Using Simple Steps
Herein, we have described two distinct ways through which you can How to void an invoice in QuickBooks Desktop.
A. Void Transactions One at a time
- The first and foremost step is to launch the QuickBooks Desktop application and head to the Customers menu.
- After this, switch to the Create Invoices tab and choose the previous arrow.
- Now, you must tap on the Delete drop-down arrow and hit the Void tab.
B. Void Multiple Invoices at a Time
- Initially, launch the QuickBooks Desktop application and move to the Accountant menu.
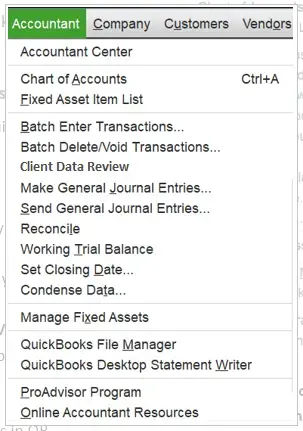
- After this, choose the Batch Delete/Void transactions and hit the Invoices for the Transaction Type.
- Now, pick those transactions that you wish to void from the list of options available.
- Next, hit the Review and Void, followed by the Back Up and Void. Then, a backup will be suggested before you void the invoice. However, if you don’t wish to generate the backup, tap on Void option instead of Backup and Void.
- Once you are done making all the necessary changes, hit the Yes tab to complete the process.
Also Read- QuickBooks Online Login
Here’s How to Void an Invoice in QuickBooks Online
For voiding an invoice in QuickBooks Online, you must implement the steps below.
- Start the process by launching the QuickBooks Online application and then hitting the Sales tab.
- After this, head to the Invoices tab and search for the invoice that you wish to void.
- Thereon, click on the drop-down arrow within the Action column and hit the Void tab.
Conclusion
So, here we conclude this post and hope that now you can easily void an invoice in QuickBooks without any further issues. Furthermore, if you still have any doubts, then feel free to connect with our QB professionals for immediate help at +1-866-408-0444. They will provide you with the best assistance within the shortest possible time.
Frequently Asked Questions (FAQ’s):-
Question 1: What does it mean to void an invoice in QuickBooks?
Ans. Voiding an invoice in QuickBooks means setting its total amount to zero while keeping the transaction record in your system. This helps maintain accurate bookkeeping without deleting the invoice entirely.
Question 2: How do I void an invoice in QuickBooks?
Ans. To void an invoice:
- Open the invoice you want to void
- Click on More or Edit (depending on your version)
- Select Void
- Confirm the action
Question 3: Can I undo a voided invoice in QuickBooks?
Ans. No, once an invoice is voided in QuickBooks, it cannot be directly restored. You would need to recreate the invoice manually if needed.
Question 4: What is the difference between voiding and deleting an invoice?
Ans.
- Void: Keeps the invoice record but changes the amount to zero
- Delete: Completely removes the invoice from your records
Voiding is usually preferred for audit trails and financial transparency.
Question 5: Will voiding an invoice affect my financial reports?
Ans. Yes, voiding an invoice will adjust your financial reports by removing its value from income totals, but the transaction history will still show that the invoice existed.
About The Author

Jonathan Browns
Jonathan Brown is a trained QuickBooks professional with 10 years of experience in the accounting sector. Moreover, he is passionate about helping businesses reduce the stress of managing accounts. Also, he is proficient in assisting entrepreneurs and small business owners to use QuickBooks and enhance their accounting experience.

QuickBooks Desktop, Payroll or Enterprise
Advanced Support for QuickBooks Desktop, Payroll & Enterprise Solutions
From payroll tax setup, direct deposit issues to Enterprise performance tuning and Desktop upgrades - our QuickBooks experts provide accurate and stepwise assistance. Get dependable support designed to minimize downtime and maximize efficiency.
Recent Posts
-
QuickBooks Bookkeeping: The Practical Way to Keep Your Books in Order
-
QuickBooks Merchant Services: Everything You Need to Know Before You Sign Up
-
QuickBooks Payroll Assisted: Everything You Need to Know
-
How to Contact QuickBooks Online Customer Service Team 2026
-
QuickBooks Online Login: Sign in to Access your QB account