Quick Ways to Eliminate QuickBooks Error Code 2203 Instantly

- By Jonathan Browns
- Aug 26, 2025
- Accounting
- 7 min read
Users often encounter QuickBooks Error Code 2203 due to a problem with setting up the Microsoft .NET Framework. Also, this error may occur when the presence of a virus or malware infection corrupts the Windows system. Unfortunately, this issue might obstruct the users from installing the QuickBooks Desktop. Whenever this issue pops up, the following message emerges on the screen stating
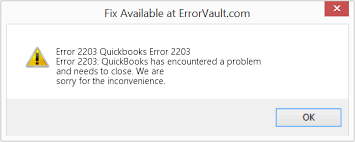
“QuickBooks has encountered a problem and needs to close. We are sorry for the inconvenience.” In this post, we have explained everything that causes the QuickBooks Error 2203, along with the solutions to fix it. Let’s read this post!!
What Causes QuickBooks Error 2203 to Appear?
The QuickBooks Error 2203 may take place due to the following reasons described below. Have a glimpse at all the possible causes and get a better understanding of the error.
- The QuickBooks Error Code 2203 may occur due to a corrupt download or a missing QuickBooks installation.
- Sometimes, you may encounter this error because of a problem with the setup of the Microsoft .NET Framework.
- You are trying to install the latest QuickBooks Desktop version on an incompatible Windows version.
- In other cases, this issue may arise because of the improper permissions to the temp folders used to store the temporary files during the installation.
- It might be possible that you don’t have enough hard drive space to install QuickBooks.
- An interruption due to the internet connection may also cause Error 2203 in QuickBooks.
Read More- QuickBooks Tool Hub Download
Simple Procedures to Resolve the Installation Error Code 2203 in QuickBooks
After knowing all the causes that trigger Error Code 2203 in QuickBooks, let’s find the best ways to fix it. The following are the troubleshooting methods to overcome the installation issue.
1. Start Running QuickBooks With Proper Admin Rights
If the user doesn’t have sufficient admin rights to run QuickBooks, then they might trigger QuickBooks Error 2203. So, to grant proper admin permissions, use the steps below.
- Shut down the QuickBooks application and move to the main screen of your Windows PC.
- After this, start searching for the QB icon on the desktop screen and right-click on it.
- Thereon, pick the Run As Administrator option from the drop-down list.

- In the upcoming screen, hit the Yes option when you see the message that states “Do you want to allow this app to make changes to your device?”
- Once you are all set, you must try to install the new version of the QuickBooks Desktop application again.
2. Begin Installing The Latest Windows Updates
To get the latest Windows updates, you must follow the instructions outlined below.
- Begin the process by accessing the taskbar of your computer and tapping on the Windows icon.
- Afterwards, in the Windows search console, type Settings and press Enter to open it.
- Thereon, choose Windows Update from the left pane of your screen.
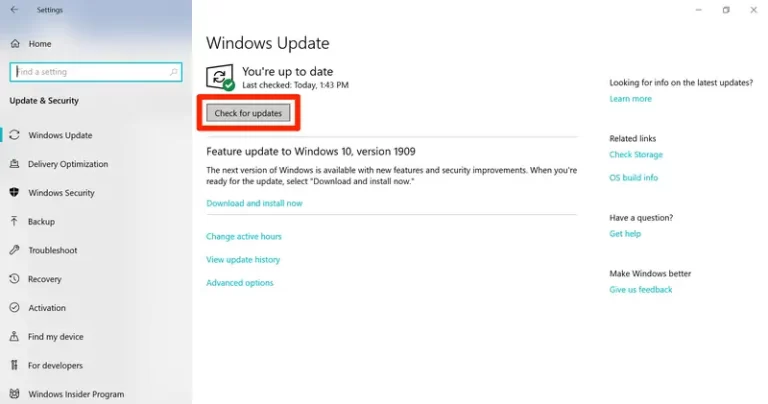
- Now, you must tap on Check for Updates and verify if the updates are available.
- Next, if you notice that the Windows updates are available, it will reflect you with the Updates Available.
- Following this, begin verifying the updates that are available, and if you want to install all of them, hit Install All.
- At last, when you are done installing the Windows update, restart your computer and try again to update QuickBooks.
3. Try Running the Disk Cleanup
By running the disk cleanup tool in Windows, you can delete the unnecessary files from your hard drive. As a result, it will enhance the overall performance of your PC by assigning extra space to get QuickBooks installed easily.
- In the beginning, access the Run Command window by pressing the Windows + R keys.
- Now, in the search box, include “cleanmgr” and press Enter.
- Afterwards, pick the (C:) drive in the Disk Cleanup tool and hit OK.
- Thereon, you will be taken to the Disk Cleanup tool for the (C:) window.
- Next, you must scroll down and tap on Clean up system files. As a result it will bring up the Disk Cleanup tool on your screen.
- Following this, make sure that you keep the drive selection as (C:) and hit OK.
- Next, all you require is to hold on for some time until the scanning of your system is done, and hit OK.
- Complete the process by hitting Yes when you get the message that states ‘Are you sure you want to delete these files?’.
- Once you have successfully deleted these files, you must try installing the QuickBooks files once again. Then, wait unless the scanning of the system is complete and then hit OK once you are all set.
4. Updating the Device Drivers Manually
Sometimes, using the outdated device drivers may also give rise to the QuickBooks Error 2203. So, to update the device drivers, you must implement the steps given below.
- In the beginning, move to the taskbar and insert Device Manager into the search box.
- After this, pick the Device Manager tab to launch it on your device.
- Now, opt for the Disk Driver category, right-click on any one of the drivers that you wish to update.
- Following this, tap on Search Automatically for updated driver software and hit the Update Driver tab.
- If you are able to get the driver update, then you must download and install it. In case Windows fails to get the updates, then start looking for the manufacturer’s website, and then start finding the updates.
5. Start Performing a Full Virus Scan On Your PC
- In the beginning, press the Windows key and add Settings from the search results.
- Afterwards, head to the Privacy & Security option from the left panel of the screen.
- Now, browse to the Windows Security and opt for the Virus & Threat Protection under the Protection area.
- As a result, you will be taken to the Windows Security window.
- Following this, hit the Quick Scan beneath the Current Threats for running a full malware scan on your PC.
- Next, all you require is to run a scan for the antivirus software on your PC.
- Thereon, if you notice that the No Current Threats message displays, you’re all set to go. However, if it shows that your PC is corrupt or contains any malicious threats, it will eventually remove the threats from your PC.
6. Get the Ownership of the Temporary File Folder
The users must take ownership of the temporary file folders for security reasons and permissions to install any program.
- First of all, hit the Windows logo key and include Services in the search console.
- After this, search for the Windows Installer from the list of running services and right-click on it.
- Thereon, choose the Stop option and hit the Windows + E keys to bring up the File Explorer window. Then, you must access the C:\Windows\Temp location.
- Now, press the Ctrl + A keys to choose all files from the temp folder and then right-click on the Bin icon to erase the files.
- Next, give some time to complete the process and browse to the location C:\Users\Username\AppData\Local.
- Following this, start searching for the temp folder, right-click on it, and pick the Properties tab.
- As a result, you will be directed to the Temp Properties window, wherein you must tap on Properties.
- Furthermore, move to the Security tab > Advanced option and hit Next beside the owner in the Advanced Security Settings for Temp.
- From the Select User or group pop-up, insert Everyone beneath the Enter the object name to open.
- Thereon, tap on Check Names and then OK to save the changes made.
- Proceeding further, return to the Security tab and click the Add option and include Everyone.
- Afterwards, choose the Check Names > OK> Everyone beneath the Group or user names. Make sure that you put a check mark beside the Full Control below the Permissions for Everyone section.
- Once you are all set, return to the Services window and right-click on Windows Installer. Later on, pick the Start option.
- Complete the entire process by relaunching your PC and then try installing QuickBooks once again.
7. Start Utilizing the QuickBooks Install Diagnostic Tool
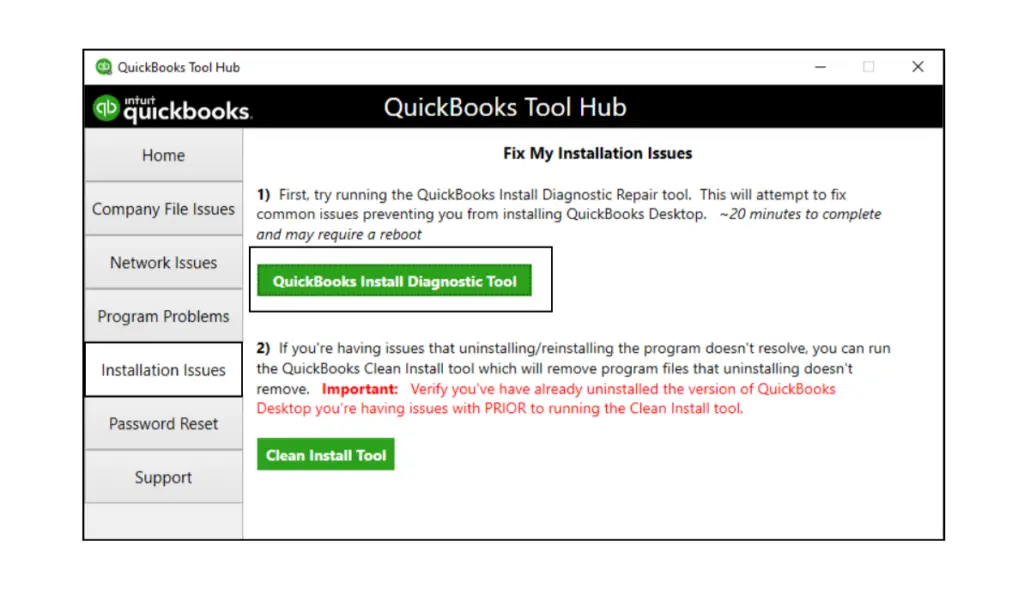
If the above steps won’t help you get rid of QuickBooks Error 2203 while installing, then you must try running the QuickBooks Install Diagnostic tool. This utility tool is used to deal with the common issues faced while installing the QuickBooks Desktop.
Conclusion
With this, we hope that now you can easily address QuickBooks Error Code 2203 by performing the solutions given above. Thus, it will help you install the QuickBooks Desktop application without any hindrance. Furthermore, if you are still struggling, then have a conversation with our QB professionals for quick assistance.
Frequently Asked Questions (FAQs)
1. What should you do to rectify QuickBooks Error 2203?
Ans. You can rectify QuickBooks Error 2203 by applying the solutions given below.
- Make sure you install the QuickBooks application with proper administrative rights.
- Verify the Temp folder permissions accurately.
- You must turn off the antivirus or firewall settings temporarily.
- Start running the QuickBooks Install Diagnostic tool.
2. Does Error 2203 in QuickBooks affect company data?
Ans. Error 2203 in QuickBooks is directly affiliated with an installation error and won’t cause any damage or corruption to the company data. But, for a safer side, it is always suggested to generate a backup of the data file to keep your data secure.
3. Can Windows updates trigger QuickBooks Error Code 2203?
Ans. Yes, Windows updates are one of the reasons that may trigger QuickBooks Error Code 2203. This is so because QuickBooks relies on the Windows components to run smoothly, and if Windows updates aren’t installed properly, you may face issues installing QuickBooks.
4. Should I disable antivirus software to resolve QuickBooks Error 2203?
Ans. Yes, it is necessary to disable the antivirus software in order to troubleshoot QuickBooks Error 2203.
5. What symptoms will you notice when the QuickBooks Error 2203 appears?
Ans. On the appearance of QuickBooks Error 2203, you may observe the following symptoms.
- You may face difficulty in downloading and installing the QuickBooks Desktop application.
- Another sign is that while installing QuickBooks, you may notice sudden crashing or freezing of the system.
- The users will notice an error message on their screen when the error occurs.
About The Author

Jonathan Browns
Jonathan Brown is a trained QuickBooks professional with 10 years of experience in the accounting sector. Moreover, he is passionate about helping businesses reduce the stress of managing accounts. Also, he is proficient in assisting entrepreneurs and small business owners to use QuickBooks and enhance their accounting experience.

QuickBooks Desktop, Payroll or Enterprise
Advanced Support for QuickBooks Desktop, Payroll & Enterprise Solutions
From payroll tax setup, direct deposit issues to Enterprise performance tuning and Desktop upgrades - our QuickBooks experts provide accurate and stepwise assistance. Get dependable support designed to minimize downtime and maximize efficiency.
Recent Posts
-
Fix QuickBooks Error PS032 | QB Payroll Update Error
-
How to Fix QuickBooks Error 12031 (Network Timeout Issue)
-
QuickBooks Error PS036: Causes, Fixes, and Prevention
-
Converting from QuickBooks Desktop to QuickBooks Online: A Complete Guide
-
Tried Everything? Here’s How to Fix QuickBooks Error Code 80070057