How to Create, File & Print Form 1099 and 1096 in QuickBooks?

- By Jonathan Browns
- Oct 13, 2025
- Accounting
- 7 min read
Form 1099 and 1096 in QuickBooks are tax forms used for reporting income and payments made to individuals who are not the employees of a company or business, such as independent contractors and vendors. QuickBooks 1099 forms are meant for reporting different types of income, including miscellaneous income, interest, dividends, and much more. It gives information in detail about the recipient, payment amounts, and tax withholding, etc. Whereas Form 1096 is a summary form that has the information from multiple QuickBooks 1099 forms. It includes the total amounts paid, the number of forms filed, and the payer’s information.
Furthermore, read this blog and learn how to create, file, and print Form 1099 and 1096 in QuickBooks.
What Do You Understand By Form 1096 & Form 1099?
Form 1096
If you have made payments throughout the year to independent contractors, vendors, or other non-employee, you need to report such payments; you are supposed to file the 1096 forms.
These forms contain and transmit details to the IRS for every year. You should file these forms whenever you’re submitting multiple returns by mail.
Form 1099
These forms are a group of tax forms that document payments made by a single person or a business that is not your employer. This can be any individual, business, or government. There are different types of 1099 forms that give details about various types of income and how they were earned. These payments might be for interest, dividends, non-employee compensation, or retirement plan distributions. Many small businesses have to send 1099s when they make certain payments. Copies of these forms get sent to the ones who are being paid and to the IRS. The form has the payments that are made during the tax year. Sometimes, a copy is also sent to your state taxing authority. The one who is paying solely holds the responsibility for filling out the appropriate 1099 tax form and sending it to you. The IRS requires payers to provide most 1099 forms by January 31; sometimes, the date also extends to February 15.
How to Create and File Form 1099 in QuickBooks?
In this part, we will understand how a QuickBooks user can create, file, and print the 1099 and 1096 forms in QuickBooks. Let us see all three steps one by one in a detailed manner. Let us have a look at the steps on how one can create, file, and print the forms.
To Create Form 1099 in QuickBooks
To create a Form 1099 in QuickBooks for Windows, follow the steps below. The steps for creating Form 1099 are as follows-
Step 1: Update QuickBooks for Windows
In case you are using QuickBooks on a Mac, follow the procedure below.
In-product update
The steps for updating QuickBooks are as follows-
- Launch the QuickBooks application and from the QuickBooks drop-down, select Check for QuickBooks Updates.
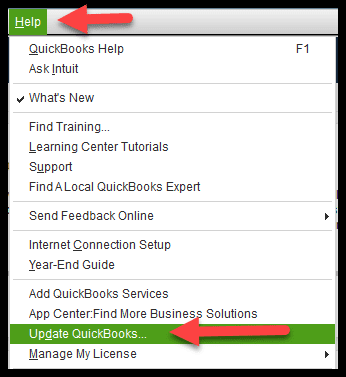
- If a new version is available, select Install Update.
- When asked, select the option Install and Relaunch.
- When the Update is completed, QuickBooks for Mac automatically opens.
Update QuickBooks Server for Mac
To update the QuickBooks server for Mac, the steps are as follows-
- Go to QuickBooks [year] Server next to the Apple logo.
- Go and select Check for Quickbooks Server updates.
- Select the option Install Update.
- Now, click on Install and Relaunch.
Step 2: Creating 1099s in QuickBooks Desktop
a. For Windows
Follow these steps to create your 1099s in QuickBooks Desktop.
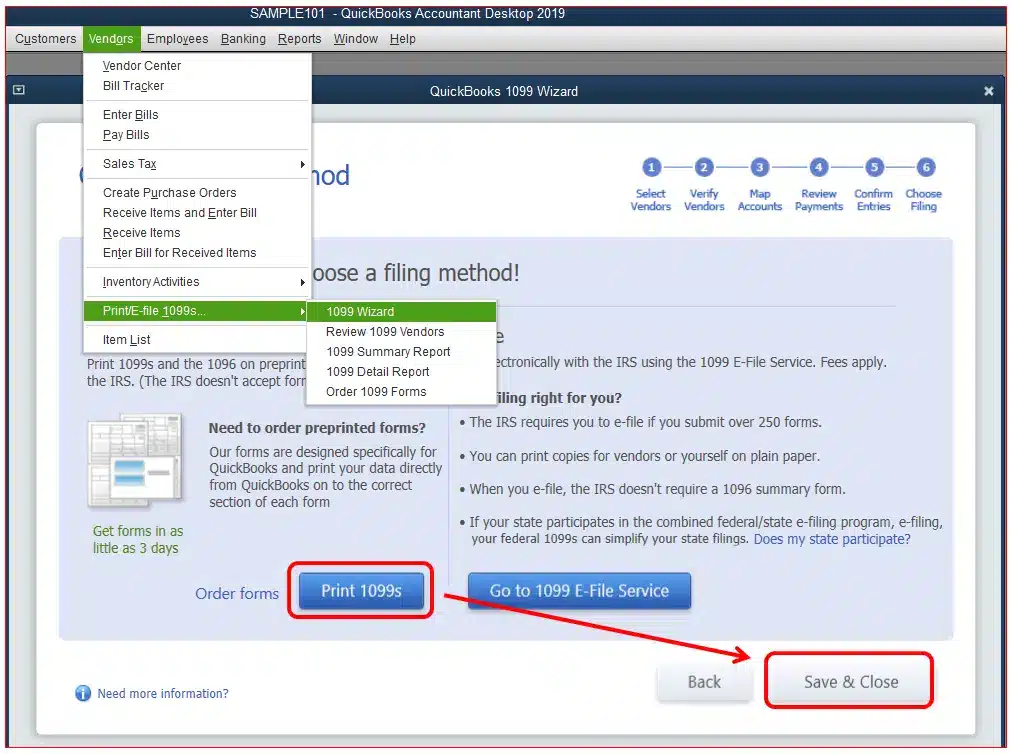
- Launch the QuickBooks application, then navigate to the Vendors option, then choose 1099 Forms, then Print/E-file 1099 Forms.
- Now, you must create a backup
- Select the option Get started for the 1099 form you wish to create. If you wish to create 1099-NEC and 1099-MISC, you’ll need to repeat the same procedure for filing the other form, too.
Important: There are some changes in the 1099 forms and boxes; make sure to choose your forms carefully. Most businesses will choose “Non-employee compensation, Box 1 on the 1099-NEC, but tally the information with your accountant if you are doubtful, if you think you have made other types of payments.
- If you’re filing the form for New Jersey or Wisconsin, these states have special rules for the Form 1099 in boxes 16 and 17. See the option File your state 1099 forms.
- Choose the vendors that need a 1099 form and select Continue.
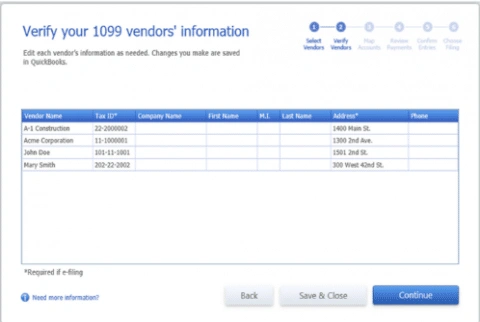
- Verify if the vendor information is correct. You can edit any incorrect information if you have made any mistakes. Double-click on the section that requires an Update. Select the option Continue.
- Navigate to the section of vendor payment accounts. Move to the drop-down menu in the Apply payments to this 1099 box section. Select the account you wish to connect the payment to. If you see any boxes that are gray in colour, they will be mapped down to the other 1099 form. You are allowed to do mapping of accounts to only one 1099 form. When this process is completed, select the option Continue.
Note: If you see a message in red colour, stating or highlighting that your settings do not match the current IRS qualifications, select the Show IRS 1099-MISC filing thresholds option and choose the option Reset to IRS Thresholds.
- Review your payment information for exclusions. For more information on what can be excluded, see What payments are excluded from a 1099-NEC and 1099-MISC? Select the option View Included Payments or View Excluded Payments to see detailed reports.
- Now, select the option Continue.
- Re-check the vendors and amounts you’re going to report. Select Continue again.
Note: If you want to look for the vendors who don’t meet the IRS qualifications, select the option View Summary Report.
- Choose whether to print 1099s or e-file.
b. Creating 1099s in QuickBooks Desktop for MAC
To create a Form 1099 in QuickBooks for MAC, follow the steps below.
- Create and do a backup
- Go to option Vendors, then select the option of 1099 Forms, then go to the option of Print or E-file 1099/1096…
- Refer to the steps for Windows (Steps 3 to 6)
- Map the vendor payment accounts. Go to the drop-down under account and select the account you want to link the payment to. If any boxes are gray, they are mapped to the other 1099 form. You only map accounts to one 1099 form. When complete, select Next.
- Review your included and excluded payments. For more information on what can be excluded, see What payments are excluded from a 1099-NEC and 1099-MISC?
- Select View Included Payments or View Excluded Payments to see detailed reports. Select Next.
- Review the vendors and amounts you’re going to report. Select Next.
- Choose whether to print 1099s or e-file.
Step 3: Importing Data into Tax1099
After preparing your 1099s in QuickBooks, select the E-file button and follow the on-screen steps to import your data into your Tax1099 account.
Step 4: E-filing of Your 1099 Form in Tax 1099
After you are done with the importing process, you’ll see the Tax1099 Dashboard with the list of vendors, amounts, and boxes. From here, start filing your 1099 form. The steps are as follows-
- Select the name of the vendor or click on the Edit button to edit the vendor or box information, then select Update.
Note: Changes you make in Tax1099 do not happen to your QuickBooks company file.
- If you need to file 1099s with your state, enter the information under the appropriate state boxes.
- Select the vendors you want to upload to e-file by checking the box, then select Next. If there are any errors, a pop-up message will appear. Once corrected, select the vendors again, then select Next.
- Select the vendors by checking the box next to the Date column. Choose how you want to send copies to the recipient/vendors by checking the box under USPS Mail or Email Recipient. You may also select Download Multiple PDFs to provide vendors with their copies yourself.
Note: There is an extra fee if USPS Mail is selected.
- If you need to file with your state, choose it here, then select Next or Calculate Tax1099.com Fee to see the total filing fee.
- When you are finished with the options on the Select Forms page, you’re taken to the Payment page. Once you enter your payment info, select Pay & Submit to e-File.
- If you need to create both 1099-NEC and 1099-MISC, you’ll need to repeat the steps for the other form.
Step 5: Check your filing status
After you’ve submitted your 1099s to the IRS, go back to your account to check their status.
- Not Submitted: If you have not e-filed Form 1099-NEC or 1099-MISC with the IRS. Consider revisiting it.
- Submitted: You have e-filed the form to the IRS.
Important: If you are Willing to revise it, you should file a manual amendment. Read IRS instructions and forms.
- Received by IRS: The form has been received by IRS, or is still under process, or is being processed, or has already been processed and approved. You’ll get an email in a week after the IRS accepts and confirms the submission. You may not receive this confirmation until the middle of January or later.
How do we file state 1099s in Easy Steps?
When you submit your 1099 forms, they will be forwarded to the IRS. The IRS will then send the info on the 1099-NEC or 1099-MISC forms to the states that are part of the program.
- Some states still require you to submit these forms directly to their agency. If that’s the case, we’ll give you the info you need to complete the process yourself.
- Your state may have additional requirements for you to file 1099s based on your business location. Refer to the details below.
Important: QuickBooks currently doesn’t support e-filing for states that require direct filing outside of Combined Federal/State Filing (CFSF), e-filing for states when there is state tax withholding, e-filing when the state threshold is below the federal threshold, or multi-state e-filing. You are responsible for understanding your state requirements. If you have questions, please check directly with your state.
Print Form 1099 and 1096 in QuickBooks Online
In this section, we will see how a QuickBooks user can print Form 1099 and Form 1096 in QuickBooks. Let us see the steps for both forms.
To Print Form 1096
The steps to print Form 1096 are as follows:
- Make sure to update your QuickBooks.
- Select the Reset Update checkbox.
- Navigate to the Vendors option, then choose 1099 Forms, then Print/E-file 1099 Forms. Create your 1099s.
- In the Choose a filing method window, select Print 1099-NEC or Print 1099-MISC.
- Specify the date for the forms, then choose the option OK.
- Select all vendors for whom you wish to print 1099s.
- Select Print 1099. Select Print 1096s instead if you’re printing Form 1096.
- Double-check your printer settings, then select Print
To Print Form 1099
The steps to print Form 1099 are as follows:
- Make sure to update your QuickBooks.
- It’s important to be on the latest release of the QuickBooks application to make sure that your 1099s are printing correctly.
- Navigate to the option of Vendors, then move on to choose the option 1099 Forms, and move to the option of Print/E-file 1099 Forms. Create your 1099s.
- In the Choose a filing method window, select Print 1099-NEC or Print 1099-MISC.
- Make sure to specify the date range for the forms, then choose the option OK.
- Select all vendors for whom you wish to print 1099s, then select Print 1099
- Double-check your printer settings, then choose Print.
How to Reprint 1099 in QuickBooks Online?
The steps to reprint 1099 in QuickBooks Online are as follows-
- Consider visiting the 1099 E-File Service sign-in page and signing up.
- Fill in your Intuit login credentials.
- Select the option Sign In.
- Click on the View past forms page.
- Print the form.
Final Words
We have come to the end of this blog. In this blog, we have thoroughly covered how a QuickBooks user can create, file, and print Form 1099 and 1096 in QuickBooks Online for free. In case you still have some doubts regarding the process of creating, filing, and printing these forms, consider getting in touch with our Biz Books Advice Professionals.
Frequently Asked Questions (FAQs)
1. How do I print previous years’ 1099 in QuickBooks Desktop?
Visit the official website, go to 1099 login, and then click on Past forms.
2. How do I find previously e-filed 1099 forms in QuickBooks Online?
- Open the QuickBooks application.
- Then go to Taxes. Then, select 1099 filings.
- Choose View 1099 to view a PDF copy.
3. Can I print my own 1099 Forms?
So just open up the Form 1099-NEC from the IRS website, and start filling it in on your browser. (Already downloaded the form? You can open it in a browser by right-clicking on the file and selecting “Open with…”) Once you’ve filled out your information, you can print the document the same way you would any other file.
4. Do I need a 1096 for every 1099?
If you file more than one type of information return on paper – for example, 1099-NEC, 1099-MISC, 1099-K, etc. you must prepare a separate Form 1096 for each type of information return. Form 1096 is not required for filing electronically.
5. Do I need to file a 1096 form if I file electronically?
Technically, there is no such thing as e-file 1096. Form 1096 is used to transmit paper forms to the IRS, but if those forms are filed electronically, 1096 is unnecessary. In sum, if you are e-filing your 1099 forms, you do not need to e-file 1096.
About The Author

Jonathan Browns
Jonathan Brown is a trained QuickBooks professional with 10 years of experience in the accounting sector. Moreover, he is passionate about helping businesses reduce the stress of managing accounts. Also, he is proficient in assisting entrepreneurs and small business owners to use QuickBooks and enhance their accounting experience.

QuickBooks Desktop, Payroll or Enterprise
Advanced Support for QuickBooks Desktop, Payroll & Enterprise Solutions
From payroll tax setup, direct deposit issues to Enterprise performance tuning and Desktop upgrades - our QuickBooks experts provide accurate and stepwise assistance. Get dependable support designed to minimize downtime and maximize efficiency.
Recent Posts
-
QuickBooks Error PS036: Causes, Fixes, and Prevention
-
Converting from QuickBooks Desktop to QuickBooks Online: A Complete Guide
-
Tried Everything? Here’s How to Fix QuickBooks Error Code 80070057
-
This QuickBooks Company File Needs to Be Updated: A to Z Guide
-
Renew QuickBooks Subscription: Desktop & Online Renewal Guide