How to E-File Form 941 with QuickBooks Online & Desktop

- By Jonathan Browns
- Nov 27, 2025
- Accounting
- 7 min read
The IRS tax form 941 is basically an Employer’s Quarterly Federal Tax return, which every employer must report for federal income, social security, and Medicare taxes withheld from employees’ paychecks. Any late filing of the Form 941 may cause you a penalty of five percent monthly, or a maximum of 25%. But now you can also file Form 941 in QuickBooks to have a smooth filing experience. Herein, this blog contains all the stepwise instructions to file and print QuickBooks Form 941.
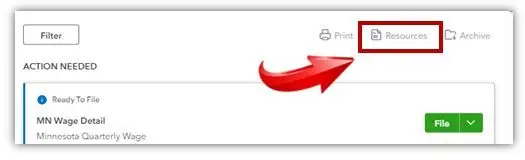
Where to Find Form 941 in QuickBooks Online?
To find the Form 941 in QuickBooks Online, you must closely follow the steps below.
- Initially, choose the Taxes menu and click the Payroll tax option.
- Head to the Filings tab and hit the Resources option. Then, tick-mark the Archived forms and filings option.
- Now, hit the drop-down menus to apply the filter to the form that you wish to view.
- Finally, look for the form name and opt for the View option.
How to View Your Previously Filed 941 Form in QuickBooks Desktop Based on Payroll Subscription?
Depending upon your payroll subscription, perform the steps below to view Form 941 in QuickBooks Desktop & QuickBooks Online Payroll.
QuickBooks Online Payroll
- Access the Payroll Tax option and click the Filings tab.
- Now, start viewing the current tax forms within the Action Needed or Coming Up section. Otherwise, you must hit the Resources > Archived Forms and Filings for past forms.
In case you have manually filed your tax form, then do as follows:
First Step: Archive the Form
- Choose the Payroll tax and then click the Filings tab.
- Now, beside the tax form you wish to save or archive, tap on the File menu.
- Thereon, opt for the period and choose the Archive option.
Second Step: View the Tax Form
- Initially, choose the Payroll Tax and then click the Filings tab.
- Now, head to the Resources tab and from there browse to the Archived forms and filings option.
- Next, hit the drop-down menu to apply the filter to the form you wish to view.
- At last, pick the form name and hit the View tab.
QuickBooks Desktop Payroll Assisted
- Browse to the Employees menu and click the Payroll Center option.
- Move to the File Forms tab and choose the View/Print forms & W-2s option.
- When you are on the Payroll Tax Center window, provide the correct Payroll PIN. Then, opt for the OK tab.
- Go to the Filed Forms option and pick the forms that you wish to view, print, or save.
QuickBooks Desktop Payroll Enhanced
- Click the Employees menu and from there head to the Payroll Center option.
- Choose the File Forms option, and below the Filing History section.
- Go to the Save Filings or E-Filings tab.
- At last, choose the form that you wish to view in QuickBooks.
How to View Your Old 941 in QuickBooks Online?
Herein, we have provided you with the step-by-step instructions to view the old 941 in QuickBooks Online.
- Initially, browse to the Taxes menu and click the Payroll Tax section.
- Choose the Filings tab option.

- After this, move to the Resources tab and hit the Archived Forms and filings for past forms.
Facts You Must Know About QuickBooks Form 941
The QuickBooks Form 941 is specifically designed for the non-agricultural businesses that owe above $1,000 in total federal taxes, including Federal Withholding, Social Security & Medicare. However, it is essential for businesses to file the Form 941 with the IRS quarterly.
This form is supported by the QuickBooks Online Payroll and QuickBooks Desktop Payroll products for filing this form.
Furthermore, have a look at the table illustrated below to identify if you are a semi-weekly or monthly depositor.
| Deposit schedule | Threshold for each deposit schedule |
| Semi-Weekly | Businesses who reported more than $50,000 in taxes during the lookback period |
| Monthly | Businesses who reported less than $50,000 in taxes during the lookback period |
What’s the Due Date For Filing the Form 941 QuickBooks?
The employer needs to file the Form 941 for reporting the wages, tips received by your employees, and federal income tax withheld. Also, it’s essential for both the employer’s and employee’s share of security and Medicare taxes. The Form 941 is due by the month that falls at the end of the quarter.
| January 1 to March 31 | April 30 |
| April 1 to June 30 | July 31 |
| July 1 to September 30 | October 31 |
| October 1 to December 31 | January 31 |
Tip: In case the due dates fall on Saturday, Sunday, or a legal holiday, then you need to file the Form 941 on the next business day.
How to File QuickBooks Form 941 in QuickBooks Desktop Payroll Enhanced?
Perform the instructions outlined below to file QuickBooks Form 941 in QuickBooks Desktop Payroll Enhanced.
First Step: Initiate Federal E-File & E-Pay
To begin the process, you must set up your Federal E-File and E-Pay in QuickBooks Desktop.
Enroll & Then Set Up For Federal Taxes E-Payment
Perform the following stepwise instructions for enrolling for the Federal taxes.
1. Register In the IRS Electronic Federal Tax Payment System (EFTPS)
- Perform the Registration if you started the business prior to 2011
It is essential to get registered with EFTPS once. In case you’re not sure whether you’re registered or not, connect with the IRS for further guidance.
- Perform the Registration if you started the business prior to 2011
- Visit the EFTPS.gov website and then choose the Enrollment tab. Then, go through the on-screen prompts to submit your enrollment.
- After this, within 7 to 10 business days, you will obtain your PIN and enrollment number via mail.
- Note: If you do the payment before receiving the PIN, connect with the IRS two business days after completing the enrollment. If the data you provide tallies with the IRS records, then an agent can take the payment. For some security reasons, the agent won’t provide you with the PIN over the phone.
- Once you obtain your 4-digit EFTPS PIN:
- Access the EFTPS.gov webiste.
- Choose the Login tab and mention the information required, like (EIN, 4-digit EFTPS PIN, bank account, or last eight digits of your enrollment number).
- Furthermore, complete the process to generate your password successfully.
2. Organize & Set up your tax payments to e-pay
- Access the Employees menu, tap on the Payroll Taxes & Liabilities tab.
- Choose the Edit payment Due Dates/Methods option.
- Now, head to Schedule Payments > Federal 941/944/943.
- When you are in the Edit Payment Schedule window, edit your payment method to E-pay.
- You must pick your payment frequency and click the E-Pay accounts tab.
- Thereon, opt for the account type, and ensure that the bank details you entered are appropriate.
- Finally, you must tap on Finish to complete the process.
Enroll & Then Set Up E-File
1. Setting Of Your Federal Filing Method
- Choose the Employees menu and click Payroll Tax Forms & W-2s.
- After this, browse to the Process Payroll Forms.
- Now, tap on the Manage Filing Methods option from the Other Activities list.
- You must opt for the Filing Methods. Then, opt for a federal form (Federal 941/944/943 or Federal Form 940), and click on Edit.
- Click the Filing As Responsible Individual (Owner/Partner/Corporate Officer) for a single FEIN.
- Finally, head to the E-file > Finish option.
2: Register within the IRS e-file program
- Within the Filing Methods screen, choose Enrollments and click on IRS.
- Choose the Edit menu and follow the on-screen instructions. Then, check your Employee Identification Number and insert the company’s legal name and address. Then select Next.
- Now, add your name, job title, email address, and contact number of the person the IRS can contact regarding your enrollment and your payroll tax forms. Then, hit Next.
- Tip: Make sure the name of the person you provided is linked with your company and not a third-party provider or accountant.
- Finally, choose the Send Information tab.
Second Step: E-Pay Your Federal Taxes
To ascertain that the federal tax payments are made on time, take care of the following things:
- If your federal tax liability crosses $100,000 in a liability time period, make the payment via the IRS EFTPS website on the next banking day.
- Also, verify that the E-payments must be sent before 5:00 PM PT two banking days prior to the due date. If the payment is made after this time, you must make the payment via the IRS EFTPS website.
E-Pay in QuickBooks Desktop
- Initially, move to the Employees menu and click Payroll Center.
- Choose the Pay Liabilities tab.
- When you are within the Pay Taxes & Other Liabilities section, click the liability to pay. Then, choose the View/Pay button.
- Cross-check the liability details for accuracy and hit the E-Pay.
- Provide the 4-digit EFTPS PIN and other login details correctly.
- Tip: In case you have previously made changes to the bank account for your e-payment, enter your new PIN.
- Thereon, hit the Submit option.
- Furthermore, start printing the confirmation notice that appears, indicating that Intuit has received your request. Then, submit your e-payment to the correct agency.
- Finally, click the Close tab.
After the e-payment, you will receive an email confirmation within 24-48 hours.
Third Step: E-Filing of Your Federal Forms
- Access the Employees menu, click Payroll Tax Forms and W-2s option.
- After this, tap on Process Payroll Forms and choose the federal form you wish to file from the list.
- Tap on the Create Form option and select the form filing period. Then, hit OK.
- Start checking every part of the form and click on the Check for Errors tab. Then, perform the required modifications.
- Now, click the Submit Form option and choose the E-File option.
- Provide your 10-digit IRS E-file PIN and then follow the on-screen guidelines to continue filing the form.
With this, you will receive the email confirmation within 24-48 hours.
How to Pay & File Payroll Forms in QuickBooks Desktop Payroll?
Herein, we have described the complete procedure to pay and file payroll forms in QuickBooks Desktop Payroll.
Generate & Print Your Payroll Tax Payment
First Step: Establish a Scheduled Payment
With the help of scheduled payments, you can monitor when your payroll taxes are due to avoid missing any payments. You may also set up the scheduled payment even if you have not yet accessed e-payments in QuickBooks.
- Move to the Employees menu, and from there choose the Payroll Taxes and Liabilities option.
- Tap on the Edit Payment Due Dates/Methods option and pick the state tax you want to schedule first. Then, click the Edit menu.
- Go to the Payment method and then pick the Check option.
- Provide your state account number and pick your payment frequency given to you by the state agency.
- Resume the above steps again for each state tax. Once everything is sorted, hit the Continue tab.
- Choose the bank account you wish to track payments in QuickBooks and tap on the Edit menu. Make sure that it tallies with the bank account you access for registering with the IRS and state agencies.
- Finally, hit the Finish tab to complete the process.
Second Step: Generate & Print Your Tax Payment
For making the Federal tax payments, you can record the payment in QuickBooks. You can either send the payment electronically or via the IRS website. However, for state tax payments, you must generate and print the checks to send them to the state agencies.
- Navigate to the Employees menu, click the Payroll Taxes and Liabilities, and choose the Pay Scheduled Liabilities option.
- Pick the tax you wish to pay and head to the View/pay option. Herein, you can check the taxes and amounts due.
- Next, hit the Save & Close tab and then pick the Print Checks tab.
Generate & Then Print Your Payroll Tax Forms
First Step: Pay or Record All The Tax Payments
Before setting up the tax form, ensure that you pay all the tax forms in QuickBooks. Otherwise, you will get the amounts due on the form.
Second Step: Get Ready & Print or Save Your Payroll Tax Form
- Initially, click the Employees > Payroll Tax Forms and W-2s > Process Payroll Forms.
- Choose the federal or state form you want to create from the list.
- Now, hit the Create Form option and choose the Filing Period. Once the period is chosen, hit the OK tab.
- Fill out the Interview for your form. Herein, you must ensure that all the sections are highlighted in Green and verify any pre-filled details on the form.
- Tap on Next and start checking all pages on the form.
- Once done, choose the Check For Errors tab. Eventually, QuickBooks will start looking for the errors on the form. Make sure that you address the issues before printing and saving the form.
- When you are all set for printing and saving your form, tap on Save as PDF or Print for your records. To access the form in the future, choose the Save and Close tab.
Third Step: Send the form to the tax agency
After successfully printing the tax forms, have a look at the instructions page to check where to send your tax forms.
How to Print 941 Forms in QuickBooks Online With Easy Steps?
Follow the stepwise instructions to print 941 Forms in QBO.
- Primarily, browse to the Taxes and then Payroll Tax option.
- Now, go to the Quarterly Forms or View and Print Archived Forms to check the archived forms from prior periods.
- Thereon, select the 941 links.
- At last, hit the Preview option. Then, you can either download the form in PDF format or print it.
How to Print Form 941 in QuickBooks Desktop?
For printing the Form 941 in QuickBooks Desktop, carry on with the following steps.
- Move to the Reports menu and click the Employee & Payroll option.
- After this, choose the Payroll tax Forms & W-2s.
- Now, opt for the 941 form and insert the date range for the historical tax records that you wish to get.
Conclusion
With this guide’s help, we hope that now you can easily file and print the QuickBooks Form 941. Thus, it also prevents the users from paying huge tax penalties on late or wrong filing of the tax forms. If you still require any expert’s opinion, then you can connect with our BizBooksAdvice professionals. They will guide you throughout the entire tax filing process and simplify your tax filing experience.
Frequently Asked Questions (FAQ’s):-
Question 1: Where can I find my 941 form in QuickBooks?
Ans. To find the 941 form in QuickBooks, move to the Reports menu and click the Employees and Payroll option. After this, choose the Payroll Tax Form to obtain these reports. Then, pick the 941 option by clicking on the drop-down menu to obtain the required report.
Question 2: How to file a prior year 941 in QuickBooks?
Ans. For filing a prior year 941 in QuickBooks, perform these steps.
- Choose the Reports menu and move to the Employees & Payroll option.
- Browse to the More Payroll Reports in Excel and click the Tax Form Worksheets option.
- Thereon, choose the Macros option and click the Quarterly 941 option.
- Provide the dates and pick the Create Report option.
Question 3: How to print Form 941 in QuickBooks Desktop?
Ans. For printing Form 941 in QuickBooks Desktop, move to the Reports menu and click the Employees and Payroll option. After this, hit the Payroll Tax Forms & W-2s. Next, you must opt for the 941 Form and mention the date range for the historical tax records.
Question 4: How to change 941 in QuickBooks Online?
Ans. To change the federal tax form 941 in QuickBooks Online, move to the Settings option. Thereon, tap on Payroll Settings> Edit beside the Federal tax option. Now, you must pick which form you file and how frequently you pay your taxes, and its effective date.
Question 5: What happens if you file an incorrect Form 941 in QuickBooks Desktop?
Ans. If you have filed an incorrect Form 941 in QuickBooks Desktop, you will obtain a notification from the IRS that the form must be corrected. Then, move back to the QuickBooks QuickBooks Desktop and do the necessary corrections in the form before submitting it to the IRS.
About The Author

Jonathan Browns
Jonathan Brown is a trained QuickBooks professional with 10 years of experience in the accounting sector. Moreover, he is passionate about helping businesses reduce the stress of managing accounts. Also, he is proficient in assisting entrepreneurs and small business owners to use QuickBooks and enhance their accounting experience.

QuickBooks Desktop, Payroll or Enterprise
Advanced Support for QuickBooks Desktop, Payroll & Enterprise Solutions
From payroll tax setup, direct deposit issues to Enterprise performance tuning and Desktop upgrades - our QuickBooks experts provide accurate and stepwise assistance. Get dependable support designed to minimize downtime and maximize efficiency.
Recent Posts
-
QuickBooks Self-Employed Login Issue: Cause and Troubleshooting
-
A Complete Guide to Fix QuickBooks Microsoft 365 Email Setup Problems
-
QuickBooks Online Updates: How They Work, and Why They Matter in 2026
-
QuickBooks Online Forecasting Tool: Plan Cash Flow & Business Growth
-
Here’s the Step-by-Step Guide For QuickBooks ETSY Integration