How to Fix QuickBooks Error 50004 (Direct Deposit Activation Error)?

- By Jonathan Browns
- Apr 14, 2026
- Business
- 7 min read
Does “QuickBooks Error 50004: We’re unable to complete your request with this email. Contact your admin to activate direct deposit” stop you from activating direct deposit?
This error primarily indicates a failure to connect with Intuit’s server due to various reasons, including software installation issues, firewall restrictions, or incorrect system date and time. As a result, it prevents users from using the direct deposit feature and disrupts their workflow. Considering this, we have mentioned all the major causes along with the troubleshooting methods to fix the QuickBooks Desktop Error 50004.
QuickBooks Error 50004 is a direct deposit activation error and can be resolved easily by running the Verify & Rebuild Data Utility in QuickBooks.
What are the Major Reasons That Lead to QuickBooks Error Code 50004?
QuickBooks Error Code 50004 mainly occurs while setting up the direct deposit due to damaged QuickBooks installation files. Besides this, you may also get this issue due to the following reasons.
- Windows Firewall blocking QuickBooks from accessing direct deposit services.
- Incorrect date and time on your system.
- Damaged or corrupt QuickBooks company files.
- Issues with the network connectivity may also cause QuickBooks Error Code 50004.
- Using an unsupported or outdated version of QuickBooks or Windows.
How to Fix QuickBooks Error 50004 Using Reliable & Effective Solutions?
After knowing the causes that trigger QuickBooks Error 50004, let’s know about the troubleshooting methods to fix the issue.
Method 1: Edit Your QBW.INI File in QuickBooks Desktop
The QBW.INI file in QuickBooks is used to store the user-specific application settings, preferences, and the list of recently opened company files. If this file, gets corrupted, it may trigger Error Code 50004 QuickBooks Desktop. Therefore, renaming or editing the QBW.ini file can help fix the issue.
- Open the Product Information screen by pressing the F2 or Ctrl + 1 keys.
- After this, hit the F3(or Ctrl 2) to access the Tech Help window.
- Now, browse to the Open File tab and double-tap on the qbw.ini file.
- You must search for the qbw.ini file that is written as [QBLICENSE} PAYROLL_BUNDLE_STATE= Y.
- Herein, change the Y to N.
- Next, select the File menu and click Save to save the qbw.ini with the changes.
- Go back to QuickBooks and try accessing the WF Invites or PTC again.
- If you are able to see the Payroll Activation screen, use the above steps. But instead of changing Y to N in the 5th step, remove the section [QBLICENSE] PAYROLL_BUNDLE_STATE=Y].
- Finally, if the error continues, then move to the next solution.
Method 2: Include Intuit as a Trusted Site in Your Browser
Sometimes, browsers block QuickBooks services. Adding Intuit as a trusted site ensures uninterrupted access to direct deposit features. So, it’s essential to add Intuit as a trusted website in your browser and run the QuickBooks direct deposit feature easily.
- Exit from the QuickBooks Desktop and your company file. Then, launch Internet Explorer on your computer.
- Now, drag your cursor to the upper right corner and select the Tools icon.
- Choose the Internet Options > Programs > Make Default tab.
- After this, hit OK and head to the Advanced Section.
- Opt for the Security tab and click the Trusted Sites > Sites option.
- Within the required fields, provide the following web links and tap on the ” Add option.
- https://*.intuit.com
- https://*.quickbooks.com
- Exit from the window and browse to the Custom Level segment.
- You must scroll down to the Miscellaneous Category and hit the Enable tab.
- Browse to the “Access data sources across domains” fields and hit the OK tab.
- At last, confirm the action by hitting the Apply and then the OK tab.
Method 3: Assign Admin Access to QuickBooks To Resend the Direct Deposit
With the proper administrative rights in QuickBooks, you can easily use the Direct deposit feature to make the payments. Perform the following steps to give the admin access to fix error code 50004 QuickBooks desktop.
- Open the Start menu and type QuickBooks Desktop in the search console.
- Now, right-click on the QuickBooks icon and opt for the Run As Administrator option.
- Once the QuickBooks window opens, hit the Employees menu and choose Employee Center.
- Choose the name of the Employee and tap on the Payroll Info option.
- Move to the Direct Deposit window and head to the Use Direct Deposit For [Employee’s name]. Then, confirm the number of accounts.
- Provide the necessary details in the text fields for the Employee’s bank details.
- At last, hit OK, and when asked, provide your PIN to authenticate the action.
Method 4: Update QuickBooks to the Latest Version
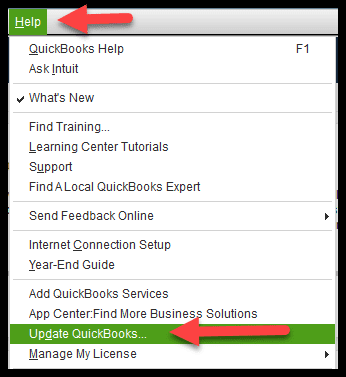
At times, most of the issues in QuickBooks, such as QuickBooks direct deposit activation error 50004, may be triggered due to an outdated QuickBooks version. Therefore, to resolve the issue, download the most recent release available for QuickBooks Desktop.
Method 5: Run the Verify & Rebuild Data Utility
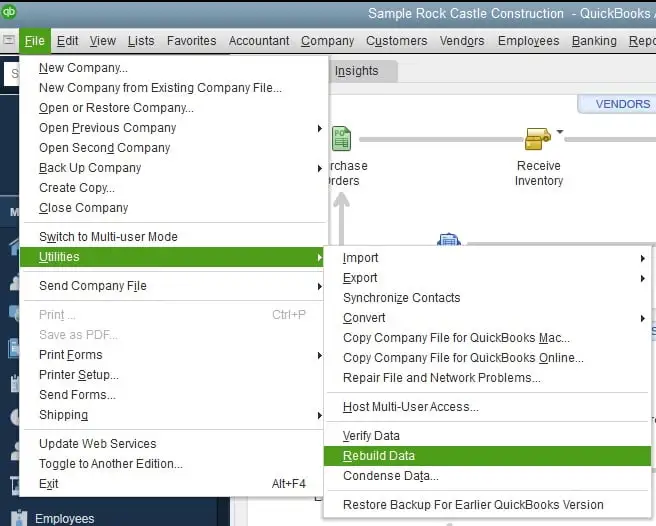
If the issue persists, run the Verify & Rebuild data utility to identify and repair data integrity issues in your company file.
Method 6: Make Changes to the Paycheck Details
Perform the following instructions to make changes to the paycheck details and fix the QuickBooks Desktop Error 50004.
- Initially, open the first paycheck and tap on the Paycheck Detail option.
- As a result, a Review paycheck window will open. From there, choose the Earnings tab.
- Start searching for the last item on the list and transform it into a new item.
- With this, QuickBooks displays a Net Pay Locked window. Herein, hit the No option to exit it.
- Choose the Rate field for the item included in the 4th step.
- Also, verify that no changes are made to the Net pay and taxes. Then, hit the OK tab.
- Finally, choose the Save and Close option to save the necessary changes.
Method 7: Establish the Paycheck Manually
To create the paycheck manually in QuickBooks, perform the steps instructed below.
- Initially, move to the Employee’s menu from your QuickBooks Desktop.
- Click the Pay Employees and select a check type: scheduled, unscheduled, or termination.
- When in the Create Paycheck tab, choose the Start Schedule Payroll and then hit the Opt Schedule.
- Now, verify that the end date and bank account details are appropriate.
- Look for the paycheck details by hitting the Open Paycheck option.
- Click on Save > Next and then the Save option.
- Once verified, all the details are added, and tap on Continue.
- If you wish to print them, then look for the Print option.
- Finally, verify all the employees’ accounts to ensure all the paychecks are correct.
Summarizing the Above
QuickBooks Error 50004 is a direct deposit activation errors which mainly trigger while setting up the direct deposit feature. You can fix it easily by performing the troubleshooting methods described ahead in this post. Additionally, ensure a stable internet connection and use updated QuickBooks and Windows versions to avoid such issues in the future.
For more assistance regarding this error, you can connect with our BizBooksAdvice experts. They will assist you in the best possible manner.
Frequently Asked Questions (FAQ’s):-
Question 1: How to activate direct deposit in QuickBooks?
Ans. Perform the following steps to activate direct deposit in QuickBooks.
- Choose the All apps and then choose your Employee.
- Click the Start or Edit menu from the Payment method section.
- Choose the Direct Deposit option and opt for a Direct Deposit method.
- Provide the routing and account numbers from the Employee’s voided check and click Save.
Question 2: How long does it take to set up direct deposit in QuickBooks Online?
Ans. The direct deposit setup and verification process may take around a week to complete. Once the details are submitted, it may take up to 3 days to finish the risk analysis.
Question 3: How to verify direct deposit in QuickBooks Online?
Ans. To check the direct deposit in QuickBooks Online,
- Launch the QuickBooks application and log in as a QuickBooks administrator.
- Choose the Activate Direct Deposit option and then log in to your Intuit account.
- Provide the debt amount twice and choose the Verify option.
About The Author

Jonathan Browns
Jonathan Brown is a trained QuickBooks professional with 10 years of experience in the accounting sector. Moreover, he is passionate about helping businesses reduce the stress of managing accounts. Also, he is proficient in assisting entrepreneurs and small business owners to use QuickBooks and enhance their accounting experience.

QuickBooks Desktop, Payroll or Enterprise
Advanced Support for QuickBooks Desktop, Payroll & Enterprise Solutions
From payroll tax setup, direct deposit issues to Enterprise performance tuning and Desktop upgrades - our QuickBooks experts provide accurate and stepwise assistance. Get dependable support designed to minimize downtime and maximize efficiency.
Recent Posts
-
QuickBooks Online Forecasting Tool: Plan Cash Flow & Business Growth
-
Here’s the Step-by-Step Guide For QuickBooks ETSY Integration
-
How to Migrate From QuickBooks Desktop to QuickBooks Online
-
QuickBooks Enterprise Latest Version (2026): Everything You Need to Know
-
How to Troubleshoot QuickBooks Error PS038 During an Update?