How To Fix QuickBooks Missing PDF Component Error

- By Jonathan Browns
- Nov 05, 2025
- Accounting
- 7 min read
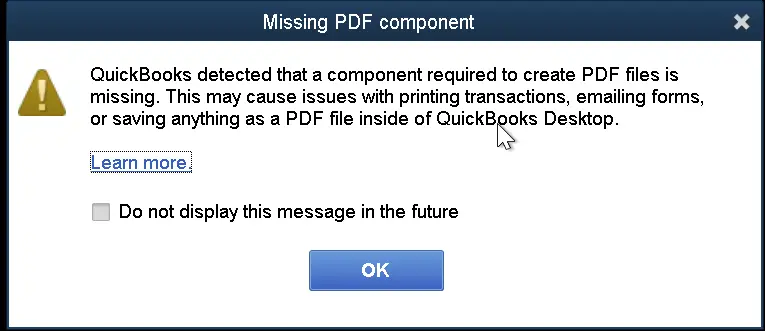
Is the QuickBooks Missing PDF Component Error message prompting on your screen while printing reports or saving files in the form of PDF? Well, this issue may take place due to a missing Adobe Reader, a disabled XPS Document Writer, or while running the old QuickBooks version. Thus, it restricts the users from performing different tasks, which include printing, emailing forms, or saving in a PDF file within QuickBooks. Herein, this guide explains the factors contributing to the QuickBooks component missing PDF error and solutions to address them. Let’s continue reading this post.
Why Does the User Experience the QuickBooks PDF Component Missing Error?
The following are the root causes why users end up with the QuickBooks PDF Component Missing error. So, let’s understand all the root causes.
- The presence of damage or a missing Adobe Reader application.
- You are not working on an incompatible version of the Adobe Reader or QuickBooks application.
- There might be the possibility that Microsoft XPS Document Writer is disabled in Windows settings.
- If you doesn’t have sufficient permissions to access the temp folder and XPS Document Writer.
- Corrupt or damaged QBprint.QBP file, which is used for printing from QuickBooks.
Effective Methods to Resolve QuickBooks Missing PDF Component Error
If you are receiving the QuickBooks Missing PDF Component Windows 11 error, then perform the solutions given below.
Solution 1: Download the Latest Version For QuickBooks Desktop
At times, the users may experience that a component required for PDF print from QuickBooks is missing while working on the old QuickBooks version. So, to address the issue, you must download and update QuickBooks Desktop to the latest version.
Solution 2: Update the Temp Folder Permissions
Incorrect Temp folder permissions may restrict the users from printing. So, to resolve the issue, you must refresh the temp folder permissions by performing these steps.
First Step: Relaunch Your PC
Before beginning the process, restart your computer and then try again. If the issue is still not resolved, change the temp folder permissions.
Second Step: Refresh Your Temp Folder Permissions
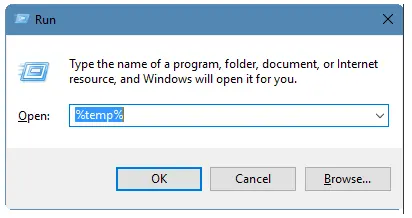
- Initially, access the Run window by using the shortcut keys Windows key + R.
- After this, insert “%TEMP%” and click the OK tab.
- Now, right-click an empty area of the temp folder and tap on Properties.
- Next, move to the Security tab and verify that all user names and groups in Security have Full Control.
- After giving Full Control, try to save as a PDF again in QuickBooks.
Third Step: Check if you are able to print with XPS
QuickBooks makes use of the XPS Document Writer for saving in the form of a PDF. So, to test whether you are able to print with your XPS Document Writer, carry on with these steps.
- Launch the Notepad application and write Test in the window.
- Now, head to the File menu and click the Print option.
- Choose the XPS Document Writer and then hit the Print menu.
- Provide a filename and then save it on your desktop.
- Move back to your desktop and view the XPS Document you have printed via Notepad.
If you fail to print via an XPS printer outside of QuickBooks, connect with your IT expert or Microsoft for assistance.
Read More – QuickBooks Detected that a Component Required to Create PDF
Let Your Computer Print to Your XPS Printer
- Firstly, move to the Control Panel and then head to the category View tab.
- Choose the Programs option and then click the Turn Windows Features On or Off.
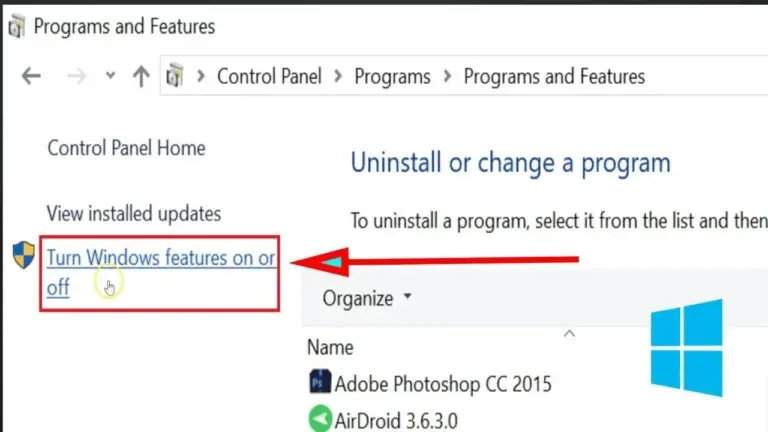
- Make sure that you have marked the checkbox of Microsoft XPS Document Writer within the list of services.
- Finally, when all the changes are done, hit the OK tab.
Solution 3: Try Running the QuickBooks Print & Print Repair Tool
If you are still getting issues while printing or saving the file in the PDF format, then you can fix it by running the Print Repair tool. For that, you must use the following steps.
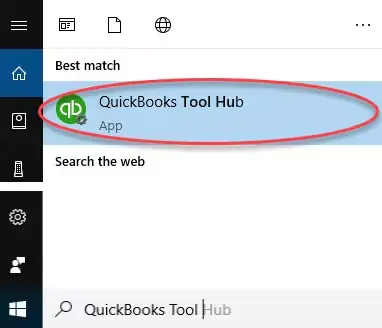
- Make sure that you have downloaded and installed the latest QuickBooks Tool Hub (1.6.0.8).
- Now, double-tap on the QuickBooks Tool Hub icon and hit the Program Problems tab.
- Now, choose the QuickBooks PDF & Print Repair Tool option. The tool will then take some time to run on your system.
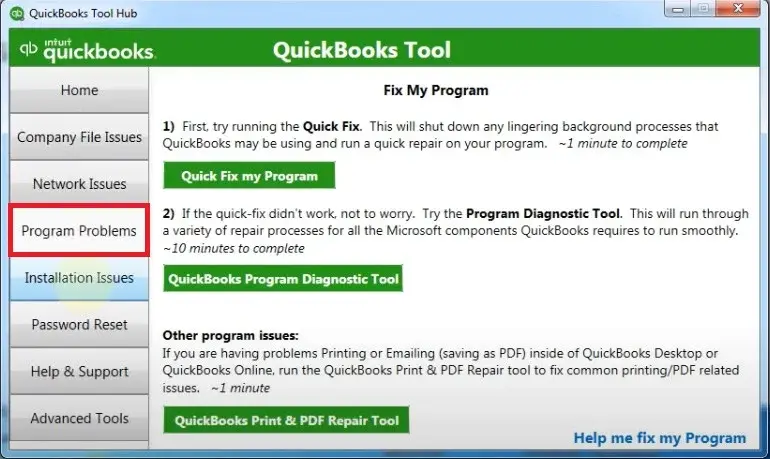
- Finally, you must try to print, email or save the file as a PDF via QuickBooks Desktop to see if the error exists.
Learn More – QuickBooks Form 941
Solution 4: Turn On the Microsoft XPS Document Writer
The Microsoft XPS Document Writer is basically a virtual printer that lets QuickBooks create, save reports, or print and mail them. Moreover, it works as a print-to-file function that helps in converting the document data into an XPS file format. In case the XPS Document writer is disabled, it might create issues while printing or saving the file as a PDF.
- Launch the Run Command window using the shortcut keys Windows + R.
- After this, insert “optionalfeatures” and click the OK tab.
- Search for the Microsoft XPS Document Writer and verify that it’s chosen.
- Finally, tap on the OK option to complete the process.
Solution 5: Reinstall The Microsoft XPS Document Writer & Modify Permissions Accordingly
The following are the instructions to reinstall the Microsoft XPS Document Writer.
- Launch the Run window and insert the control printers in the search panel.
- After this, choose the Add Printer option and then hit the The printer I want isn’t listed option.
- Head to the Add a local printer or network printer with manual settings tab.
- Choose the Use an existing port option and then click Next.
- Go to the Microsoft option from the left panel and choose Microsoft XPS Document Writer from the right column.
- Move further by clicking on Next, and it will instantly download the XPS Document.
Instructions to Adjust Windows User Permissions For XPS Document Writer
- Firstly, browse to the Printer Control Panel and right-click on Microsoft XPS Document Writer.
- After this, click the Printer Properties option > Security tab and pick the Everyone user group. If you can’t find it, choose the Add option.
- Tap on the Check Names option after adding Everyone into the text box.
- Now, hit the OK tab and choose the Print within the Allow column.
- Click on OK and then head to the following path “C:\Windows\System32\spool.
- Thereon, choose the Security tab, click on Edit > Add, and then pick the Local Service option.
- Press the Enter key and verify that Full Control is assigned to the Local Drives.
- Later on, hit the OK tab and then once again try printing the PDF via QuickBooks.
Solution 6: Update & Then Repair Adobe Acrobat Reader
Users often end up with the QuickBooks Desktop PDF component missing error while using an older or damaged Adobe Reader. So, to address the issue, you must install the Adobe Reader updates and then repair it.
- Initially, hit the Windows logo key to launch the Start menu and type Adobe in the search console.
- Now, hit the Adobe Reader from the applications list and head to the Check for Updates tab.
- Thereon, begin downloading the setup file for installation by browsing to the Adobe Product Download page.
- Finally, perform the instructions given on the screen to successfully install the latest update.
Repair the damage present within the QuickBooks PDF missing component.
- Shut down all the open Windows and browsers on your computer.
- Now, launch the Run window and hit the Uninstall/Change option.
- Next, double-tap on the Adobe Reader and choose the Uninstall/Change option.
- Thereon, click on Next and the Repair option.
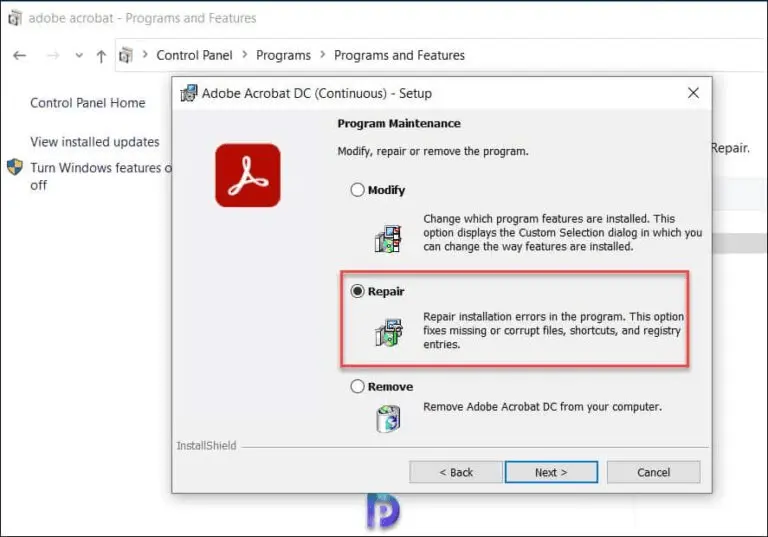
- Once again, tap on Next and head to the Install option.
- When you are done with the installation part, hit the Finish tab and relaunch Windows.
Solution 7: Edit the QBPrint.qbp File
QBPrint.qbp is the file that keeps the customized printer settings and form layouts for the transactions. However, when the printing issue occurs, then changing the name of the QBPrint.qbp forces QuickBooks to generate a new one with default settings.
- Access the Windows File Explorer and then head towards the C:\ProgramData\Intuit\QuickBooks 20XX folder.
- Tip: Herein, the XX in 20XX reflects your QuickBooks Desktop version, and you may need to display hidden files and folders to view the QBPrint.bp file on the system
- Now, move to the QBPrint.bp file in the folder and then right-click it.
- Choose the Rename option and type .OLD at the back of your file name.
- Thereon, access the QuickBooks Desktop application and opt for the Printer Setup from the File menu.
- Next, pick any transaction from the Form Name list and click the OK button.
- As a result, this action will prompt QuickBooks to create a new QBprint.qbp file.
Conclusion
The QuickBooks Missing PDF Component error often appears while trying to print or save the file in the PDF format. Thus, this issue prevents the users from performing the print-related functions. SO, to resolve the issue, ensure that the Microsoft XPS Document Writer is enabled, and you are running the updated Adobe Reader.
In case this issue still continues after performing the above solutions, feel free to connect with our BizBooksAdvice professionals. They will ensure that you offer the step-by-step instructions to address the issue.
Frequently Asked Questions
Question 1: How to fix QuickBooks can’t complete the current action due to a missing component?
Ans. You must perform the following troubleshooting methods to fix the issue where QuickBooks can’t complete the current action due to a missing component.
- Make use of the QuickBooks Tool Hub.
- Try running the QuickBooks Print & PDF Repair Tool
- Verify that you have changed the temp folder permissions.
- Also, look into the print settings.
Question 2: Why can’t I view or print a PDF in QuickBooks?
Ans. Users often face issues while viewing or printing a PDF in QuickBooks when the PDF file is damaged or the PDF reader is outdated.
Question 3: What precautions must you take to prevent the QuickBooks missing PDF component error?
Ans. Here, we have listed some of the important pointers you must consider to avoid the QuickBooks missing PDF component error.
- The users must ascertain that you are running the latest QuickBooks Desktop or Microsoft PDF Component.
- You must give the necessary permissions to the Temp folder.
- Also, ensure that you have reinstalled the Microsoft XPS Document Writer.
Question 4: Can antivirus software trigger the QuickBooks missing PDF Component error?
Ans. Yes, sometimes the interference of the antivirus software might prevent users from printing or saving the PDF file. Thus, it might give rise to the QuickBooks missing PDF component error.
Question 5: What to do when the reconcile window doesn’t show or disappear, but the PDF function works?
Ans. If the PDF function in QuickBooks works, but the reconcile window fails to show or disappear, then perform these steps.
- Move to the Reconcile option and click the banking menu.
- After this, review all the open Windows to verify if the reconciliation window is listed.
- Thereon, head to the Close All option and then start the reconciliation process again.
About The Author

Jonathan Browns
Jonathan Brown is a trained QuickBooks professional with 10 years of experience in the accounting sector. Moreover, he is passionate about helping businesses reduce the stress of managing accounts. Also, he is proficient in assisting entrepreneurs and small business owners to use QuickBooks and enhance their accounting experience.

QuickBooks Desktop, Payroll or Enterprise
Advanced Support for QuickBooks Desktop, Payroll & Enterprise Solutions
From payroll tax setup, direct deposit issues to Enterprise performance tuning and Desktop upgrades - our QuickBooks experts provide accurate and stepwise assistance. Get dependable support designed to minimize downtime and maximize efficiency.
Recent Posts
-
Tried Everything? Here’s How to Fix QuickBooks Error Code 80070057
-
This QuickBooks Company File Needs to Be Updated: A to Z Guide
-
Renew QuickBooks Subscription: Desktop & Online Renewal Guide
-
QuickBooks Online Login: Sign in to Access Your QB account
-
Change EIN in QuickBooks: Complete Guide for Desktop, Online & Payroll