QuickBooks Shipping Manager Not Working: Here’s What To Do

- By Jonathan Browns
- Dec 02, 2025
- Accounting
- 7 min read
QuickBooks Shipping Manager is a tool designed to handle shipping processes by generating and printing discounted shipping labels. Moreover, it integrates with the carriers, including USPS, FedEx, and UPS, for automatically syncing addresses.
But, sometimes users may experience the QuickBooks shipping manager not working issue when the FedEx package is selected, the tool does not open the shipping label on the screen. Rather than, it started appearing the Ship Rush dialog box (Shipping Label) in the taskbar. In other instances, this issue may occur while upgrading to QuickBooks Enterprise 2022.
In this guide, we will explore all the possible causes why QuickBooks Shipping Manager is Not Opening and solutions to fix them.
- “Error: The Shipping Manager database is newer than the Shipping Manager on this PC.”
- “DBISAM Engine Error # 11949 SQL parsing error
- “Sometimes when users try to ship via UPS within QB, they get this error:
- “Error: [250002] Invalid Authentication Information.”
What causes the QuickBooks Shipping Manager not working Issue?
Users often experience the QuickBooks Shipping Manager Not Working issue due to corruption in the QuickBooks Shipping Manager Database. Other factors that might give rise to this error are illustrated below.
- You might experience this error if the program’s installation files or modules are damaged.
- The QuickBooks Shipping Manager Not Opening issue may arise while attempting to access the shipping manager from the POS Client workstation.
- Interference of the Windows Firewall may also block access to QuickBooks Shipping Manager.
- In other instances, the issue may arise while running the outdated QuickBooks application.
How to Resolve the QuickBooks Shipping Manager Not Opening Issue?
Herein, we have discussed all the possible solutions to fix the QuickBooks shipping manager not opening error.
Solution 1: Register Your ShipRush OCX File
Once you register your ShipRush OXF file, you can easily troubleshoot the QuickBooks shipping manager not working issue.
- Launch the Start menu and move to the All Programs tab
- Now, you must right-click on Command Prompt and tap on the Run as Administrator option.
- Browse to the Command prompt window, insert “cd c:\ Windows \ syswow64” and hit the Enter key.
- Afterwards, for registering the file, you must look for the regsvr32.exe “c:\Program Files (x86)\ Common Files\ Intuit \ ShippingManager \ Zrush_ShipRush9_QB.ocx” and click on the OK tab.
- When all the changes are done, hit the OK tab.
- Finally, relaunch your computer, and it will set up the Shipping Manager.
Solution 2: Modify the Name of Your Shipping Manager Folders
You can edit the names of your shipping manager folders by performing the instructions outlined below.
- Initially, access the File Explorer window by pressing the Windows + E keys together.
- After this, you must start searching for the following locations:
- C:\Program Files (x86)\CommonFiles\Intuit\ShippingManager
- C:\Users[WindowsUserName]\AppData\Roaming\Intuit\ShippingManager
- Furthermore, right-click on the folder and add .OLD at the end of the file name.
- At last, relaunch your system to see if the issue still persists.
Solution 4: Generate Another Shipping Manager Account
At times, a damaged or corrupt Shipping Manager account might trigger the QuickBooks Shipping Manager not working issue. So, to resolve the issue, you must create another shipping manager account by performing these steps:
Removing the Old Account
- Firstly, launch the QuickBooks application and move to the File menu.
- After this, click on the Shipping option and then hit the Shipping Options.
- Browse to the Settings menu and click the Delete Account tab.
When the process is over, go through the steps below to create a new account.
Create a New Account
- Open the QuickBooks Desktop application and then log in to your company file.
- After this, choose the File menu and hit the Shipping > Ship UPS Package option.
- You must complete the account details accurately in the given text fields.
- Now, read and then give your consent to the End User License Agreement.
- To give confirmation for the terms and conditions, mark the checkbox “I Agree to Terms and Conditions.”
- Thereon, hit the Next tab and check your printer settings.
- At last, click the Next and then the Finish tab to complete the process.
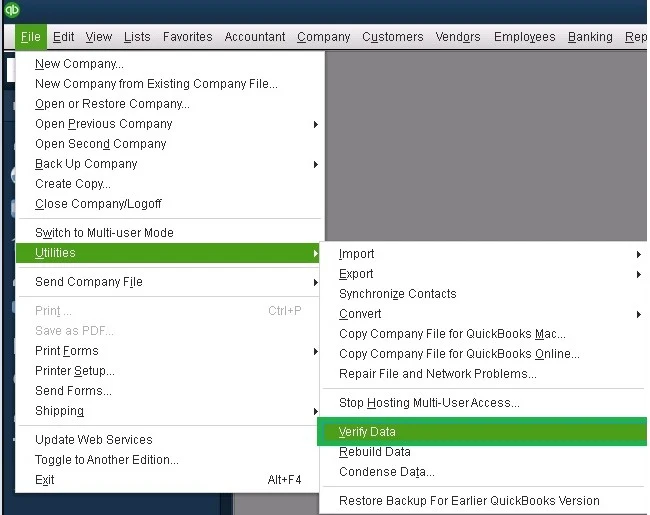
Solution 5: Verify & Rebuild Data Utility in QuickBooks Desktop
If you are still receiving the QuickBooks Shipping Manager Not Opening issue, then try to run verify and rebuild data utility in QuickBooks Desktop. Doing so will help you run a system check-up to identify the root cause of the problem.
Solution 6: Try to Run a Quick Fix My Program Tool
If you are still experiencing the QuickBooks Shipping Manager to Stop Working issue, then try running the Quick Fix My Program tool. By this, QuickBooks will close down the background running processes and then run a quick fix to your program. For that, use these steps below.
- Initially, launch the QuickBooks Tool Hub on your computer.
- After this, choose the Program Problems tab and then pick the Quick Fix My Program option.
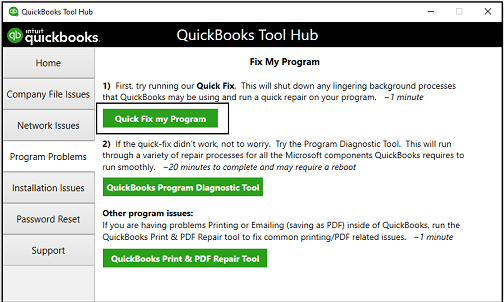
- Now, launch your data file in QuickBooks Desktop to see if the issue is still bothering you.
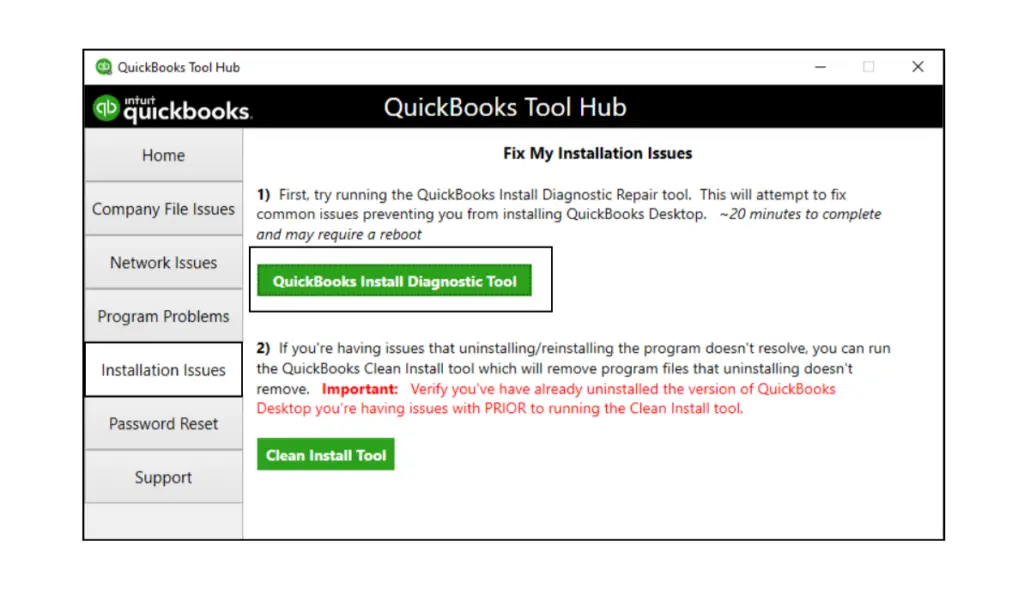
Solution 7: Access the QuickBooks Install Diagnostic Tool
At times, damage or corruption during the installation of QuickBooks Desktop might cause the QuickBooks Shipping Manager not to open. So, to resolve the issue, you must run QuickBooks Install Diagnostic tool.
Solution 8: Reinstall the QuickBooks Point Of Sale (POS) Application
Herein, we have discussed the stepwise instructions to reinstall the QuickBooks Point of Sale (POS) application.
- Launch the Start menu and open the Control Panel window.
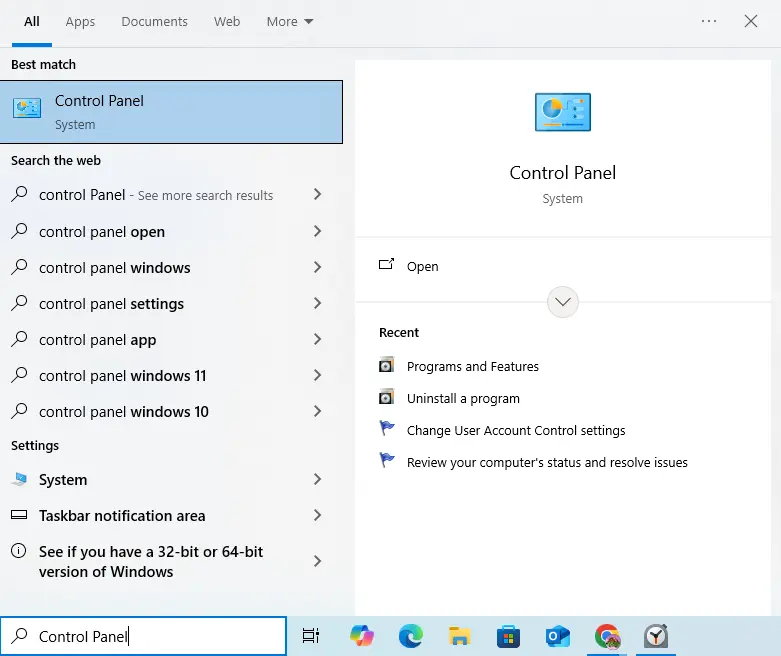
- Choose the Programs and Features option and pick the QuickBooks POS that you wish to uninstall. Right-click on the QB POS application and click on the Uninstall option.
- Thereon, do as per the instructions given on the screen for uninstalling the QuickBooks POS.
- Now, reinstall the QuickBooks Point of Sale application and move to the File menu.
- Browse to the Preferences tab and hit the Company option.
- You must go to the Sales menu > Shipping and avoid selecting the Use QuickBooks Shipping Manager checkbox.
- Thereon, hit the Save option and reopen the File menu. Then, choose the Preferences > Company > Shipping option.
- Furthermore, tick the checkbox of “Use Shipping Manager” and then launch the POS application.
- Later on, hit the Shipping Manager settings and provide the details of the Shipping Manager account.
How to Fix QuickBooks Access Violation Error Within Shipping Module?
The users often get a QuickBooks access violation error in the shipping module while attempting to create a UPS shipment. You may also get this issue due to damage in the folder. So, to resolve the issue, it’s necessary that the Shipping Manager be in the shared company files folder.
- To begin the process, relaunch both the host computer and the network computer.
- After this, launch QuickBooks on the host computer and confirm that the shipping manager works.
- Now, by keeping the QuickBooks open on the host computer, perform these steps:
- Tap on the Help menu and choose the About QuickBooks option.
- When you are in the green window, ensure that “User Licenses” says 2 or greater. Herein, copy the license number to a safe place and leave your QuickBooks application open.
Then, move to your network computer and perform the following steps.
- Launch the QuickBooks application and ensure that the company file works on the host computer (if it works with Company Files folder permissions), and leave QuickBooks open.
- Hit the Help menu and then click About QuickBooks. When you are in the green window, check that the license number tallies with the license number for the host computer. Then, ensure that the “User Licenses” says 2 or greater.
Return to the host computer and then use the following steps.
- Access the Shipping Manager Settings and opt for the Connection Settings menu.
- You will see the Connect Via Network box, which will ensure that the shipping manager database is situated in the following location: “C:\Documents and Settings\All Users\Documents\Shipping Manager v4\Database.v4.” Herein, all you require is to note down the Shipping Manager path.
- Now, verify that the company file is situated in “C:\Documents and Settings\All Users\Documents\Intuit\QuickBooks\Company Files” (or a path other than the default). You need to write down the company file path in a safe place.
- Exit from QuickBooks on both computers.
- Thereon, access the QuickBooks application. Within the “Shipping Manager Settings>>Connection Settings>>Connect Via Network”box, provide the path “C:\Documents and Settings\AllUsers\Documents\Intuit\QuickBooks\Company Files\Shipping Manager v4\Database.v4\” and click OK. Otherwise, you can save the path back to the QuickBooks main screen and then exit from the QuickBooks application.
- When you are on the network computer, launch the QuickBooks application. Then, opt for the “Shipping Manager Settings>>Connection Settings>>Connect Via Network” and insert “\\[host computer name or ip address]\SharedDocs\Intuit\QuickBooks\Company Files\Shipping Manager v4\Database.v4\” in the block. Herein, either hit the OK tab or save back to the QuickBooks main screen.
Conclusion
So, here we end this blog and hope that the troubleshooting solutions will help you deal with the QuickBooks Shipping Manager Not Working issue. Thus, it will help you keep track of the shipments. Furthermore, if you still require any additional help in resolving the issue, then connect with our BizBooksAdvice professionals for help.
Frequently Asked Questions (FAQ’s):-
Question 1: Why is the shipping manager not opening in QuickBooks Desktop?
Ans. The shipping manager is not opening in QuickBooks Desktop due to corrupt data files, interruption of the Windows Firewall, or some system sources.
Question 2: What does a shipping manager do?
Ans. The shipping manager ensures that the shipments reach their destination on time and within the budget. Also, they coordinate incoming shipments and oversee the packaging of outgoing shipments.
Question 3: How to set up the shipping manager in QuickBooks Desktop?
Ans. For setting up the shipping manager in QuickBooks Desktop, do as follows:
- Initially, access the File menu and click the shipping option.
- Choose the FedEx Shipping Options, UPS Shipping Options, or USPS Shipping Options.
- In case you are a POS User, hit the Point of Sale option and hit the QuickBooks Shipping Manager option.
Question 4: How can you update the Shipping Manager?
Ans. To update the Shipping Manager in QuickBooks, implement these steps:
- Initially, launch the QuickBooks application and move to the Updates section.
- After this, go through the prompts given on the screen to download and install the updates available for the Shipping Manager.
Question 5. How to restore default settings in Shipping Manager?
Ans. To restore the default settings in the shipping manager, look for the option in the Settings menu. Herein, you need to be very attentive while making any changes, as it may delete custom settings that you have set up.
About The Author

Jonathan Browns
Jonathan Brown is a trained QuickBooks professional with 10 years of experience in the accounting sector. Moreover, he is passionate about helping businesses reduce the stress of managing accounts. Also, he is proficient in assisting entrepreneurs and small business owners to use QuickBooks and enhance their accounting experience.

QuickBooks Desktop, Payroll or Enterprise
Advanced Support for QuickBooks Desktop, Payroll & Enterprise Solutions
From payroll tax setup, direct deposit issues to Enterprise performance tuning and Desktop upgrades - our QuickBooks experts provide accurate and stepwise assistance. Get dependable support designed to minimize downtime and maximize efficiency.
Recent Posts
-
QuickBooks Error PS036: Causes, Fixes, and Prevention
-
Converting from QuickBooks Desktop to QuickBooks Online: A Complete Guide
-
Tried Everything? Here’s How to Fix QuickBooks Error Code 80070057
-
This QuickBooks Company File Needs to Be Updated: A to Z Guide
-
Renew QuickBooks Subscription: Desktop & Online Renewal Guide