QuickBooks Auto Import of Statements is Not Working: Let’s Fix It

- By Jonathan Browns
- Dec 23, 2025
- Accounting
- 7 min read
QuickBooks Auto-Import is a feature that allows you to automatically extract financial data. It may consist of customer details, bank transactions, or other lists from external sources directly into QuickBooks. As a result, it saves the precious time of manually entering the data by syncing it automatically. But, sometimes users may be stuck with the QuickBooks auto Import of statements is not working issue due to issues with your bank connection. Consequently, this issue prevents users from downloading the bank statements as PDFs or syncing with customer job lists.
Reasons Why QuickBooks Auto Import of Statements is Not Working
Herein, we have provided you with a list of all the possible reasons that cause the QuickBooks Auto Import of Statements not working issue arise.
QuickBooks Desktop
- Presence of data damage or corruption.
- You haven’t updated your bank feed
- An issue may arise due to the interruption between QuickBooks and the Bank Feed option.
QuickBooks Online
- You might be facing some browser-related issues.
- Sometimes, the excessive storage of browsing history, cookies, and cache files may trigger this issue.
- An uninterrupted connection between QuickBooks and the bank feed.
Best Methods to Fix QuickBooks Auto Import Of Statements Not Working in QuickBooks Desktop
Below, we have listed all the top methods to address the QuickBooks Auto Import of Statements Not Working Error.
Method 1: Run the Verify & Rebuild Data Utility
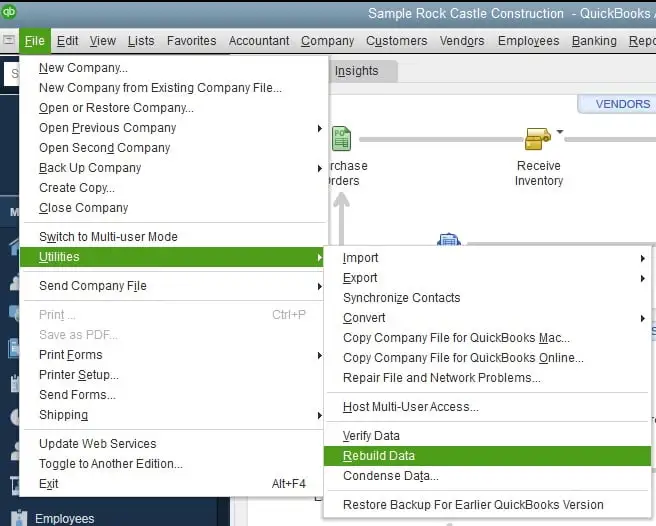
If you are facing issues while uploading the bank transactions, then you must use the Verify & Rebuild Data Utility to address the data issues. By running this tool, you can repair the data damage and continue uploading bank transactions in QuickBooks.
Method 2: Update Your Bank Name
- To update your bank, tap on the Banking menu on the left side.
- After this, hit the Update option.
- As a result, QuickBooks will begin to update the bank transactions automatically.
If you are still having trouble importing bank transactions into QuickBooks, then try another solution.
Method 3: Disconnect or Reconnect Your Bank Account
Sometimes, disconnecting and then reconnecting your bank account can help auto-import bank statements in QuickBooks Online.
A. Disconnect the account for bank feed
QuickBooks Desktop for Windows
- Firstly, move to the Lists menu and choose the Chart of Accounts.
- After that, right-click on the account that you want to turn off and hit Edit Account.
- Thereon, choose the Bank Settings option and select the Deactivate all online services option.
- Next, hit OK and then Save & Close.
QuickBooks for Mac
- Initially, browse to the Lists menu and click the Chart of Accounts.
- After that, you must highlight the account you wish to turn off and tap on the pencil icon to edit.
- Thereon, choose the Online Settings > Download Transactions and then the Not Enabled option.
- Finally, hit the OK option twice for the confirmation.
Read More:- QuickBooks for Mac
B. Reconnect the Bank Feed Account With QuickBooks Desktop
To reconnect your bank account, you need a PIN or a password. After setting it, you can easily download the electronic statements to your bank feeds.
Before moving further, check with your bank to review if the services are free or if there are any fees.
- Bank provided login details: Your bank will give you the Customer ID or password (or PIN) for the online banking setup.
- Moreover, you may also need the following things, which include:
- Account Number: This is the number that is provided by FI to your account when the account is generated, and it is also present on the bank statement. If you fail to get the account number, then contact your financial institution.
- Routing Number: A FI contains a 9-digit number, which is known as the routing number. This number is basically located on a check for your account. If you fail to get it, then connect with the FI for help.
- Account Type: It is essential to know how your bank categorizes your account, not how QuickBooks does.
- Account Type at FI Account Type in QB: Review your Bank Savings Money Market Line of credit Bank Credit card Credit card Line of credit Other current liability.
- Thereon, move to the Banking menu and hit the Bank Feeds tab.
- Now, for your account, hit the Set Up Bank Feeds option.
- At last, provide your bank name and choose it within the Enter your Bank’s name field.
Once you are done with the enrollment, do the following:
- Initially, hit the Continue option and provide the Online Banking details, such as User ID and password.
- After this, head to the Connect option and then connect QuickBooks with your bank’s server.
- Thereon, pick your bank account to which you wish to connect your account in QuickBooks.
- At last, tap on the Finish option when the connection is done.
How to Rectify QuickBooks Auto Import Statements Not Working In QBO?
If the QuickBooks Auto Import Statements is not working, then you must perform the following solutions to fix the issue.
Solution 1: Access an Incognito Window
Sometimes, accessing an incognito window, you can fix the QuickBooks import not working issue.
- Chrome Browser: Ctrl + Shift + N
- Mozilla Firefox and Microsoft Edge: Ctrl + Shift + P
- Safari: Command + Shift + N
Solution 2: Disconnect -Reconnect the Online Banking in QBO
A. Disconnect Your Account Connected with Online Banking
- Use these steps to complete them in the product.
- After this, pick the bank account you are connecting to and click the Edit menu.
- Choose the Edit Account Details option.
- Mark the checkbox beside the Disconnect this account on save.
- Finally, after making all the changes, hit the Save option.
B. Connect the Bank Feed For Your Account Again
1. Link Your Credit Card or Bank Account
Herein, we have provided the stepwise instructions to apply for both QuickBooks Online and Sole Trader.
- Perform these steps in the product.
- After this, you must pick any of the following:
- Connect account (QuickBooks Online)
- Link Account (Sole Trader)
- If your account is previously connected, choose the Link account to add another.
- Pick your bank and choose the Let’s Go option.
- Now, thoroughly review the product’s terms and conditions. Then, hit the Agree option.
- Thereon, log in using your online banking details and perform the necessary steps.
- Furthermore, pick the account that you want to connect (current, savings, or credit card).
If you don’t see your right account type, click the + Add New. Then, move further with the following steps.
Bank Account
- Account Type: Cash at bank and in hand
- Detail Type: Savings
- Account Type: Cash and Cash Equivalent
- Detail Type: Savings
Credit Card
- Account Type: Credit Card
- Insert a custom name if necessary, which you can rename later.
- Pick the date from when you wish to extract the transactions.
- Finally, hit the Connect and then the Done option.
2. Refresh & Review Transactions
You need to refresh the transactions manually if the QuickBooks auto-import of statements isn’t working.
For refreshing your data
- Follow this link to complete the steps in the product.
- Choose the Update option.
- Thereon, you must review, categorise, or match transactions to the correct accounts.
3. Access the Supported Browsers
The following are the supported web browsers along with their versions.
Important Tip: QuickBooks won’t support Internet Explorer anymore.
- Google Chrome: version 78 or newer
- Mozilla Firefox: version 76 or newer.
- Microsoft Edge: version 79 or newer
- Safari: version 12 or newer (Mac only)
- Opera: version 68 or newer
- Samsung: version 10 or newer
4. Delete Your Browser’s Cookies & Cache Files

If the above solutions don’t work in your favor, then try deleting the browser cookies and cache files.
A. Mozilla Firefox
- Initially, click the Start menu, type Settings in the search box, and hit the Enter key.
- After this, head to the Privacy & Security option from the left pane and scroll down to the Cookies & Site Data section. Later on, browse to the Clear Data tab.
- As a result, it will reflect the Clear Browsing data and cookies prompt.
- Now, choose Everything by clicking the drop-down menu beside the When option, and mark the checkbox of Temporary cached files and pages.
- Thereon, go to the Clear button and then shut down the Settings page.
- With this, all the changes are saved automatically.
B. Google Chrome
- Initially, open the Chrome browser on your computer and hit the More option at the top.
- After this, head to the Delete browsing data option.
- Choose the time range to delete the cookies and caches, including Last Hour or All Time.
- Now, select the information, including cookies and caches, to remove.
- At last, hit the Delete Data tab to complete the process.
C. Safari for Mac
- Open Safari on your Mac operating system and head to the History menu.
- After this, choose Clear History from the pop-up menu.
- Thereon, select a certain time range for how long you want to delete the browsing data.
D. Safari for iPad and iPhone
- Primarily, choose the Settings menu and click the Apps > Safari option.
- After this, pick the Website Data option below the Clear History section.
- Now, you must opt for the time range for how long you wish to clear the data. Then, hit the Clear History option. As a result, it won’t cause any damage to your Auto Fill data. In case you see that the button is gray, it reflects that there is no data left to clear. Otherwise, you have to review the web content settings below the Screen Time option.
E. Microsoft Edge Browser
- Open your Microsoft Edge browser and click the Settings and more tab.
- After this, hit the Settings menu, browse to the Privacy, Search, and Services option.
- Thereon, pick the Clear Browsing data option and then hit the Choose what to clear beside the Clear browsing data now option.
- Afterwards, pick a certain time range beneath the Time Range drop-down menu.
- Now, choose the browsing data that you wish to clear.
- For instance, if you need to clear the browsing history and cookies while retaining password and form data.
- Conclude the process by hitting the Clear Now option.
Conclusion
QuickBooks Auto import of Statements is not working issue may arise due to the interruption of the bank feed or any browser-related problems. But we hope that by going through this blog, you can easily deal with this issue and perform your bank-related tasks easily. Furthermore, if you still require any additional help, then connect with our BizBooksAdvice professionals for assistance.
Frequently Asked Questions (FAQ’s):-
Question 1: How to import statements in QuickBooks Online?
Ans. For manually importing the statements in QuickBooks Online, do the following:
- Initially, choose the Banking option from the left panel and hit the File Upload from the Update drop-down menu.
- After this, click the Browse option and pick the file you downloaded.
- Select an account from the list and go through the on-screen instructions to map the fields.
- Now, choose the transactions to import and hit the Yes option, followed by the Let’s Go tab.
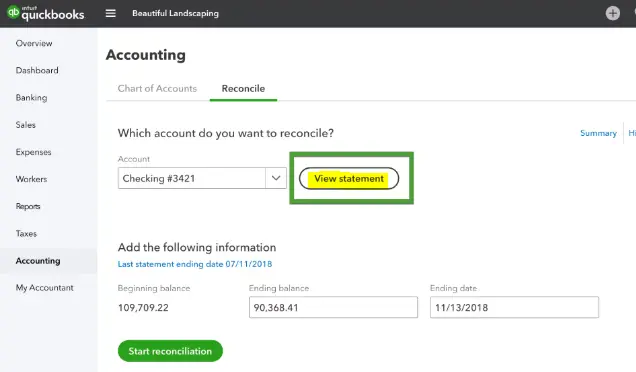
Question 2: How to attach bank statement to reconciliation in QuickBooks Online?
Ans. To attach the bank statement to reconciliation in QuickBooks Online, upload a PDF/image file through the Upload from file option during the reconciliation to pull out the data. Otherwise, for connected accounts, choose the Attach button in the reconciliation history to link a statement. Also, verify that you are using the supported formats (PDF, JPG, PNG).
Question 3: How to fix QuickBooks import invoices, which isn’t quite ready to support sales tax issues?
Ans. Users often get the QuickBooks import invoices isn’t quite ready to support sales tax issue when the sales tax feature is enabled. So, to fix the issue, you must disable the feature. For that, choose the Taxes menu and click the Sales tax Settings tab from the upper-right corner. Thereon, tap on the Turn Off Sales tax option.
Question 4: How to auto-import transactions from bank statements into QB?
Ans. To auto-import transactions from bank statements, QB, move to the Banking menu or Transactions menu. After this, connect your bank or credit card account, and QuickBooks will start downloading the latest transactions. Then, you can organize, match, and accept the transactions to stay updated with your accounts.
Question 5: Why are my transactions not showing up?
Ans. Your transactions may not show up because of the processing delays, bank system errors, or problems with the app/platform.
About The Author

Jonathan Browns
Jonathan Brown is a trained QuickBooks professional with 10 years of experience in the accounting sector. Moreover, he is passionate about helping businesses reduce the stress of managing accounts. Also, he is proficient in assisting entrepreneurs and small business owners to use QuickBooks and enhance their accounting experience.

QuickBooks Desktop, Payroll or Enterprise
Advanced Support for QuickBooks Desktop, Payroll & Enterprise Solutions
From payroll tax setup, direct deposit issues to Enterprise performance tuning and Desktop upgrades - our QuickBooks experts provide accurate and stepwise assistance. Get dependable support designed to minimize downtime and maximize efficiency.
Recent Posts
-
How to Troubleshoot QuickBooks Error PS038 During an Update?
-
Troubleshooting QuickBooks TLS Security Portal Errors Instantly
-
Fixing QuickBooks Script Error (Easy Troubleshooting Guide)
-
How to Create QuickBooks Portable Company File Easily?
-
QuickBooks Payroll Not Withholding Taxes? Here’s What to Do