QuickBooks Error 3000: Causes & How to Fix It

- By Jonathan Browns
- Nov 14, 2025
- Accounting
- 7 min read
The users often come across QuickBooks Error 3000 while attempting to link their bank account with the QuickBooks Online application. In other cases, this issue might interrupt while trying to add a bank for which you haven’t given your consent to agree to the terms and conditions. Unfortunately, this error prevents the users from downloading the latest bank transactions. In this detailed post, we have provided you with the root causes and the solutions to rectify the QuickBooks Error Code 3000.
What are the Root Causes That Trigger QuickBooks Error Code 3000?
Herein, we have provided all the major causes that might trigger QuickBooks Error Code 3000.
- You may confront Error 3000 in QuickBooks while trying to link an inactive account. The inactive Account is the one that doesn’t hold any transactions from the past 12 months.
- This issue may arise while trying to integrate with online banking or the payment systems.
- Usually, the QuickBooks Error 3000 may occur while running an older QuickBooks version.
- In other instances, this issue may arise due to issues with the data being exchanged.
Effective Methods to Address Error Code 3000 in QuickBooks
You can easily resolve Error Code 3000 in QuickBooks by performing the troubleshooting methods listed below. So, let’s have a close look at all the solutions and resume linking your bank account with QBO without any interruptions.
Error 1: Employee Hours Status Code 3000
Alert Message: The given object ID in the field “list id” is invalid
The users often come across Error 3000 in QuickBooks when an employee is inactive. Another cause behind this error is the inappropriate setup of the track data.
Method 1: Setting Up Track Data Time In QuickBooks Financials
- Initially, launch the Employees menu and then hit the Employee Center tab.
- After this, start searching for the specified employee listed on the activity log.
- Thereon, modify the employee after right-clicking on the employee’s name.
- Now, head to the Payroll Info tab and then tick-mark the checkbox of “Use time data to create paychecks”.
- Once all the necessary changes are made, tap on OK to complete the process.
Method 2: Making the Inactive Employee Active
- Firstly, tap on the Employee menu and then hit the Employee Center tab.
- After this, browse to the All Employees tab from the Employees Column.
- When you are on the Activity Log, start searching for the desired employee.
- Once you are on the employee name list, right-click on the employee and opt for the Make Employee Active tab.
Error 2: Status Code 3000
Alert Message: The given object ID in the field “list id” is invalid
You might encounter this error message while working on an older version of QuickBooks.
- In the primary stage, browse to the Downloads and Uploads Center in QuickBooks.
- After this, you must start looking for the QuickBooks version you are using.
- Now, hit the Get Latest Update tab and allow the QuickBooks update to get installed on your computer.
Error 3: Status Code 3000
Alert Message: “Something unexpected happened, and we can’t connect to Merrill Lynch.
Try again in a few hours.”
Users usually get stuck with this error when connecting their bank account to the QuickBooks Online account.
Method 1: Importing Bank Transactions Manually
- Initiate the process by browsing to the Transactions > Bank Transactions menu.
- After this, tap on the Link Account drop-down arrow and choose the Upload from file tab.
- After this, head to the Drag and drop or select files. Then, you must pick the file you wish to download from your bank. Later on, move to the Continue tab.
- Now, you must opt for the Account in which you wish to upload the transactions and hit the Continue tab. Alternatively, you may also link a new bank account.
- Furthermore, do as per the instructions given on the screen for comparing the file’s columns to the correct fields in QuickBooks. Then, hit the Continue tab to move further.
- Next, go with those transactions that you wish to import and then click the Continue tab.
- Once you are done completing the above steps, hit the Yes and then the Done option.
Method 2: Organizing Online Bank Transactions in QuickBooks Online
Go through the following steps to organize online bank transactions in the QuickBooks Online application.
First Step: Get the Latest Bank & Credit Card Transactions Downloaded
The QBO application updates its bank transactions automatically after 24 hours. However, you have the option to update them manually by performing the steps below.
- Firstly, tap on the Update option, and it will eventually update the transactions on all of your accounts.
- After this, QuickBooks will identify the common vendors from your bank transactions and will eventually include new vendors in your Account.
- Now, switch off the option if you don’t wish to link the new vendors. Under the Bank Transactions, head to the Settings and then disable Add New Vendors.
Second Step: Start Verifying & Organizing Downloaded Transactions
- Begin the process by picking up the bank account that you wish to review.
- After that, hit the For Review tab and move further.
- As a result, QuickBooks will eventually send you the downloaded transactions to the For Review tab, and it will recommend categories for each transaction. All you require is to verify each transaction, one after the other.
- Tap on the Post option if you find that the suggested category is appropriate.
- Thereon, hit the Add tab to organize the transactions.
- Next, if the transaction already exists in QuickBooks, you can tally or view multiple matches.
Different Errors That Come Under the QuickBooks 3000 Series of Errors
Below, we have described different errors that come under QuickBooks 3000 Series along with their troubleshooting methods. So, let’s have a quick look at them.
- Status code 3140 or Error 3120: There is an invalid reference to QuickBooks AR Account “###### – #########”
Users often encounter the QuickBooks Error 3140 due to the improper mapping of the Point of Sale application. In other instances, this issue may happen because of the inappropriate setting. Therefore, it is essential to fix the error by performing the solutions outlined below.
Method 1: Modify Your Preferences
To make changes in the preferences of the QuickBooks POS application, you must perform the following steps.
- Initially, access the QuickBooks Point of Sale application on your workstation and then hit the Preferences tab.
- After this, head to the Company menu, move to the Financial section, and hit the Accounts tab.
- Now, you must ensure that the accounts are mapped accurately to the appropriate account types, A/R and A/P. Later on, choose the Save tab for restoring the changes and then run the financial exchanges.
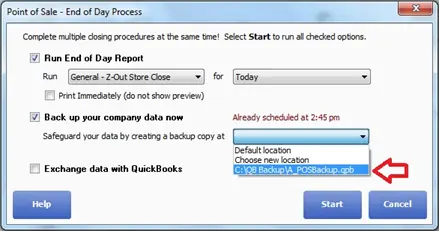
Method 2: Try Running The Verify & Rebuild Data Utility
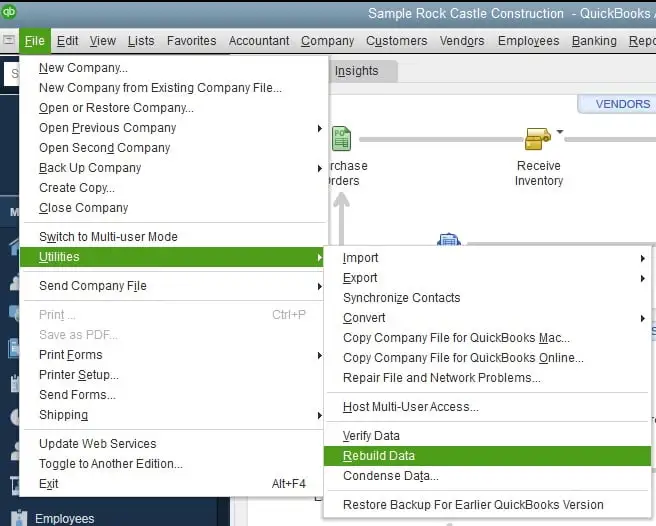
If changing the preferences won’t help you, then it might be possible that you are facing a data integrity issue. Therefore, to fix the issue, you must run the Verify & Rebuild Data to scan the data file for errors or data damage.
Method 3: Resolving the Issues With Your Data File Via QB File Doctor Tool
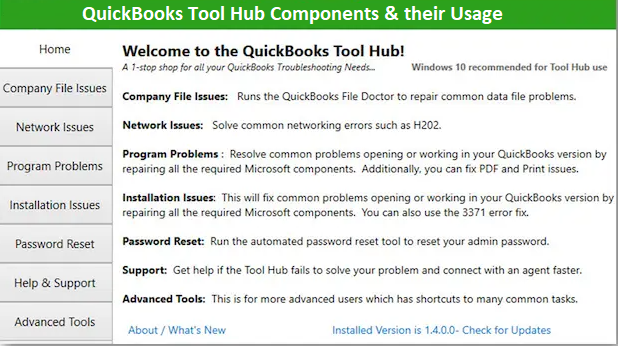
- Before beginning the process, make sure that you have downloaded the latest version of the QB Tool Hub.
- After this, launch the Tool Hub and move to the Company File Issues tab.
- Now, head to the Quick Fix My File tab and then wait for the tool to run.
- Thereon, once the tool scans and repairs the company file issues, try opening the QuickBooks application again.
Even after running the Quick Fix My File, you are getting the error, then use the QuickBooks File Doctor Tool from the QB Tool Hub.
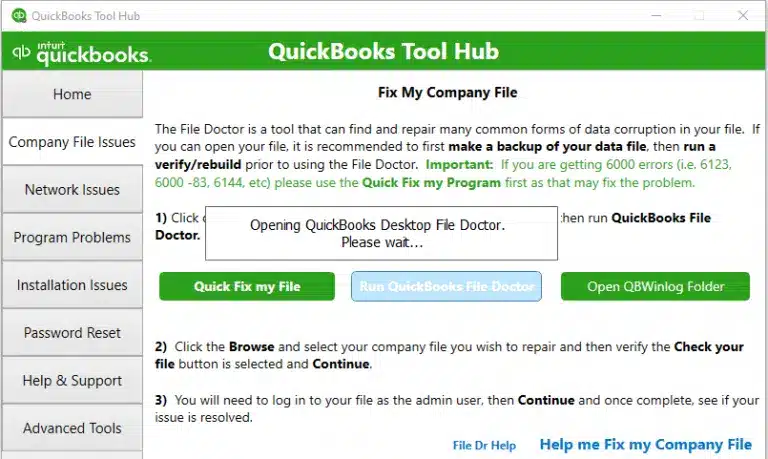
- Initially, launch the QuickBooks Tool Hub and from there choose the Company File Issues tab.
- After this, head to the QuickBooks File Doctor Tool tab and then pick the company file that is creating the issue.
- Now, tap on the Check Your File tab and then click the Continue tab. Later on, mention the QuickBooks admin credentials accurately and then move further.
- Afterwards, hit the Next tab and then allow the tool to perform the repair process.
- Once you are all sorted performing the scan, launch the QuickBooks Desktop application and then run the data file once again.
2. There is an invalid reference to QuickBooks Account “###### – #########” in the item…”
You might come across this error message if the mapped item account in Point of Sale is incorrect. In other instances, this issue may arise if the item account is inactive or removed from the QuickBooks application.
Method 1: Verify Your Preferences
- Launch the QuickBooks POS application and then go to the File menu.
- After this, head to the Preferences option > Company and then hit the Accounts tab.
- Now, you must verify that both tabs are selected, i.e, Basic and Advanced. Also, verify that the accounts are mapped accurately and hit the Save tab.
- At last, you must try running the financial exchange.
Method 2: Verify Your Item Account
- In the beginning, from the QuickBooks Financials, choose the Lists menu.
- After this, head to the Chart of Accounts and then tap Account from the bottom of the page. Later on, go with the Show Inactive Accounts tab.
- Now, if you see that the Account is inactive, it will represent an X mark next to its name. Then, choose the X mark or right-click on the Account and then hit the Make Account Active tab.
- At last, try running another financial exchange to see if the error still exists.
3. Status Code 3170: There was an error when trying to modify a vendor/ customer list element
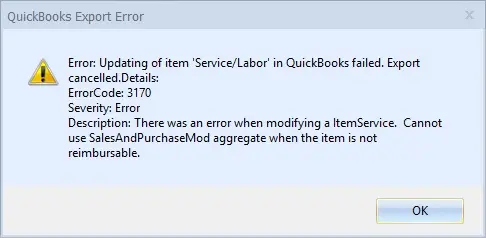
The users often come across the QuickBooks Error 3170 while changing the customer/vendor list element. It may also be caused by a duplicate name in QuickBooks Desktop Point of Sale and QuickBooks Desktop.
1: Investigate QuickBooks Desktop Point Of Sale Activity Log
- Initially, move to the Customer List from the Customers menu.
- After this, you must right-click on the header and hit the Customize columns.
- Thereon, browse to the QB Status and pick the QB status header to organize the lists. Later on, start looking for the customer name with the Not Posting or Error Status.
2: Edit the Vendor/Customer’s Name in the QuickBooks Desktop
- Initially, choose the Customers menu in QuickBooks and then hit the Customer Center. For the vendors, browse to the Vendors and then click the Vendor Center.
- Afterwards, right-click on the name mentioned on the Activity Log and click the Edit tab. Later on, mention the number “1” at the back of the name.
- Now, hit the OK tab to save the changes and then try running the financial exchange.
3: Merge the Edited & the New Names
Herein, all you require is to combine the modified and the new names by Financial Exchange in QuickBooks Desktop. For that, you must carry on with the following steps.
- Primarily, double-tap on the edited name and delete the number “1” from the name.
- After this, if QuickBooks prompts you to merge the customer/vendor to the customer/vendor generated by financial exchange, hit the Yes tab for the confirmation.
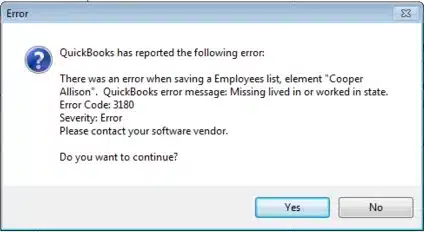
4. Status Code 3180: There was a problem with saving the General Journal Transaction
Users often encounter this error when saving the general journal entries. Thus, it may also arise due to issues with the voucher or the Account. Other instances when this error appears are as follows:
- When the Account linked with the item was inappropriate at the time of sale processing.
- You might have removed the Account from the QuickBooks Desktop.
- In other cases, it may occur when your Account is linked to an item that is inappropriate at the time of sale processing.
- When the voucher is damaged.
Method 1: Recreation of the Voucher
As the damage in the voucher might be responsible for the QuickBooks Error 3180. Therefore, to rectify the issue, you must regenerate the voucher by performing the steps below.
- Firstly, you must reverse the voucher.
- After this, regenerate the voucher.
- Next, try managing the financial exchange.
Method 2: Verify the Accounts Twice
All you require is to cross-verify the accounts by implementing the steps below to verify that inactive or inappropriately configured accounts are managed.
- Visit the Homepage and browse to the Sales History. Then, note down all the items that are affected.
- After this, go back to the Home page, tap on Item Lists, and hit the Edit menu.
- Now, you must check whether the account mapping is appropriately configured.
- Thereon, the affected accounts are active in the QuickBooks Desktop application.
- Next, browse to the QuickBooks Desktop POS, browse to the Item List, and click the Edit menu.
- Afterwards, you must configure the Income/Asset/COGS account appropriately.
- Once you have made changes, hit the Save tab and then try managing the financial exchange.
5. Status Code 3180: QuickBooks Error Message: A/P (or A/P) detail line must have vendor
Users often come across this error if the vendor is missing from the A/P or A/R detail line. However, below we have provided the error messages that you confront due to incorrect configuration settings.
- “There was an error when saving a General Journal transaction. QuickBooks error message: A/P detail line must have vendor.”
- “There was an error when saving a General Journal transaction. QuickBooks error message: A/R detail line must have vendor.”
You must carry on with the following steps to address this issue.
- Initially, browse to the Point of Sale homepage and then hit the Sales History tab.
- After this, look for the latest receipt, which is named as Payout within the Receipt Type column.
- Now, choose the Reverse tab from the I want to drop-down arrow and regenerate the Paid Out with an account other than A/P or A/R.
- Once the Paid Out is reversed and regenerated, you must verify if the issue still exists.
Status Code 3180: QuickBooks error message: The posting account is invalid.
This error message indicates an invalid posting account. However, this issue may also arise if the wrong type of QB Desktop account is accessed for mapping the accounts in QB POS. The following is the error message that you may observe upon the arrival of the error.
6. “Status code 3180: Status message: There was an error when saving a Items list, element “XXXXXXXX.” QuickBooks error message: The posting account is invalid. 140108 payment item lookup error “XXXXXXXX.”
Method 1: Do the Modifications in QB Point Of Sale
- Primarily, choose the Preferences tab from the File section and hit the Company tab.
- After this, head to the Accounts from the Financial section and verify the Basic and Advanced tabs.
- Now, ensure that the mapping of accounts is done in both the Basic and Advanced tabs. Then, click the Save tab to save the necessary changes and run the financial exchange.
Method 2: Modify the Name & Re-establish each Financial Method
- Launch the QuickBooks Desktop application, browse to the Lists menu, and click the Customer & Vendor Profile Lists.
- After this, pick the Payment Method list, right-click on the Cash Method, and choose the Edit Payment Method tab.
- Now, insert the X letter into the Payment Method and hit the OK tab to save the necessary changes.
- Next, you must right-click on the Cash Method, tap on New, and then the Cash option.
- Finally, run the financial exchange, rename it, and re-establish all the payment methods if necessary.
7. Status Code 3180: Status message: There was an error when saving a Sales Receipt
You might come across QuickBooks Error 3180 due to a damaged payment item in QuickBooks. In other instances, it may occur because of an inappropriate type.
To resolve the issue, you must change the name of the payment items and then combine the duplicate items in QuickBooks Desktop.
- Launch the QuickBooks Desktop application and then browse to the Lists menu.
- After this, pick the Item List, click Include Inactive, and then opt for the Type header to categorize the list.
- Now, you must alter the names of the Point of Sale payment items in the following manner.
- The users must right-click on the payment item beginning with POS and choose Edit Items.
- Thereon, insert “OLD” at the end of the item name and hit OK to save the necessary changes.
- Next, you must execute the financial exchange via the QuickBooks POS application.
- Try merging the duplicate items in the QuickBooks Desktop application.
- To merge the items, right-click on the payment item that is highlighted as OLD and click the Edit Item tab. Then, delete the OLD from the name and hit the OK tab.
- If the QuickBooks Desktop pop-up to merge the items, hit the Yes tab for the confirmation.
8. Status code 3180: Status message: Sales tax detail line must have a vendor
“Status code 3180: Status message: There was an error when saving a Sales Receipt (or Credit Memo). QuickBooks error message: Sales tax detail line must have a vendor.”
Method 1: Verify that the Vendor is Assigned to the Sales Tax Team
Initially, you must review that the vendor is allotted to the sales tax team by verifying that all the sales tax items have an agency attached in the following way.
- Initially, launch the QuickBooks Desktop application, head to the Lists menu, and choose Item List.
- After this, choose the Include Inactive, then pick the Type header to arrange the list.
- Now, see that all sales tax items in QB have a tax agency attached to them.
Method 2: Check Your Tax Preferences
The users can verify and edit the tax preferences in QuickBooks POS with the help of the following steps.
- Begin the process by launching the QuickBooks Point Of Sale application and then hitting the File menu.
- After this, choose the Preferences tab and hit the Company > Accounts from the Financial tab.
- Thereon, verify the Basic and Advanced tabs and verify that QB Sales Tax Payable is only mentioned in the sales tax row.
- If not, then make the alterations, and once you are all sorted, then execute the financial exchange.
Method 3: Ensure that the Problem Receipt Isn’t Paid Out Using Sales Tax Payable
In order to verify that the problem receipt isn’t paid out with the sales tax payable, you must search for the incomplete receipts and then reverse them.
- Begin the process by clicking on the Sales History from the QuickBooks Point of Sale.
- After this, you must right-click on the column and pick Customize Columns. Also, it is mandatory to verify that the QB Status is chosen.
- Now, verify that the receipts that are still incomplete. If none of these receipts are paid out of tax payable, then choose the receipt and pick the Reverse Receipt tab.
- Next, try recreating the paid out by accessing the non-sales tax payable and move further with the financial exchange.
Conclusion
So, here we reach the end of the post and hope that the troubleshooting solutions will help fix the QuickBooks Error 3000. Thus, it will also help you download the latest bank transactions without any hassle. Furthermore, if you still have any further discrepancies, then have a one-to-one consultation with our QB professionals for better guidance.
Frequently Asked Questions (FAQ’s):-
Question 1: What do you understand by error code 3000 in QuickBooks?
Ans. The users might encounter error code 3000 in QuickBooks while running an older version of the QuickBooks application. Therefore, it is mandatory to update QuickBooks to the latest version to address the issue.
Question 2: What does Error Code 3003 mean in QuickBooks?
Ans. The users often experience Error Code 3003 in QuickBooks while attempting to synchronize all the databases present within the Intuit admin, and they fail to synchronize.
Question 3: Is there any way to avoid QuickBooks Error Code 3000 from happening again?
Ans. The following are the precautions you must take before resolving QuickBooks Error Code 3000.
- It is essential to update the QuickBooks application regularly.
- Try configuring the Windows Firewall or antivirus software to give enough permissions to run QuickBooks.
- Also, it is mandatory to generate a backup of the QuickBooks company file.
Question 4: What are the possible causes behind the occurrence of Error 3000 in QuickBooks?
Ans. The following are the root causes that might be responsible for the occurrence of Error 3000 in QuickBooks.
- A network connectivity issue may also create issues while connecting the bank account with the QBO application.
- Corruption or damage to the QuickBooks installation may also be responsible.
- Firewall or antivirus software is blocking the QuickBooks application, considering it a threat.
Question 5: What are the other error codes that come under the QuickBooks 3000 series?
Ans. The error codes that come under the QuickBooks 3000 series of errors are Error 3100, Error 3140 or 3120, Error 3412, Error 3170, Error 3180, and QuickBooks Error 3260.
About The Author

Jonathan Browns
Jonathan Brown is a trained QuickBooks professional with 10 years of experience in the accounting sector. Moreover, he is passionate about helping businesses reduce the stress of managing accounts. Also, he is proficient in assisting entrepreneurs and small business owners to use QuickBooks and enhance their accounting experience.

QuickBooks Desktop, Payroll or Enterprise
Advanced Support for QuickBooks Desktop, Payroll & Enterprise Solutions
From payroll tax setup, direct deposit issues to Enterprise performance tuning and Desktop upgrades - our QuickBooks experts provide accurate and stepwise assistance. Get dependable support designed to minimize downtime and maximize efficiency.
Recent Posts
-
QuickBooks Error PS036: Causes, Fixes, and Prevention
-
Converting from QuickBooks Desktop to QuickBooks Online: A Complete Guide
-
Tried Everything? Here’s How to Fix QuickBooks Error Code 80070057
-
This QuickBooks Company File Needs to Be Updated: A to Z Guide
-
Renew QuickBooks Subscription: Desktop & Online Renewal Guide