QuickBooks Error 6177: Easy Solutions to Try Today

- By Jonathan Browns
- Jun 29, 2024
- Accounting
- 7 min read
QuickBooks has become the utmost priority for businesses in handling complex accounting, inventory management, and payroll-related tasks. Moreover, it contains the company file that contains all the essential details regarding the company. Considering its importance, keeping the data file safe and secure is the utmost priority for the company. However, sometimes, users might encounter QuickBooks Error 6177 while trying to open the file. This issue is mainly reported when the users have either changed the company file location or damaged the file.
The inability to access the company file due to Error 6177 in QuickBooks might put the company file data at risk. So, it’s mandatory to fix this issue soon and regain access to the file using the proven methods explained in this guide.
Are you looking for expert advice on how to tackle the complex QuickBooks Error 6177? Call our QB experts at +1-866-408-0444. who are available 24/7 to fix the issue immediately.
What Do You Understand By QuickBooks Error 6177 & Why Does it Occur?
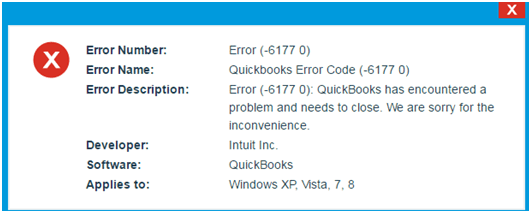
The appearance of QuickBooks Error 6177 usually pops up while attempting to open the company file. This issue states that the data file you are trying to open is either inaccessible or your system doesn’t have enough rights to open it. Apart from this, when the error occurs, it reflects the following error message on the screen that states: “We’re sorry, QuickBooks encountered a problem,” along with QuickBooks Error Code 6177.
This issue could be caused by multiple other reasons described below. Read all of them properly to understand all the primary causes.
Also Read: QuickBooks Error 6147
Flaws With the Company File Path:-
One of the primary reasons for QuickBooks Error Code 6177’s appearance is accessing the wrong file path. This situation usually occurs when you move the file to a different location without updating the path in QuickBooks. Consequently, the mapped drive letter has changed, leading to an incorrect path reference.
Inadequate Configuration of the Network Settings:-
Sometimes, QuickBooks Desktop may encounter Error 6177 due to improper network settings. The wrong network permissions might prevent users from accessing the company file.
Problems At the End of your Server:-
If the server on which you have stored your company file has issues, it might block QuickBooks from accessing the data file, leading to QuickBooks Error 6177 0.
Insufficient Permissions to Access the Company File:-
The QuickBooks company file folder must have the correct permissions set so that you can access the file appropriately. However, if the permissions are set correctly, QuickBooks can make the necessary changes.
Incompatible Version of the QuickBooks Desktop:-
Older versions may not be compatible with newer operating systems or network configurations. Working on an unsupported version of QuickBooks could also result in QuickBooks Error Code 6177.
Presence of Damaged or Corrupted Company File:-
Your QuickBooks company file may get corrupted due to sudden power outages or improper shutdown of QuickBooks. Consequently, the corrupted file could also be the reason for this issue.
What Are the Warnings You May Spot When QuickBooks Error 6177 0 Occurs?
Following are the consequences that you may identify when the QuickBooks Error 6177 0 hits your computer. Let’s study them in detail to prevent the issue from happening in the future.
Notification Regarding the Error Message:-
The most immediate and obvious symptom of QuickBooks Error 6177 is the appearance of an error message. This message typically reads:
“QuickBooks is attempting to open this Company file. Before you can open the company file from your computer, QuickBooks needs to update the file location.”
Inability to Access Your Open Company File:-
Users may be unable to open the company file stored on the server or network drive.
Sluggish Performance of QuickBooks Application:-
Even if QuickBooks doesn’t crash outright, users may experience performance degradation. It might include slow response times when accessing the company file or delays in executing commands within QuickBooks.
Malfunctioning of the Internet Connection:-
Users may observe network timeouts while attempting to access the data file. Consequently, it may start flashing error messages regarding the network connectivity on the computer screen.
Error Messages Regarding “Access Denied”:-
Users may encounter access-denied errors when opening or modifying the company file regarding folder permissions.
Issues Regarding the Crashing or Freezing of QuickBooks:-
Another possible symptom is that the QuickBooks application began to freeze or crash while launching the company file.
Read More: QuickBooks Error Code 6129
Here’s What to Do When You Have the Full Version of QBDBMgrN Installed on the Server
Use the following troubleshooting procedures if you have only installed the full version of QuickBooks Database Server Manager on the server.
Quick Fix 1: Start Updating Your File Location
Switching your location is essential if you have placed your data file on a server, an external hard drive, or in the cloud. You are supposed to follow the steps below to move it to your local drive and back to its original location using the following steps.
Stage 1: Begin Transferring Of Company File from its original location-
- Launch the Windows Start menu on your server computer or workstation in the initial phase.
- After that, insert “File Explorer” into the search area and open File Explorer on your system.
- In the next step, search for and open your QuickBooks folder. Alternatively, press F2 while QuickBooks is open to get the location.
- You are supposed to find your company file, which ends with QBW. Herein, you must verify that the file name must be represented It should look like this: [company name].qbw.
- Now, you must write down the name and location of the drive. You’ll put the file back here later on. Here’s an example: “C: >> Users >> User >> Documents >> Intuit >> QBFiles >> sample_product-based business.qbw.”
- Finally, transfer your company file from this folder to C: drive. While moving the file, make sure you only transfer the file, not the entire folder.
Stage 2: Establish a Portable File and Recover them to your Server
- In the beginning, open the QuickBooks Desktop on the workstation where you have transferred your data file.
- After this, navigate to Open or restore an existing company and launch the data file you transferred to C: drive.
- Now, construct a new Portable Company File, which will prepare a portable version of the file that also resets your file location data.
- You must navigate to the File menu > Quit QuickBooks and then try to open the QuickBooks application once again.
- Once again, go to the File menu > Open or Restore Company > Restore a Company File > Next.
- In the next step, look for the portable company file that you have recently created and then click Open > Next.
- Subsequently, pick the drive from where you have originally transferred your data file through the restore location.
- Soon after this, hit the Save button, and it will move your data file back to the network.
- Once again, switch to the File menu and hit the Quit QuickBooks option.
Quick Fix 2: Begin Installing the Latest QuickBooks Desktop Updates
Updating the QuickBooks Desktop to the latest version is another possible solution for troubleshooting QuickBooks Error 6177 0. Follow the steps outlined below to accomplish the desired task.
- In the first place, open the QuickBooks Desktop on your computer.
- After this, switch to the Help menu and select About QuickBooks Desktop.
- You should note down the current version and the release number displayed.
- Once again, move to the Help menu and select Update QuickBooks Desktop.
- Thereon, from the Update QuickBooks window, pick the Update Now tab.
- In the next step, choose the Get Updates button to start downloading. Users must ensure that their system is connected to a stable internet connection, which is essential for a smooth download.
- Once the download is complete, you will receive a notification.
- After this, you must close and then try to reopen QuickBooks Desktop.
- You will be prompted to install the update. Later on, select Yes to begin the installation.
- Afterward, you must follow the on-screen instructions to complete the installation process.
- Ending the process by restarting your computer after the installation is complete to ensure all changes take effect.
Also See: QuickBooks Error 6150
Quick Fix 3: Fix the Damaged Company File With the QuickBooks File Doctor Tool
QuickBooks File Doctor is crucial in diagnosing and fixing damaged or corrupted company file issues, including Error 6177. Below, we have provided stepwise instructions for running the tool and repairing the damaged file.
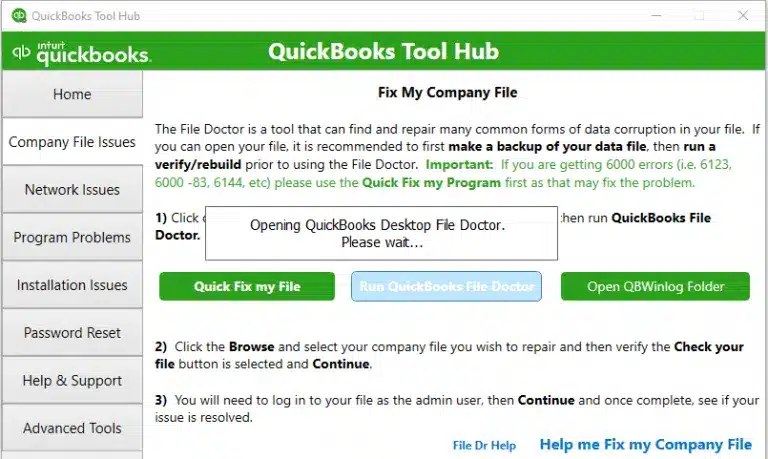
Step 1: Get Ready With the Latest QuickBooks Tool Hub Download:
To get the latest version of QuickBooks Tool Hub download, visit the official Intuit website to download the latest version of QuickBooks Tool Hub. This tool contains various utilities, including QuickBooks File Doctor.
Step 2: Perform the Installation of the Previously Downloaded Tool Hub:
- In the first stage, open the downloaded file (QuickBooksToolHub.exe).
- After that, you must follow the on-screen instructions to install the Tool Hub.
- Once installed, you should open QuickBooks Tool Hub by double-clicking its icon on your desktop.
- Run the Latest Version of QuickBooks File Doctor Tool:
- First of all, open the QuickBooks Tool Hub and then select the Company File Issues tab.
- You are supposed to click on the Run QuickBooks File Doctor button.
- Thereon, click the Browse button from the QuickBooks File Doctor to locate and select your company file. Herein, you will observe that the file you see must have a “.QBW” extension.
- Now that you are done selecting your company file tap the Open button.
- In the next step, you must select “Check your file” option and then click Continue.
- If prompted, enter your QuickBooks Admin password and hit the Next button.
- Consequently, the QuickBooks File Doctor will diagnose the selected company file for issues. This process can take some time, depending on the file size and the nature of the issue.
- Once the diagnosis is complete, the File Doctor will automatically attempt to repair any issues.
- If File Doctor finds issues that can be fixed, follow the on-screen instructions to complete the repair process.
- Once the process of repairing the file is over, open QuickBooks Desktop.
- Finally, you must try to open your company file to see if the issue has been resolved.
Quick Fix 4: Try to Repair the Issues With File Path Manually
To configure the damages with the file path, thoroughly implement the steps outlined below.
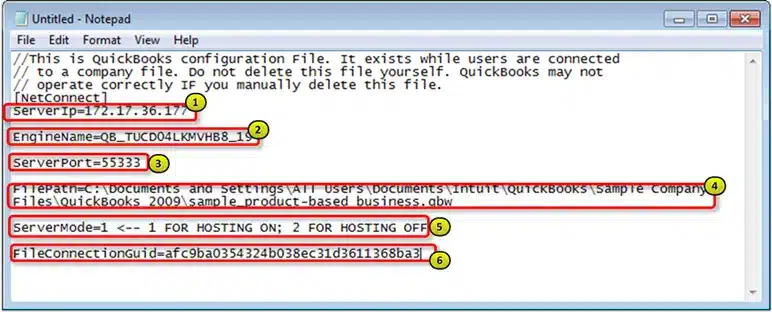
Stage 1: Locate and Remove the Network Data File (.ND):-
The main function of the network data (.ND) file is to search the data file over the network or within the multi-user mode. Therefore, to fix the issue, you need to delete the .ND file with the following instructions.
- First, launch Windows File Explorer on your server computer and locate the QuickBooks folder.
- After that, you must search for the data file ending with the ND extension. Ensure the file name is reflected as “ [MyCompanyFileName].qbw.nd.”
- Once you are all sorted, right-click the .ND file and choose the Delete option.
Stage 2: Utilize the Updated QuickBooks Database Server Manager
QuickBooks Database Server Manager plays a crucial role as it helps in managing your QuickBooks company files in a multi-user environment. It also helps resolve network-related issues, including QuickBooks Error 6177. Below, we have described the stepwise instructions for using it to fix Error 6177.
- In the first stage, visit the official Intuit website and download the QuickBooks Database Server Manager.
- Soon after this, you need to run the downloaded setup file and follow the on-screen instructions to install the Database Server Manager.
- Afterward, you must ensure you install it on the server or the computer having your QuickBooks company files.
- Once you are done with the installation, open the QuickBooks Database Server Manager.
- Next, you need to verify if any updates are available. If so, download and install the latest updates.
- Proceed to the Start menu, search for QuickBooks Database Server Manager, and open it.

- Thereafter, navigate to the Scan Folders tab > Browse button and select the folder containing your QuickBooks company files.
- In the next step, you must add the folder to the scan list.
- You should click the Scan button to begin scanning the selected folder.
- Consequently, the tool will scan the folder and display the company files it finds.
- Now, switch to the Database Server Manager and go to the Database Server tab.
- Ensure that the QuickBooksDBXX (where XX represents the version of QuickBooks) service is running.
- The users must ensure the folder containing your company files has the correct permissions.
- You must right-click on the folder, select Properties, and go to the Security tab.
- Moreover, you must ensure that all users who need access have full control over the folder.
- Now, you must launch the QuickBooks Desktop on your server and workstations.
- Finally, you must attempt to open your company file to check if Error 6177 still exists.
Know More: QuickBooks Error 6073-99001
Learn How to Rectify QuickBooks Error 6177 When You have Full Version of QB on the server
For instance, if you have both QuickBooks Desktop and QuickBooks Database Server Manager installed on the server, use the troubleshooting solutions listed below.
Quick Fix 1: Configuring the Multi-User Hosting Settings Again
- Primarily, you must launch the QuickBooks Desktop on the server computer and then click the File menu > Utilities.
- After this, you must tap the Stop Hosting Multi-User Access and then click the Yes button to provide the confirmation.
- Once you are all set, hit the File tab again and then the Quit QuickBooks option. With this, you will be able to reset your hosting settings accurately.
- Thereon, you must try again opening the QuickBooks application and avoid opening your data file.
- Now, again go to the File menu and tap the Utilities option > Host Multi-User Access, followed by the Yes button for confirmation.
- End the entire process by clicking the File menu > Quit QuickBooks option.
Quick Fix 2: Shift Your Data File to Your Server’s Local Hard Drive
If you notice that your data file isn’t located on your local server, i.e., C: drive, move it and then prepare the portable data file.
- The first and foremost step is to click the Start menu on the server computer.
- Afterwards, you must enter “File Explorer” into the search panel to open the File Explorer window.
- The users must search for the QuickBooks folder and then hit the F2 key when QB is opened to get the location.
- Once the company file (.QBW) is visible, it will be reflected as “[company name].qbw.”
- Now, you must note down the drive’s name and location in a safe place. Later, you will need this location to put the file back.
- Next, users must drag their data file from the folder to your server’s C: drive. Herein, you must be attentive that you only shift the file, not the entire folder.
Quick Fix 3: Establish a Portable Company File
Go through the steps given above to create a new portable company file.
Quick Fix 4: Generate a Brand New Folder For QuickBooks
- Launch File Explorer and locate your QuickBooks folder to prepare it.
- You must establish a new folder on the server’s local C: drive and assign a new name to the folder.
- Now, you must copy everything to the QuickBooks folder and your portable data file and then paste it into the new folder.
Quick Fix 5: Try Restarting the QuickBooks Application
- Begin the process by launching the QuickBooks Desktop application.
- After that, tap the Open or restore an existing company instead of selecting a company from the list.
- Following this, go with the Open a company file followed by the Next button.
- Presently, launch the portable company file that you have recently transferred to the new folder.
- Finally, try to open QuickBooks on all of the computers and see if everything is perfect.
Drawing to a Conclusion!!
We will ensure you have the essential details to troubleshoot QuickBooks Error 6177 and regain access to your data file. If you need additional assistance, feel free to communicate with our QB professionals at +1-866-408-0444 for the best results.
About The Author

Jonathan Browns
Jonathan Brown is a trained QuickBooks professional with 10 years of experience in the accounting sector. Moreover, he is passionate about helping businesses reduce the stress of managing accounts. Also, he is proficient in assisting entrepreneurs and small business owners to use QuickBooks and enhance their accounting experience.

QuickBooks Desktop, Payroll or Enterprise
Advanced Support for QuickBooks Desktop, Payroll & Enterprise Solutions
From payroll tax setup, direct deposit issues to Enterprise performance tuning and Desktop upgrades - our QuickBooks experts provide accurate and stepwise assistance. Get dependable support designed to minimize downtime and maximize efficiency.
Recent Posts
-
Tried Everything? Here’s How to Fix QuickBooks Error Code 80070057
-
This QuickBooks Company File Needs to Be Updated: A to Z Guide
-
Renew QuickBooks Subscription: Desktop & Online Renewal Guide
-
QuickBooks Online Login: Sign in to Access Your QB account
-
Change EIN in QuickBooks: Complete Guide for Desktop, Online & Payroll