Let’s Set Up and Use Tax in QuickBooks Desktop & Online

- By Jonathan Browns
- Mar 24, 2026
- Accounting
- 7 min read
Proper management of the sales tax is crucial to staying compliant and keeping your books of accounts up-to-date. However, it’s essential to collect sales tax on certain goods and services you offer. Herein, QuickBooks helps you keep the proper record of these taxes to monitor and submit them to the right tax agency. Therefore, to record these taxes, it’s essential to set up and use tax in QuickBooks Desktop.
In this guide, we have provided the step-by-step instructions to set up tax in QuickBooks Desktop and Online versions. Let’s begin reading.
Facing issues while trying to set up and use tax in QuickBooks Desktop? Call Us : +1-866-408-0444 and connect with our QB professionals instantly for the right guidance.
How to Set Up Sales Tax in QuickBooks Desktop?
Below, we have described the complete process for setting up sales tax in QuickBooks Desktop.
Turn On Sales Tax Feature
For recording the sales tax in QuickBooks Desktop, turn on this feature and then set up sales tax items or tax groups.
- Move to the Edit menu and click Preferences > Sales Tax.
- After this, head to the Company Preferences tab.
- Next, tap on the Yes option to turn on sales tax in the Do you charge sales tax section.
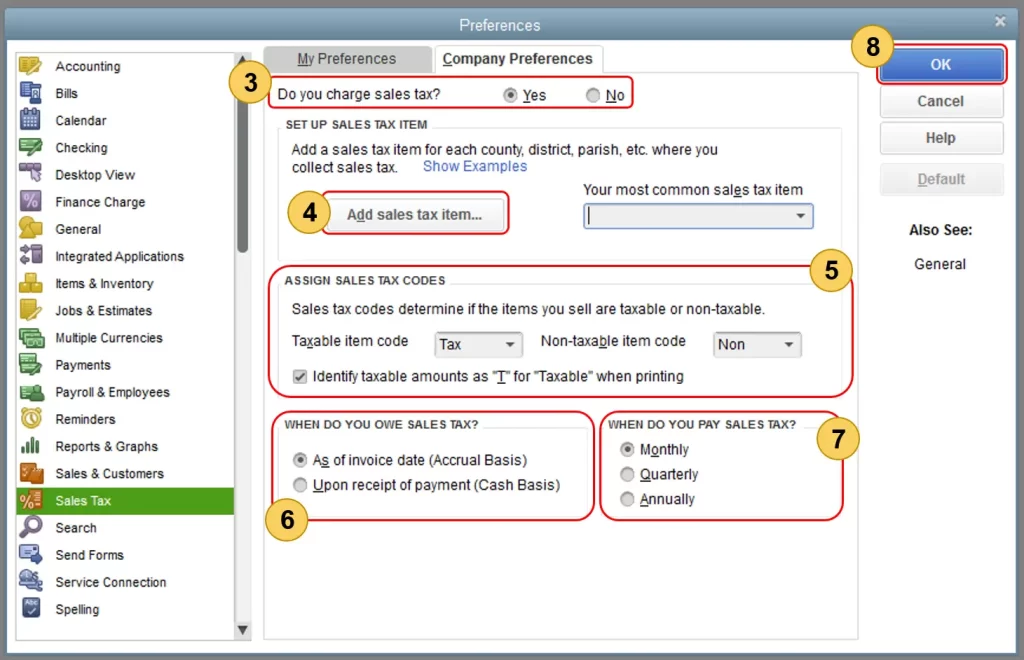
Configure Sales Tax Settings
When you are in the Company Preferences tab for Sales Tax:
1. Set Up Sales Tax Items
You can include a sales tax item for each location according to the country, district, or city where you collect sales tax from. Then, choose the Add Sales tax item to start the process. Use the steps below to create items and groups.
2. Assign Sales Tax Codes
Using Sales Tax Codes, you can easily differentiate between non-taxable sales and customers for reporting. Then, QuickBooks will eventually generate TAX (taxable) and NON (taxable) codes when you enable the sales tax.
- Use TAX for items/customers requiring tax collection.
- Use NON for tax-exempt items/customers (for example, non-profits, out-of-state sales, resale items).
3. Set Tax Basis
Herein, you must pick when you owe sales tax:
- As of invoice date (Accrual Basis)
- Upon receipt of payment (Cash Basis)
- Consider your company’s accounting preference.
4. Set Payment Frequency
Select how frequently you pay sales tax.
- Monthly
- Quarterly
- Annually
When all the changes are done, click OK to restore the preferences.
Read More:- QuickBooks Tax Payment was Rejected
Create Sales Tax Items & Groups
Sales Tax Item
The Sales Tax Item is used to calculate a specific tax charge amount on taxable sales.
For generating a new sales tax item;
- Go to the Type drop-down arrow and click Sales Tax Item.
- Within the Sales Tax Name field, mention a name according to your tax location. Also, add more details to the Description field.
- Now, provide the Specific tax rate and the name of the collecting agency (set up as a vendor). If you don’t see the agency listed, tap on Add New to set it up.
- Hit the OK tab to complete.
Here’s how to edit sales tax item in QuickBooks Desktop
- Initially, click the Lists menu and then hit the Item List.
- Locate the sales tax item that you wish to update and right-click the item.
- Choose the Edit item (pencil icon in QuickBooks for Mac).
- Now, update the name, rate, or tax agency as required.
- At last, click OK to complete.
Learn More:- QuickBooks Payroll Not Withholding Taxes
Sales Tax Group
You can use a sales tax group when multiple sales tax items are applied to the same transaction, but have to appear as a single line item on forms. Moreover, you can also monitor and report each tax individually.
For creating a sales tax group;
- Click on the Type drop-down arrow to select the Sales Tax Group option.
- When you are in the Group Name/Number field, provide a preferred name for that group. You have to add more details to the Description field.
- Now, mention each sales tax item that belongs to the group. If an item still doesn’t exist, click Add New and then perform the steps for creating a sales tax item.
- Finally, click OK to complete the process.
Assign Sales Tax Codes
It is essential to assign appropriate sales tax codes (such as TAX or NON) to items or customers that let you report correctly on taxable and non-taxable sales.
Set Up Non-Taxable Status
For an Item
- Firstly, browse to the Lists menu and click Item list.
- Next, click Item, then New (or Edit Item to change an existing item).
- After this, select the tax code drop-down menu and hit the Non-Taxable Sales (or Non-Taxable Labor).
For a Customer
- Choose the Customers menu and click Customer Center.
- Now, right-click on the customer name and tap on Edit Customer: job. If you haven’t set the customer, hit the New Customer & Job > New Customer.
- After this, head to the Sales Tax Settings tab.
- From the Tax Code drop-down list, select the Non-Taxable Sales (or Service).
- Provide the Customer’s resale certification number in the Resale No. Field.
- Once you are done, select OK.
Create Specific Tax Codes
If you see that the default TAX and NON codes are insufficient, then you can generate custom ones.
- Click on the Tax Codes drop-down menu and click the Add New option.
Other Non-Taxable Codes: You may access these codes for certain situations.
| Sales Tax Codes | When to Use |
| OOS | OUT-OF-STATE SALE – There are many states that doesn’t charge sales tax for out of state sale. You need to give the sales tax code to a customer who but the product from store, but stays in another state. |
| LBR | LABOR: There are many states that doesn’t taxed labor services, so you have to assign LBR to a service item. However, there are some of the company files that previously include this non-taxable sales tax code. |
| NPO | NON-PROFIT ORGANIZATIONS: These organizations doesn’t charge sales tax, even though the products or services you sell are taxable. NPO is basically alloted to a customer. |
| GOV | GOV: Sales made to government offices, which isn’t taxed. |
| WHL | WHOLESALERS: These are the customers who resell the goods they buy from you. |
| RSL | RESELLERS: These are the customers who are reselling the products they purchase from you or who is accessing your products of their own, which they can sell ahead. |
How to Change Unemployment Tax Rate in QuickBooks Desktop?
You can change the unemployment tax rate in QuickBooks Desktop using the following steps.
- Open the QuickBooks Desktop application and move to the Lists menu.
- Choose the Payroll Item List from the drop-down menu.
- Now, double-tap on [state abbreviation] – Unemployment Company.
- Thereon, hit the Next tab unless you reach the Company tax rates window.
- Provide the correct rates for each quarter.
- At last, click the Next and Finish option.
How to Set up and Use Sales Tax in QuickBooks Online?
Once you set up and use sales tax in QuickBooks Online, you can add tax on your invoices and receipts for smooth tax filings. Later on, QuickBooks will inform you when the tax payment is outstanding to file them on time and prevent extra fees.
Follow these steps to set up Sales tax in QuickBooks Online and get started.
Read More:- Everything you Need to Know about Tax liability for Small Businesses
First Step: Learn how to calculate tax
The total tax rate for each sale depends on the following factors:
- Customer’s tax-exempt status
- Where or sell or where you ship
- Your service or product’s tax category
Second Step: Tell QuickBooks where you collect tax
QuickBooks keeps an eye on tracking taxes of all transactions to compute taxes and returns accurately.
If you have recently signed up for QuickBooks, then set up how you charge tax for the first time. However, to set up tax, perform the following steps.
Use this link to complete the steps in the product.
- Tap on Set Up Tax and provide the Tax name, and then provide a Description.
- The tax agency name gets populated automatically depending on the tax name you have entered. You can also edit if required.
- Now, provide your Business ID No. (Optional).
- Next, choose the Start of current tax period and Filing Frequency.
- Also, pick your Reporting method (it’s usually Accrual, but if you aren’t sure, connect with your Accountant).
- Optionally, input the Sales Rate, and if tax is collected on purchase, mark the checkbox. Provide a Purchase Rate (optional) and tick the checkbox that Purchase tax is reclaimable.
- At last, hit the Next > OK option.
After successfully setting up the tax centre, add the custom roles.
Third Step: Add tax categories with your products and services
Once you are all set, allot the tax categories to anything you sell. With this, QuickBooks will understand how much tax you have to charge depending on what exactly you are selling.
- Use this link to complete the steps in the product.
- After this, start searching for the item that you wish to allot to a tax category and click the Edit menu.
- Now, tap on the tax drop-down arrow and pick the specific tax suitable for your item. Then, complete the item details for an inventory item or a non-inventory item.
- At last, save your item.
Fourth Step: Double-check your Customer’s Details
You have the option to modify tax rates if you ship products or while performing services at your customer’s address. Also, some customers won’t have to pay tax for churches, schools, or non-profit organisations.
Ensure that your customer’s tax status, billing address, and shipping address are correct. Perform these steps to cross-verify your customer details in QuickBooks.
Fifth Step: Track tax from your customers
Once things are set up, you can use the tax feature. It will represent how it works, and where you will see it when you generate an invoice or receipt for a customer.
Steps to Track tax automatically when you make a sale
- Firstly, you must create an invoice or sales receipt.
- Verify that the Location of sale is accurate.
- If you ship ordered items, add them with the Shipping to, Ship via, Shipping Date, and Tracking No. Info. This will help in identifying where to charge tax.
- Now, review your taxable items in the Tax column.
- Finally, click the Save and Send option.
Sixth Step: Check how much you owe and why
You can now get an in-depth look at the tax you owe and why you owe it. This will ensure that everything is fine before filing, and then you can pay your tax return.
Here’s how to run the Tax Liability Report to view your tax details anytime
The Tax Liability report is a summary of your taxable and non-taxable sales, along with the total tax you get from customers. Follow these steps to run the report.
Use this link to complete the steps in the product.
- Choose your Tax Liability report from the Type report name here drop-down menu list.
- Click the Report period drop-down menu and choose the date range for how frequently you file taxes.
- If your report is opened in:
- Classic View: Do the necessary customisation.
- Click on the Tax Agency menu and then All.
- Pick the Run Report and search for the Tax amount column. Herein, you can check the total amounts you collect from customers.
- Modern View: Do the required customisation.
- Click the Filter and then the Tax Agency > Equals.
- Now, choose the name of the tax agency.
- Browse to the Category/Product /Service tax amount column. Herein, you can check the total tax amounts you get from your customers. It may include totals for state rate and local tax rates.
- Classic View: Do the necessary customisation.
- Furthermore, to determine what you owe, pick any tax amount. This will launch a transaction report displaying how much tax is charged in each sale. Moreover, it also reflects more details such as customers, transaction dates, and tax rates.
Seventh Step: File your tax return
In the last stage, verify that your tax is set up accurately so that you file the tax return accurately.
QuickBooks will let you track payment due dates all in one place to prevent late returns and penalties. Once you file the tax, check what you owe to verify that everything is working accurately. After filing the tax, you can easily monitor your new tax payment in QuickBooks to keep the records up-to-date.
File and pay your tax.
First Step: Review what you owe
You must verify that everything is accurate before filing the tax return.
- Firstly, review which return is due this month and click Prepare Return.
- Choose the accurate option from the Filing period drop-down menu.
- Now, update the dates in the End Date and Filing Date fields.
- To add an adjustment for things, click Adjust for the item in the list you wish to add as an adjustment. Then, provide the adjustment details and tap on Save. With this, your adjusted value will get updated with your return.
- Thereon, write down the gross sales, taxable sales, tax due, and adjustment amount. These numbers are required while filling out the tax return form.
- Once the details are updated, choose Mark as filed.
- Finally, click the Continue option.
Read More:- QuickBooks Money
Second Step: File your return with the right tax agency
You can file the tax return either by e-filing on the tax agency’s website or via mail.
E-file your tax return.
The e-filing of a tax return can’t be done in QuickBooks. You can file directly via the tax agency online and then add your tax payment in QuickBooks to keep the tax details up-to-date.
- Visit your tax agency’s website to file the return online.
- If you have not filed, sign up for your state’s e-filing service.
- Now, fill out and complete the tax return.
- You must check out the gross sales, taxable sales, and tax due amounts, which you have recorded in Step 1.
Mail your tax return.
There are many states that support businesses for e-filing. If you fail to file online, go to your tax agency website to get more details on how to mail your return.
Correct a tax return.
Amended tax reporting is no longer supported by QuickBooks Online. If you wish to correct the tax filing, consult with your tax agency.
Third Step: Record your tax payment in QuickBooks
After filing the tax returns, you can record the tax payment in QuickBooks to zero out your tax payable. As a result, it will keep your tax details in QuickBooks updated.
- Initially, look for the return you recently filed and click Record Payment.
- Right below the Payment Type, choose the Payment option.
- Now, provide the following payment details:
- Bank account
- Memo (optional)
- Payment Date
- Payment Amount
- When all the changes are done, tap on Save.
With this, you will get the payment details listed below the Payments tab.
Next Steps:
- If you file online:
Visit your tax agency’s website to review your return filing status.
- If you file by mail:
Connect with your tax agency immediately to receive an update for your return.
Conclusion
We hope that using this guide, you can now easily set up and use tax in QuickBooks. Thus, it ensures accurate reporting, easy tax filing, and reduces compliance issues. Once the settings are done accurately, QuickBooks will automatically calculate and track sales tax, which saves your time and prevents tax penalties.
If you still find it challenging to set up tax in QuickBooks Desktop or Online, then directly connect with our BizBooksAdvice experts. You can connect with them via live chat or using TFN and get the right assistance.
Frequently Asked Questions (FAQ’s):-
Question 1: How to categorize sales tax in QuickBooks Online?
Ans. To assign your items to different sales tax categories;
- Move to the All Apps > Sales & Get Paid > Products & Services.
- Choose the item you want to assign a tax category to and click Edit.
- Now, head to the Edit sales tax and search for the sales tax category you wish to use.
- Pick the closest category for the item and choose Done > Save and close option.
Question 2: How to set up use tax in QuickBooks?
Ans. For setting up use tax in QuickBooks.
- Move to the Taxes menu > Sales Tax > Add/edit tax rates and agencies.
- Hit the New and click the Single or Combined tax rate, and provide the name, agency, and the percentage.
- At last, you have set up the tax rate to record it as a liability.
Question 3: How to Track Use Tax in QuickBooks?
Ans. To track use tax in QuickBooks.
- Move to the Taxes > Add Adjustment option.
- Pick the accurate tax agency and provide the adjustment amount as a tax increase.
- Now, add a memo saying Use Tax-Out of State Purchase.
- Once the changes are done, click Save.
Question 4: Where are taxes in QuickBooks Desktop?
Ans. Taxes are mainly managed via the Sales Tax menu for customer sales in QuickBooks Desktop and the Employees/Payroll Center for payroll taxes. You can enable the sales tax by moving to Edit > Preferences and then the Sales Tax menu. You will get the tax reports in the Reports menu.
Question 5: What is the QuickBooks Desktop Sales tax report?
Ans. The QuickBooks Desktop Sales tax report provides a summary of the total sales, taxable/non-taxable sales. Also, it will provide you with the accurate amount of sales collected and owed to different tax agencies.
Question 6: Where can I find the QuickBooks sales tax code list?
Ans. To get the QuickBooks sales tax code list;
- Initially, move to the Taxes menu > Sales Tax.
- After this, click the Sales Tax settings option.
- Check your tax rates and agencies.
Question 7: How to add a tax in QuickBooks Online?
Ans. To add a new tax in QuickBooks Online;
- Choose the Manage Sales Tax and click the ” Add Tax option.
- Now, tap on Add next to one of the options given and follow the on-screen prompts.
- For running payroll in QuickBooks Online, pick the Sales Tax.
About The Author

Jonathan Browns
Jonathan Brown is a trained QuickBooks professional with 10 years of experience in the accounting sector. Moreover, he is passionate about helping businesses reduce the stress of managing accounts. Also, he is proficient in assisting entrepreneurs and small business owners to use QuickBooks and enhance their accounting experience.

QuickBooks Desktop, Payroll or Enterprise
Advanced Support for QuickBooks Desktop, Payroll & Enterprise Solutions
From payroll tax setup, direct deposit issues to Enterprise performance tuning and Desktop upgrades - our QuickBooks experts provide accurate and stepwise assistance. Get dependable support designed to minimize downtime and maximize efficiency.
Recent Posts
-
QuickBooks Bookkeeping: The Practical Way to Keep Your Books in Order
-
QuickBooks Merchant Services: Everything You Need to Know Before You Sign Up
-
QuickBooks Payroll Assisted: Everything You Need to Know
-
How to Contact QuickBooks Online Customer Service Team 2026
-
QuickBooks Online Login: Sign in to Access your QB account