Run QuickBooks Print & PDF Repair Tool To Fix Printing Issues

- By Jonathan Browns
- May 13, 2026
- Accounting
- 7 min read
Are you stuck while printing or saving the file as a PDF format in QuickBooks? Here comes a time when the QuickBooks Print & PDF Repair tool comes into the picture. This is a great utility that helps in addressing the printing, emailing, or saving the file in PDF format issues. To run this tool, you need to get the new version of the QuickBooks Tool Hub. Herein, this guide contains all the step-by-step instructions to use and run this tool for addressing the printing problems.
Which Errors Can You Fix With the QuickBooks Desktop Print and PDF Repair Tool?
The following are the errors that you can resolve by running the QuickBooks Desktop Print and PDF Repair tool.
- The PDF converter shows offline.
- Issues generated while connecting to your selected printer, Microsoft XPS Document Writer on the XPS port.
- QuickBooks isn’t responding.
- The device isn’t ready.
- QuickBooks could not save your forms or reports as a PDF.
- QuickBooks freezes while trying to reconcile accounts.
- Print Driver Host for the 32-bit Applications has stopped working.
- Unrecoverable errors
- Issues faced while printing transactions or reports.
- The reconcile window disappears or doesn’t show.
- Could not print to the printer.
- Error: QuickBooks can’t complete the current action due to a QB missing component: Missing PDF file component.
- You can’t print directly to the QuickBooks PDF Converter.
- Unable to save as a PDF file.
- QuickBooks PDF Converter Activation Error -20, -30, or -41.
- Facing Error 1722 or 1801 when installing PDF Converter.
System Specifications Required To Run QuickBooks PDF & Print Repair Tool
For the QuickBooks PDF & Print repair tool to run smoothly, it’s essential to fulfill the basic system requirements. Let’s read them out.
- Check that the system on which you wish to install the QuickBooks PDF & Print Repair tool is connected to a good internet connection.
- The screen size must be 1024 X 768 or access a high screen resolution.
- A 266 MHz or even faster computer processor is required.
- It supports all the Windows operating systems.
- At least 1 GB of RAM is necessary to run the QuickBooks tool hub PDF repair tool easily. Moreover, the hard disk space up to 512 GB is supported.
Steps for QuickBooks print and PDF repair tool Download & Install
The QuickBooks Print & PDF Repair tool is a great utility that helps to address printing issues while saving the file in PDF format. Below, we have provided you with the detailed steps for downloading and installing this tool.
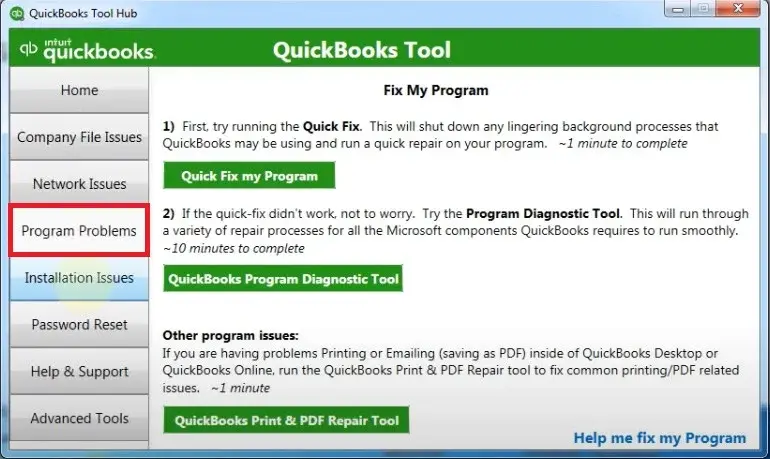
- To begin with, download and install QuickBooks Tool Hub.
- Next, double-tap on the QuickBooks Tool Hub icon to open it.
- Now, choose the Program Problems tab and then hit the QuickBooks PDF & Print Repair Tool.
- After this, you must wait for some time to run the PDF & Print Repair tool.
- Finally, try to print, email, or save the file in PDF format from the QuickBooks Desktop application.
What to Do When the PDF Repair Tool for QuickBooks Doesn’t Work?
If the PDF Repair Tool for QuickBooks doesn’t work, then you must perform the troubleshooting methods.
Solution 1: Relaunch & Change the Temp Folder Permissions
Relaunch your computer and then try to print once again. If the issue still persists, then reset your temp folder permissions.
- Primarily, access the Run window and insert “%TEMP%” in the search console.
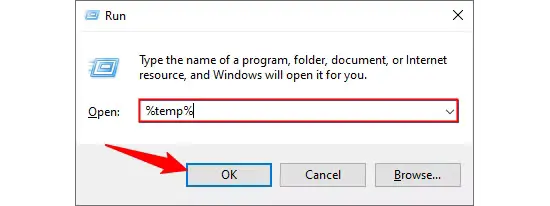
- After this, right-click on the blank space of your temp folder and choose the Properties tab.
- Click the Security option and verify that all users’ names, including groups, must have Full Control.
- When the permissions are granted successfully, then save the file in the PDF form again in QuickBooks.
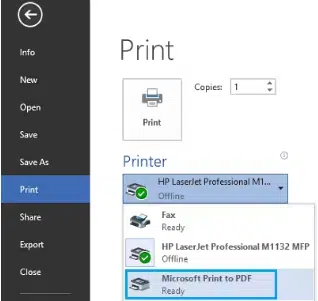
Test Whether You Can Print With XPS Document Writer
The QuickBooks application utilizes the XPS Document Writer for saving the file in the PDF format. It’s essential to run the test to check that you can print via XPS Document Writer.
- Launch the Notepad application and then write TEST.
- Head to the File menu and choose the Print option.
- Now, pick the XPS Document Writer and then hit the Print option.
- Include a filename, and then you must save it to your desktop.
- Return to your desktop and then view the XPS Document Writer you printed via Notepad.
Give Permissions To Your Computer To Print Via XPS Printer
- Initially, browse to the Windows Control Panel and then head to the Category View option.
- Choose the Programs tab and click the Turn Windows Features On or Off.
- Now, ensure that the checkbox beside the “Microsoft XPS Document Writer” is selected within the list of services.
- Finally, click the OK tab to print with an XPS printer.
Solution 2: Refresh the Print Spooler Service Properties
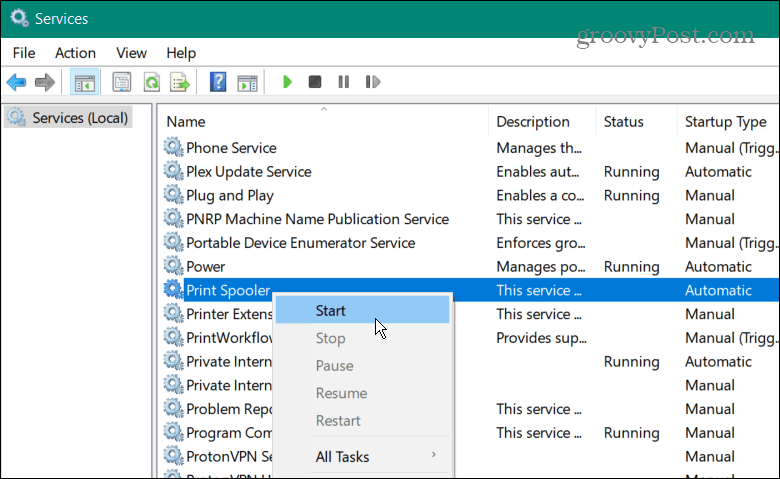
- Initially, click on the Start menu from the taskbar and click on the Run option.
- After this, insert “Services.msc” and click on OK.
- Now, start looking for the Print Spooler service.
- Next, right-click on the Print Spooler service and tap on Properties.
- Move to the Startup type, opt for Automatic, then click Apply and OK.
- Finally, right-click on the Print Spooler service and hit Start to begin the service.
Solution 3: Give a New Name To the QBPrint.qbp file
- Exit from the QuickBooks application.
- After this, locate the QBPrint.qbp file from your QuickBooks installation folder.
- Now, you must right-click the file and click Rename. Then, insert.OLD to the end of the file name.
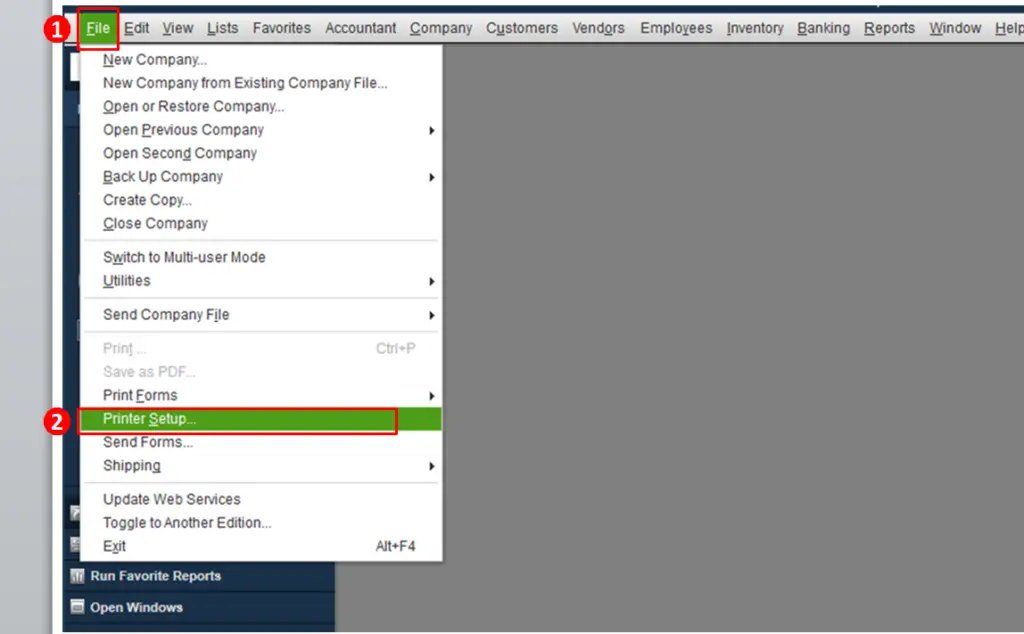
- Thereon, launch the QuickBooks application and head to the File menu > Printer Setup.
- At last, pick any form and hit OK to create a new QBPrint.qbp file.
Solution 4: Generate a New Template or form
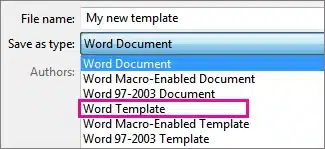
- Initially, generate a new template for the form.
- When you are on your transaction, you can modify the template.
- At last, you must generate your PDF.
Conclusion
QuickBooks Print & PDF Repair Tool is the best utility that helps in dealing with print or PDF-related issues. We hope that this blog has provided you with enough information to download and run this tool. Furthermore, if you still find any issues, then connect with our BizzBooksAdvice experts for immediate resolution.
Frequently Asked Questions (FAQ’s):-
Question 1: How to print a PDF from QuickBooks?
Ans. For printing a PDF from QuickBooks, move to the Transactions List tab and then look for the invoice you wish to print. Then, hit the Edit menu and, for printing the statement, tap on the Print and Download option. Otherwise, you may also opt for the Download icon to start saving in the PDF format.
Question 2: What is a PDF repair tool in QuickBooks?
Ans. QuickBooks Print and PDF Repair is a utility located in QuickBooks Tool Hub that is used to rectify print or save file as PDF issues. You can locate the PDF repair tool within the Program Features tab of the QuickBooks Tool Hub.
Question 3: Why are my QuickBooks invoices not printing correctly?
Ans. The ” QuickBooks invoices not printing correctly error might appear due to corrupt PDF drivers, outdated software, or incorrect printer settings. However, by running the QuickBooks PDF & Print Repair tool, you can easily address these issues.
Question 4: Can reinstalling QuickBooks fix the PDF and print issues?
Ans. Yes, you can try reinstalling QuickBooks to address the PDF and print-related issues, but it’s not guaranteed.
Question 5: What precautions must you take before running the QuickBooks Print and PDF Repair tool?
Ans. The following are the precautions you must take before running the QuickBooks Print & PDF repair tool.
- The users must look into the printer settings and ensure that it is connected properly.
- Also, verify that the system is connected to a stable internet connection.
- Try running the print test to check if the tool is working properly.
About The Author

Jonathan Browns
Jonathan Brown is a trained QuickBooks professional with 10 years of experience in the accounting sector. Moreover, he is passionate about helping businesses reduce the stress of managing accounts. Also, he is proficient in assisting entrepreneurs and small business owners to use QuickBooks and enhance their accounting experience.

QuickBooks Desktop, Payroll or Enterprise
Advanced Support for QuickBooks Desktop, Payroll & Enterprise Solutions
From payroll tax setup, direct deposit issues to Enterprise performance tuning and Desktop upgrades - our QuickBooks experts provide accurate and stepwise assistance. Get dependable support designed to minimize downtime and maximize efficiency.
Recent Posts
-
QuickBooks Bookkeeping: The Practical Way to Keep Your Books in Order
-
QuickBooks Merchant Services: Everything You Need to Know Before You Sign Up
-
QuickBooks Payroll Assisted: Everything You Need to Know
-
How to Contact QuickBooks Online Customer Service Team 2026
-
QuickBooks Online Login: Sign in to Access your QB account