


QuickBooks Banking Error 350: Effective Solutions for Online & Desktop

- By Jonathan Browns
- Oct 09, 2026
- Accounting
- 7 min read
QuickBooks Banking Error 350 can occur in both QuickBooks Online and QuickBooks Desktop, but the cause can differ depending on the product and error message.
In QuickBooks Online, Error 350 usually occurs when the connection to a bank or credit card account expires or is updated by the financial institution. In QuickBooks Desktop, Error 350 may appear as a “Verify ToC” error when transactions involved in the Transfer of Credits aren’t linked appropriately.
This guide explains the causes, symptoms, and troubleshooting methods for fixing QuickBooks Error 350 in both QuickBooks Online and Desktop.
A Quick Overview of QuickBooks Banking Error 350
Here we have provided you with a table that provides you with a glimpse of what we are going to cover ahead in this blog.
| Parameter | Description |
| Error Name | QuickBooks Error 350 |
| Error category | Banking Connection Error / Transfer of Credits |
| Affected Products | QuickBooks Online and QuickBooks Desktop |
| QBO Issue | Expired or updated bank connection |
| Desktop Issue | Transfer of Credits transaction-linking issue |
| Common Symptoms | Bank connection failure, transactions not downloading, or Verify ToC Errors. |
| How to fix it | Reconnect bank account, verify /rebuild company file, or recreate affected transactions. |
What is Error 350 in QuickBooks?
QuickBooks Error 350 is a bank connection error that occurs when QuickBooks fails to connect with your bank or credit card account.
When this error appears, you may see the following error message:
The Error 350 message includes the line “Verify ToC: Verify has failed due to an error under Transfer of Credits related to transactions.”
This error mainly occurs when an existing bank connection stops working or when a new connection cannot be established.
Common Symptoms of QuickBooks Error 350
The following are the signs and symptoms that will help you determine that you are affected by QuickBooks Error Code 350.
QuickBooks Online
- Failure to download the latest bank transactions.
- QuickBooks fails to connect with your bank account.
- The bank connection needs to be reauthorized.
- Bank feeds remain outdated.
QuickBooks Desktop
- QuickBooks displays a “Verify ToC” error.
- This issue may also appear when invoice, payment, or journal-entry transactions aren’t linked correctly.
- The error identifies a specific transaction or transaction number.
- Verify Data detects an issue with the company file.
Major reasons that trigger Error 350 in QuickBooks
QuickBooks Error 350 is typically triggered by banking connection issues, expired account authorization, or incorrect login credentials. Identifying the exact cause helps you choose the right troubleshooting method and restore the connection quickly.
Causes of QuickBooks Online Error 350
- Expired bank connection.
- This issue may occur if the bank has updated its connection requirements.
- Bank requires reauthorization.
- Your bank login credentials are outdated.
- Temporary bank-side issue.
Causes of QuickBooks Desktop Error 350
- Incorrectly linked transactions
- Issues involving invoices, payments, or GJE transactions
- Company-file data issues
How to Fix Error 350 in QuickBooks Desktop.
Follow the troubleshooting methods below in the order they’re listed to resolve QuickBooks Error 350 effectively.
Solution 1: Update QuickBooks Desktop
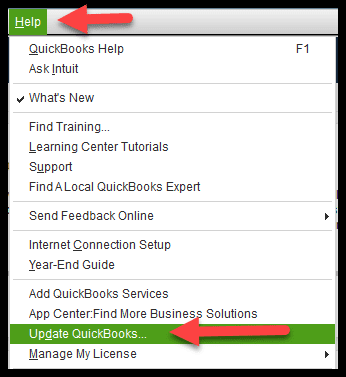
A supported version of QuickBooks Desktop is required to run payroll, manage data, and perform other processes seamlessly. If the QB software you are using is outdated, you may encounter security risks or technical issues. Therefore, updating QuickBooks Desktop to the latest version will help resolve QuickBooks Error Code 350.
Solution 2: Verify & Rebuild Your Company File
The Verify tool looks for common issues present in the company file, and then the rebuild tool fixes the data integrity. Perform the following steps to run the Verify and Rebuild data utility in QuickBooks desktop .
For Windows
Verify Your Data
- Initially, go to the Windows menu and click the Close All tab.
- Head to the File menu and choose the Utilities tab.
- Finally, hit the Verify Data option.
Rebuild your company file data.
If the verify tool spots the damage in the company file data, run the rebuild tool to repair your company file. Make sure to take a backup of the company file before starting the process.
- Move to File > Utilities > Rebuild Data.
- This will ask QuickBooks to conduct a backup before rebuilding your company file.
- Now, hit OK and select a location to save the backup company file. Again, click OK and make sure not to replace another backup file.
- After this, provide a new name in the File name field and tap on Save.
- Finally, when the “Rebuild has completed” message appears, click OK.
For Mac
Verify your company file data
- Initially, choose the File menu and click Utilities.
- Go to the Verify Data and hit OK to exit from all windows. When you see the message stating “Your data has failed the integrity check,” rebuild your file. If you spot that there is no issue with the data, it means that you are all done.
Rebuild your Company File Data
After verifying the data, try to rebuild the company file to fix any errors or data damage that’s available.
- Initially, hit the File menu > Utilities > Rebuild Data.
- After this, click OK to exit from all Windows.
- Now, QuickBooks will prompt you to generate the backup before rebuilding the company file, and click OK. If you don’t wish to take the backup, tap on Cancel to rebuild your data file.
- If any backup preferences aren’t set, QuickBooks will prompt you to update. Tap on Backup Preferences, make the necessary changes, and click OK.
- Once the backup is done, hit the Show in Finder option to search for the backup. Otherwise, click OK if you are all done.
Solution 3: Delete and Re-Create Transactions
Deleting and recreating a damaged transaction can refresh its data and links, helping QuickBooks to move ahead with proper bank-feed synchronization.
- First, select the Edit menu and click the Find option.
- Choose the Invoice option by clicking on the Transaction Type drop-down menu.
- Type the Invoice Number provided in the error message or error logs in the Invoice No field. Tap on Find and pick the invoice from the search results.
- Navigate to the Create a Copy option on your invoice.
- Choose Save & Close, and it will take you back to the Customer Payment screen.
- Move to the Edit > Transaction History option. Choose the original invoice and click the Delete option.
- Select the Edit menu again and click Transaction History and pick the payment.
- Select a check mark on the transaction line where the new invoice is located. Ensure that all the related transactions are linked.
- Finally, verify and then rebuild your data.
Solution 4: Use the QuickBooks Tool Hub
Using the QuickBooks Tool Hub, you can access numerous tools and utilities to address the company file and network-related issues that can fix QuickBooks Bank Connection Error 350.
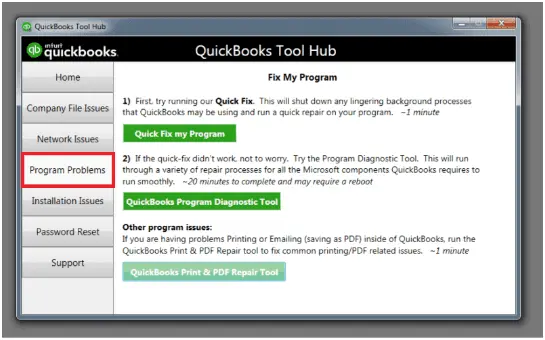
Note: Ensure that you have set up the latest version of the QuickBooks Tool Hub available.
a. Run Quick Fix My Program
• From the Tool Hub, hit the Company File Issues tab.
• Now, click the Quick Fix My File option.
• Once the process is done, hit the OK tab.
b. Run the File Doctor Tool
Running the file doctor tool from the tool hub will help in fixing the corrupt or damaged company file. Thus, it also helps to fix QuickBooks Error 350.
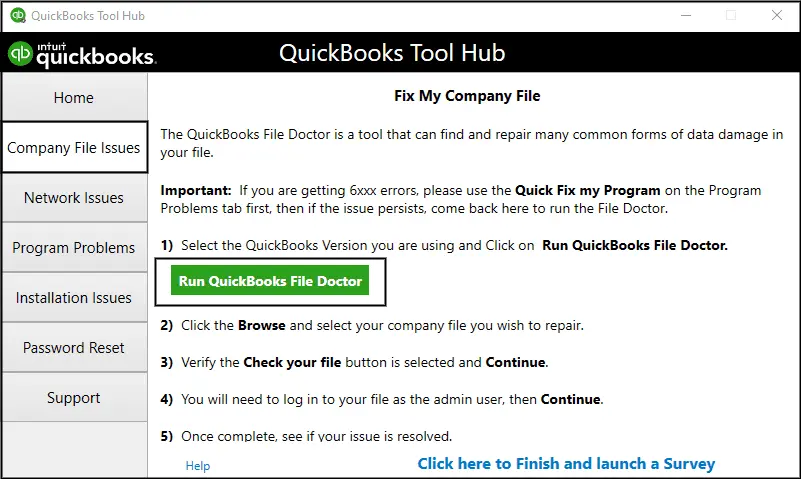
- Open the QuickBooks Tool Hub.
- Choose Company Files Issues from the left menu bar.
- Click on Run QuickBooks File Doctor and wait for some time for the File Doctor to open.
- Choose your company file from the drop-down menu in QuickBooks File Doctor. If you don’t see the company file, click Browse and search to locate it.
- After this, click Check your file and then Continue.
- Enter the QuickBooks admin password to give access and click Next.
- The scan time usually depends on the company file size and may take 10-15 minutes. It may say the scan was unsuccessful even after fixing the issue.
- Once done, open QuickBooks Desktop, then open your company file.
Solution 5: Find the Error in the Log File
You need to search for the exact transaction or file that is causing QuickBooks Banking Error 350. Here are the steps to locate the error in the log file.
- Initially, hit the F2 key on the QuickBooks homepage to open the Product Information window.
- Press the F3 key to open Tech Help.
- Now, browse to the Open File tab, locate the log, and then open it.
- Lastly, review the log to identify the exact error and transactions causing Error 350 in QuickBooks.
Solution 6: Re-Entitle the Connection Between QuickBooks Desktop and Bank
Resetting connection entitlement ensures that QuickBooks can easily link and sync with your bank account.
- Firstly, choose the Banking menu and pick the account with Error 350.
- Hit the Sign in to your bank option and provide your bank login details.
- Choose the accounts that you wish to link and hit the Continue option.
- Once the Oauth window closes, hit the Update option to sync the transactions.
Solution 7: Manually Update PNC Bank or Other Bank Accounts
Perform the following steps to update PNC Bank or other bank accounts.
- Launch QuickBooks Desktop and choose the Banking menu.
- Click the Update option and enter the Multi-Factor Authentication (MFA) credentials.
- Hit the Continue Update option to finish the sync process.
How to Fix Error 350 in QuickBooks Online
If you get the Error 350 in QuickBooks Online, then you may proceed with the following troubleshooting methods to fix the issue. Thus, it will help you regain access to your online banking.
Solution 1: Reconnect your bank or credit card account
The Bank connection error may arise when the bank or credit card account expires. So, to fix the issue, you need to connect with your bank or credit card account again. Here are the steps that will help you reconnect them.
- Click All apps, choose Accounting, and then Bank Transactions.
- Now, choose the bank or credit card account you want to reconnect.
- Select the Edit icon and click Edit account sign-in.
- Cross-check the bank login credentials to sign in to your bank’s website.
- Enter your bank login details if required.
- Tap on the Save and Connect option.
- Note: When you reconnect, you will get a pop-up stating “Connection Complete and transactions updated!
- Lastly, click Done for the confirmation.
Solution 2: Clear the Cache of Your Web Browser
Clearing the browser cache will refresh the website preferences that might be causing issues while connecting the bank feeds in QuickBooks Online. So, to clear the browser cache, perform the following steps.
Mozilla Firefox
- Initially, hit the menu and click the History option.
- Choose Clear Recent History and set the Time range to Everything. Circle the cache checkbox and hit the Clear Now tab.
Chrome Browser
- Initially, open the Chrome browser and hit the three dots to choose the History option.
- Tap on Clear Browsing Data and set the time range to All Time.
- At last, hit the Clear Data option.
Safari Browser
- Open the Safari browser and hit Preferences > Advanced and enable the Develop menu.
- After this, tap on Develop > Empty Caches and restart the Safari browser.
Conclusion
QuickBooks Error 350 can occur for different reasons depending on the product. In QuickBooks Online, it usually relates to an expired or updated bank connection. In QuickBooks Desktop, it can occur when transactions involved in Transfer of Credits aren’t linked properly.
For QBO, start by reconnecting your bank or credit card account and troubleshooting your browser if necessary. For QuickBooks Desktop, use Verify and Rebuild Data, recreate the affected transactions, or run the QuickBooks Tool Hub utility.
If the error still exists, then contact your bank or contact with our BizBooksAdvice professional for further assistance.
Frequently Asked Questions
What does the “can’t connect error cause in Citi Bank Error 350 in QuickBooks?
If your bank connection expires or isn’t updated after 90 days, QuickBooks may display a “Can’t connect bank error 350”. It can also occur due to incorrect credentials or bank server issues.
How do I fix a bank error in QuickBooks?
To fix a bank error in QuickBooks, perform these steps.
- Initially, move to All Apps > Accounting > Bank Transactions.
- Choose the Update option.
- If the error still exists, search for a banner on the Banking page. Then, pick the Check Connections link and follow the steps to address the issue.
Why does QuickBooks Error 350 keep coming back?
If you are running QBO, then your bank needs to be reauthorized. However, if multiple companies are accessing the same bank login details, then reconnecting one company may affect another connection.
Is QuickBooks Error 350 the same in Online and Desktop?
No, QuickBooks Error 350 isn’t the same in Online and Desktop. In the Online version, it is caused by an expired or updated bank connection. In the Desktop version, it refers to Transfer of Credits issues involving improperly linked transactions.
About The Author

Jonathan Browns
Jonathan Brown is a trained QuickBooks professional with 10 years of experience in the accounting sector. Moreover, he is passionate about helping businesses reduce the stress of managing accounts. Also, he is proficient in assisting entrepreneurs and small business owners to use QuickBooks and enhance their accounting experience.
Recent Posts
-
How to Fix QuickBooks Error 1603 During Installation or Updates
-
How to Fix QuickBooks Error 248 With Expert Tips? [Complete Guide]
-
QuickBooks Banking Error 350: Effective Solutions for Online & Desktop
-
How to Fix QuickBooks Missing PDF Component Error
-
QuickBooks Running Slow? Causes and Easy Fixes