QuickBooks Email Not Working? Fix Using Expert Tips

- By Jonathan Browns
- Sep 25, 2025
- Accounting
- 7 min read
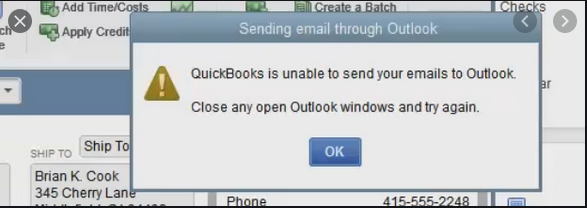
Are you experiencing the QuickBooks email not working issue while sending emails?
Well, it might happen due to the incorrect email settings or problems with the network configuration. Unfortunately, this disrupts the users’ ability to send important business emails, causing a delay in the ongoing task. So, if you are the one stuck with the same issue, then this blog is a saviour for you. In this post, we have explained all the possible causes along with the troubleshooting tips to get over the QuickBooks not sending emails error.
What are the Reasons Behind the QuickBooks won’t send email Issue?
Before fixing the QuickBooks won’t send email issue, it is mandatory to detect the root causes. Herein, we have discussed all those causes in detail below.
- Users don’t have enough administrative rights to send emails in QuickBooks.
- Problems associated with the setting of the email preferences in QuickBooks.
- The QuickBooks email not working with Outlook issue may appear due to incorrect Internet Explorer settings.
- Damage or corruption in the MAPI32.dll may also be responsible for the QuickBooks email not working issue.
- An incorrect email or password for Outlook can also give rise to the QuickBooks email invoice not working issue.
What to Do If QuickBooks Email not working with Outlook?
In this blog’s section, we have shared all the effective solutions to overcome email issues in QuickBooks Desktop. Thus, it will help regain access to the email services without any hindrance.
Solution 1: Make Changes To Email Preferences in QuickBooks
Incorrect email settings in QuickBooks are one of the possible reason that causes the QuickBooks email not working issue. So, to resolve the issue, you must ensure that the email settings are correct by performing these steps.
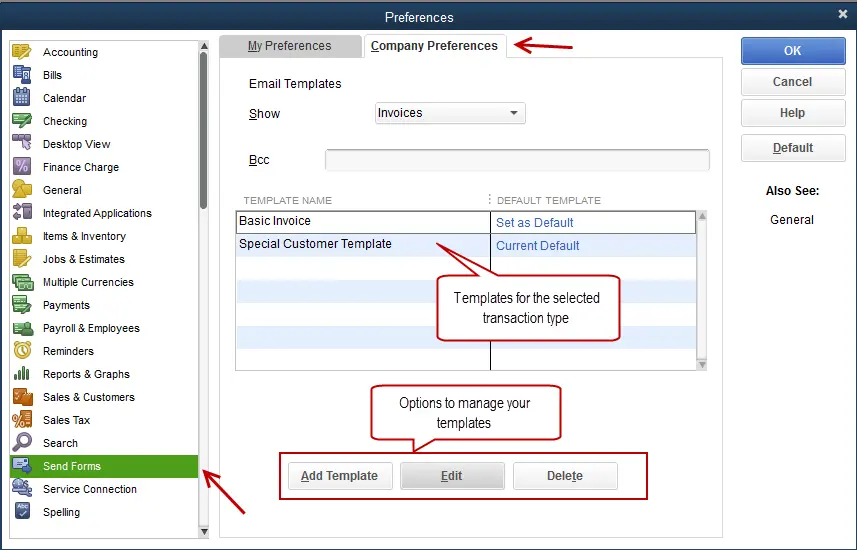
- Launch the QuickBooks application, move to the Edit menu, and choose Preferences from the sub-menu.
- After that, tap on the Send Forms option followed by My Preferences.
- Now, choose Outlook as an email option and click OK.
Furthermore, send a test email from QuickBooks. If you still get an error, then change your preferences.
- Primarily, choose the Edit menu and tap on the Preferences tab.
- After this, pick the Send Forms tab and choose the My Preferences tab.
- Thereon, choose the QuickBooks email or webmail and hit the OK tab. With this, your preferences will be turned off.
- Now, resume the same steps again. Return to the My Preferences tab and from there choose Outlook > OK tab.
- Next, exit from the QuickBooks application and from other open programs.
- Finally, relaunch your PC to see if the error still persists.
Solution 2: Modify Your Admin Rights
For sending the emails in QuickBooks, it is essential to ensure that you are running QuickBooks with proper administrative rights.
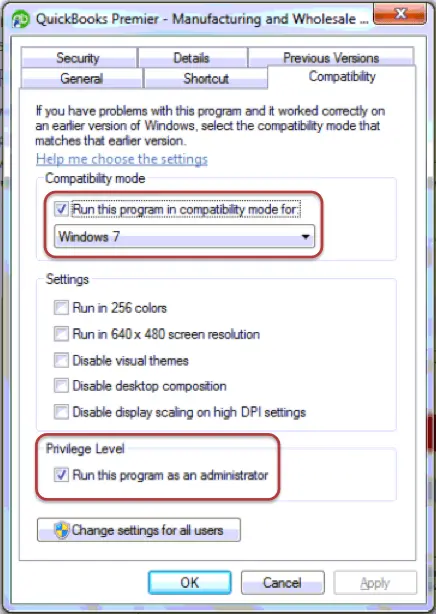
- Initially, shut down the QuickBooks Desktop application if it’s already open.
- After this, hit the Start menu, go to QuickBooks, and right-click on its icon.
- Thereon, choose the Open file location tab.
- From the folder, right-click on the QuickBooks.exe file and select the Properties tab.
- Following this, browse to the Compatibility tab and verify that the checkbox ” Run this program as administrator isn’t marked. If you notice that the option is greyed out, head to the Show Settings for All Users. With this, the option will become available.
- When all the changes are done, hit Apply and then OK to bring the changes into effect.
Solution 3: Test Your Internet Explorer Email Preferences
If you are still getting QuickBooks email not working with Outlook issues, then try to reset the Internet Explorer email preferences. This is so because QuickBooks uses Internet Explorer to run web services in the background.
- Exit from the QuickBooks application if it’s already open.
- After this, access the latest version of Internet Explorer.
- Now, choose the Tools option and then the Settings menu.
- Next, opt for the Internet options > Programs tab > Set Programs.
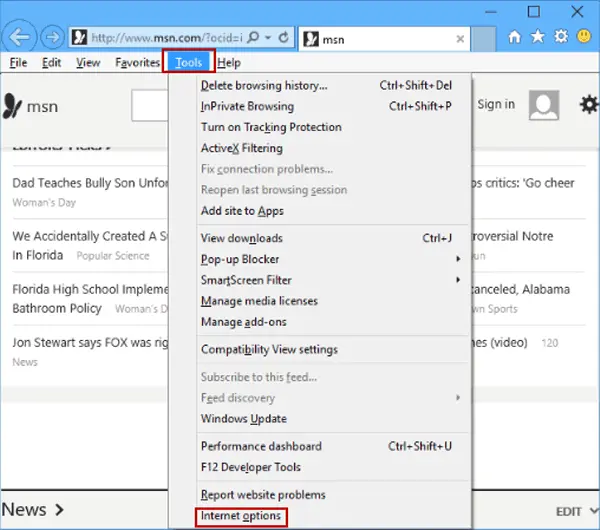
- Furthermore, you must set your default programs and pick the email service you want to use.
- Afterwards, hit the Apply and then OK.
- Once done, you must shut down Internet Explorer.
Solution 4: Repairing the MAPI32.dll files
You might find it challenging to perform these tasks. If you have enough technical knowledge, then perform the steps. Otherwise, you can also take help from an IT expert for guidance.
- To begin with, run the test to slow down the issue.
- Relaunch your Windows operating system.
- After this, launch the Microsoft Word application and then generate a new document.
- Thereon, move to the File menu, click Send, and then opt for the Email as PDF attachment option.
Now, you must send a test email. If you couldn’t send an email from Microsoft Word, then connect with the Microsoft Help and Support. You may have an issue with your Outlook or Office Suite.
Furthermore, if you are able to send an email via MS Word but not in QuickBooks, undertake the steps below to repair the MAPI32.dll file.
- Shut down all the open programs in the background.
- After this, launch the Start menu, insert “File Explorer” in the search area, and access the File Explorer.
- Later on, insert “C:\Windows\System32 in the search area.
- Now, locate and then launch the Fixmapi.exe, and then apply the steps on the screen to run the repair.
- Once the repair process is over, relaunch your Windows PC.
Solution 5: Try Installing the QuickBooks Desktop Again
Even after implementing the above steps, you fail to rectify QuickBooks email issues, so fix them by installing QuickBooks Desktop.
How to Resolve Email Issues in QuickBooks Desktop?
Herein, we have discussed the simple tips that will help rectify email issues of QuickBooks Desktop.
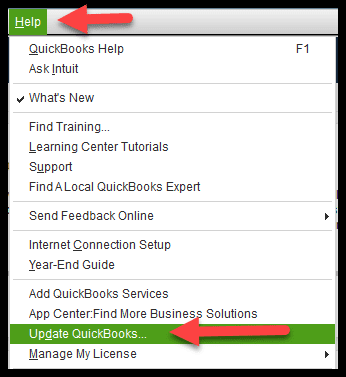
First Step: Ensure You Have Updated QuickBooks Desktop
Sometimes, working on an old QuickBooks version might cause QuickBooks Desktop email invoices not working issues. So, to fix the issue, you must update QuickBooks Desktop to the newly launched version.
Second Step: Verify Your Email Settings
You must launch your online email service and then have a look at the settings as well as the latest release. Then, you can send an email to test the transaction.
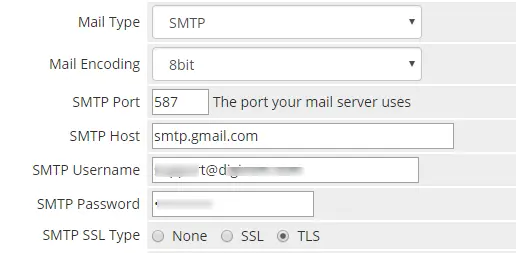
A. Steps to Change Email Settings in Gmail
If you see that the QuickBooks email is not working in Gmail, then you must verify the app preferences. There might be the possibility that something is blocking the connection with your Google account.
- Firstly, you must turn on the access for less secure apps.
- After this, set the access preferences for certain apps such as QuickBooks.
- Then, return to the QuickBooks application and send an email for testing a transaction.
If you couldn’t send emails, then disable the 2-step Verification feature for your Gmail account.
B. Steps to Change Email Settings in Yahoo! Mail
Yahoo Mail accesses the two-step verification process. For that, you must look for the security settings given below.
- Initially, access the Yahoo Account Security page.
- After that, disable the Two-Step Verification and allow apps that use less secure sign-in features.
- Now, return to QuickBooks and then email a test transaction.
If you are facing the QuickBooks Yahoo email not working issue while sending emails, access Yahoo’s third-party app password tool. Then, you can access the random password to link with QuickBooks. You only need to perform these steps once.
- Initially, to get a Yahoo password, do as follows:
- Log in to your Yahoo Account Security page.
- After this, look below the External Connections and hit the Create App Password tab.
- Thereon, provide your app’s name in the search area and opt for Generate password.
- Now, you can utilize the one-time password for logging into the third-party app.
- Once you are all set, opt for the Done tab.
- Afterwards, move back to QuickBooks and then start emailing yourself a test transaction.
- When you are in the Password field box, provide the third-party app password. Then, hit the OK tab to apply the changes.
Third Step: Test Your Antivirus Settings
Sometimes, the antivirus software might interrupt the connection. Therefore, it is essential to look for your antivirus provider’s website to enable port exceptions.
- Verify that Port 465 is open for Yahoo! Mail.
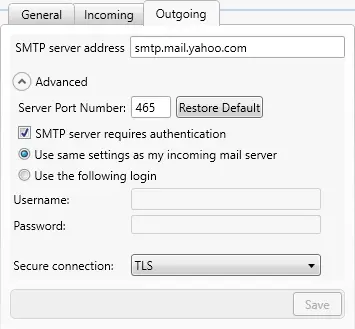
- Also, verify that Port 587 is open for Gmail, along with other email services.
In case you are working on McAfee, then launch the antivirus software and look for the excluded processes list. Herein, you need to include all these names in the list to run it smoothly.
- QBW32.exe – C:\Program Files\Intuit\QuickBooks [year]\QBW32.exe
- QBDBMGRN.exe – C:\Program Files\Intuit\QuickBooks [year]\QBDBMgrN.exe
- QBDBMGR.exe – C:\Program Files\Intuit\QuickBooks [year]\QBDBMgr.exe
Read More:- Try This When QuickBooks Database Server Manager Stopped
What Should You Do If QuickBooks Email Paystub Not Working?
If you are confronting issues while emailing pay stubs, then you must use the troubleshooting steps given below.
Solution 1: Update QuickBooks to the New Versions
The users must verify that they are operating an up-to-date QuickBooks Desktop version. Moreover, it is necessary to ensure that you have the updated version of the Adobe Acrobat Reader. This is so because QuickBooks utilizes Adobe for converting pay stubs into PDF form.
Solution 2: Verify Your Email Settings Accurately
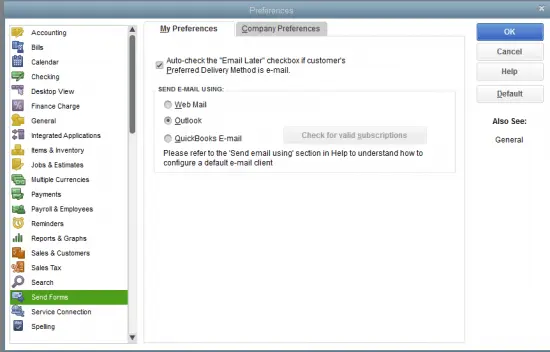
Before sending the email pay stubs in QuickBooks, it is mandatory to enable the pay stub feature. For that, you must perform the steps below closely.
- Open the QuickBooks application, choose the Edit menu, and tap on Preferences.
- After that, browse to the Send Forms menu and then pick the My Preferences tab.
- Now, from the Send email using section, you must opt for any one of these options:
- Users accessing Gmail, Yahoo, or similar email services go with the Web Mail.
- The users working on MS Outlook choose Outlook. If the Outlook option is unavailable, here’s how to set it up.
- In case you are accessing the QuickBooks email service, choose QuickBooks Email. If you aren’t still ready, then here’s how to set up your email service.
- Once all the necessary changes are made, select OK.
Solution 3: Email Your Pay Stubs
- In the beginning, head to the File menu and choose Switch to Single-user Mode. If you notice “Switch to Multi-user Mode,” avoid choosing it. It will indicate that you are already in Single-user Mode.
- Once again, move to the File menu and hit the Print Forms option. Then click on Pay Stubs.
- Thereon, choose the Bank Account you use for payroll.
- Afterwards, fix the date range for the pay stubs you want to email.
- Next, pick those employees to whom you wish to email the pay stub. Herein, you may also choose and unmark the checkbox of an employee’s name if you don’t want to include them.
- Furthermore, choose Preview to review each pay stub before sending it. Later on, opt for the Email option.
- As a result, you will see that QuickBooks will automatically generate a password for each employee and email. Herein, you must note down the passwords so you can give them to the recipients. Then, click on OK twice to confirm.
- Now, mention every employee’s email address one at a time.
- Start checking your email from the Send Forms window. Herein, you can modify To and From fields, subject lines, and the email body.
- Finally, tap on the Send Now option once you are all set.
If your employee doesn’t receive their pay stubs
When your employees are having some issues seeing or launching your emails, then do as following:
- Begin sending the test emails to yourself. With this, it gets easier to detect whether the issue lies with your email service.
- You may also ask your employees to review their spam folders and filters that are blocking emails.
- Moreover, you must ensure that the employees have provided the accurate password.
How to Fix If Customers Aren’t Getting Emails From QBO?
Are your customers having issues while sending invoices, emails, or estimates? Then, stop worrying and follow the steps below to resolve the issue.
Solution 1: Refresh Your Email Address
If you are confronting the QuickBooks invoice email not working issue, then try resetting your email address to update the connection. Doing so will help you send email invoices to your customers.
- Initially, you must log in to your QuickBooks Online account.
- After this, browse to the Settings icon and opt for Account Settings.
- When you are in the Company section, hit the Edit icon from the Contact Info.
- Now, begin checking each email address and make the changes according to the requirements.
- When you are done making the necessary changes, click the Save and then Done option.
Read More:- Pro Guide on QuickBooks Online Login: How to do it and Why?
Solution 2: Remove & Add Your Email Address Once Again
In case changing the email address won’t resolve the issue, then your customers must review their spam and junk folders. If the mail is still not available, try to add the email address once again by performing the steps below.
- Under this process, move to the Settings icon and choose the Account & Settings option.
- Now, browse to the Company section and click the Edit option from the Contact Info tab.
- Make sure that you leave the Company email field empty and provide the email address accurately. While mentioning the email address, ensure that you don’t use any extra characters or spaces before, within, or after the address you have provided.
- Once all the changes are done, tap on Save, then Done.
- Furthermore, start sending a test transaction to yourself.
- In case you are still having trouble receiving the email, try accessing any other email address with a different domain.
Solution 3: Make Changes to Your Server to Accept QBO Mail Server Host Names & IP Addresses
Herein, an IT expert has to include the QBO mail server host names and IP addresses in the outgoing mail servers’ allow list. It is essential to verify that QuickBooks emails aren’t marked as spam by mistake.
Add the Server Hostname
- o1.sg.n.intuit.com
- o2.sg.n.intuit.com
- o3.sg.n.intuit.com
- o4.sg.n.intuit.com
- o5.sg.n.intuit.com
- mailout1b.intuit.com
- mailout2b.intuit.com
- mailout3b.intuit.com
- mailout4b.intuit.com
- mailout1a.intuit.com
- mailout2a.intuit.com
- mailout3a.intuit.com
- mailout4a.intuit.com
- mailout5a.intuit.com
- mailout11.intuit.com
- mailout12.intuit.com
- mailout13.intuit.com
- mailout14.intuit.com
- mailout21.intuit.com
- mailout22.intuit.com
- mailout23.intuit.com
- mailout24.intuit.com
- mailout101.intuit.com
- mailout102.intuit.com
- mailout103.intuit.com
- mailout104.intuit.com
- mailout201.intuit.com
- mailout202.intuit.com
- mailout203.intuit.com
- mailout204.intuit.com
- lvmailout01.intuit.com
- lvmailout02.intuit.com
- lvmailout03.intuit.com
- lvmailappout10.intuit.com
- lvmailappout11.intuit.com
- lvmailappout12.intuit.com
- lvmailappout13.intuit.com
- lvmailappout20.intuit.com
- lvmailappout21.intuit.com
- lvmailappout22.intuit.com
- lvmailappout23.intuit.com
Add the IP Address
For instance, if you have to provide the subnet mask, then you can access 255.255.255.255. With this, your customers are able to obtain the emails via QuickBooks.
Conclusion
The QuickBooks email not working issue might prevent businesses from sending emails to their customers, vendors, and retailers. Therefore, to resolve the issue, you must update the email settings, verify the internet connection, or verify the email or password. Furthermore, if you are still struggling while sending the emails, then connect with our QB professionals for better assistance.
Frequently Asked Questions (FAQ’s):-
Question 1: How to review email settings in QuickBooks?
Ans. To verify the email settings in QuickBooks, hit the Manage your Intuit Account option. If asked, then try signing in to your account again and choose Data Privacy. After that, choose the View option beside the product to which you want to make changes.
Question 2: How can I change the default email on QuickBooks?
Ans. The following are the steps you must apply to change the default email on QuickBooks.
- Launch the QuickBooks application, choose Preferences > Email icon.
- After that, move to Send Emails Using > Custom option.
- With this, a list of email accounts will pop up.
- You must hit the Plus icon to insert a new account.
- Thereon, provide an account name, and then mention the settings from your email provider.
Question 3: What should you do to change the outgoing email in QuickBooks Desktop?
Ans. To change the outgoing email in QuickBooks Desktop, do the following:
- Firstly, choose the Gear icon from the top, then click Accounts and Settings.
- After this, pick the Company option and tap on the Pencil icon to edit the Contact details.
- Now, provide the updated email address in the text field.
- Finally, hit the Save and then Done option to complete the process.
Question 4: How can I reset my email password on QuickBooks?
Ans. To reset the email password on QuickBooks, launch the QuickBooks application and then your data file. After that, tap on “I forgot my password” from the login screen. Thereon, choose the email address and hit Next. Later on, you will obtain a token for recovering the password.
Question 5: Which information can be customized in the email from QuickBooks?
Ans. You can customize the invoices, estimates, sales receipts, and other transactions within the email from QuickBooks.
Related Posts-
QuickBooks Outlook is Not Responding? Let’s Fix It Immediately
How to Sync Outlook Contacts with QuickBooks Desktop?
Top Solutions to Fix QuickBooks Down or not working Error
About The Author

Jonathan Browns
Jonathan Brown is a trained QuickBooks professional with 10 years of experience in the accounting sector. Moreover, he is passionate about helping businesses reduce the stress of managing accounts. Also, he is proficient in assisting entrepreneurs and small business owners to use QuickBooks and enhance their accounting experience.

QuickBooks Desktop, Payroll or Enterprise
Advanced Support for QuickBooks Desktop, Payroll & Enterprise Solutions
From payroll tax setup, direct deposit issues to Enterprise performance tuning and Desktop upgrades - our QuickBooks experts provide accurate and stepwise assistance. Get dependable support designed to minimize downtime and maximize efficiency.
Recent Posts
-
How to Troubleshoot QuickBooks Error PS038 During an Update?
-
Troubleshooting QuickBooks TLS Security Portal Errors Instantly
-
Fixing QuickBooks Script Error (Easy Troubleshooting Guide)
-
How to Create QuickBooks Portable Company File Easily?
-
QuickBooks Payroll Not Withholding Taxes? Here’s What to Do