Resolve QuickBooks Error 1402 – Windows & Registry Fixes

- By Jonathan Browns
- Jan 05, 2026
- Accounting
- 7 min read
Finding it difficult to install the QuickBooks Desktop and struggling with QuickBooks Error 1402?
This issue typically occurs when installing or opening the data file after completing the installation process. It basically appears due to the presence of damage in Windows components or the incorrect installation of the QB application. Unfortunately, this issue prevents users from installing the QuickBooks application, hindering the ongoing business tasks. So, let’s read this guide to find the easy troubleshooting methods to tackle the QuickBooks Desktop Error 1402.
What Causes QuickBooks Error Code 1402?
The QuickBooks Error Code 1402 often appears while installing or updating the QuickBooks program. However, this issue may occur due to the following reasons, as stated below.
- Windows Firewall is blocking QuickBooks.
- The QuickBooks installation is either damaged or corrupt.
- The Windows OS or the QuickBooks Desktop you are running is not the updated version.
- Sometimes, corruption or damage in Windows components may also cause this error.
- An unstable internet connection might create trouble installing the QB app.
How to Troubleshoot and Fix Error 1402 During QuickBooks Desktop Installation
Finding it difficult to QuickBooks install error 1402 when installing QuickBooks Desktop? Well, in that case, go through the troubleshooting methods given below to fix the issue.
Solution 1: Download & Then Install the Latest Windows Updates
To set up the latest version of the Windows operating system, follow the instructions outlined below.
- Press the Windows logo key to open the Windows Start menu.
- Type “Update” within the search bar.
- Choose the Check For Updates option to launch a new window.
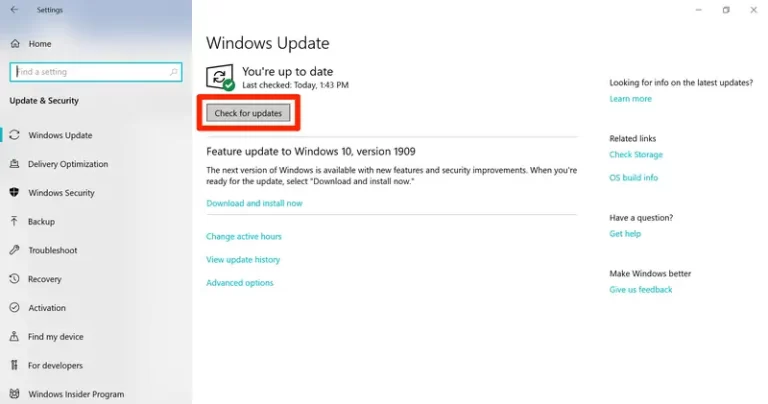
When you are on the Update screen, you will get You’re Up-to-date when your OS is already updated.
- If there are any available updates, click Download and Install Now.
- Now, wait patiently till the time new Windows updates are downloading.
- Finally, relaunch your computer and then see if the Error Code 1402 in QuickBooks Desktop appears.
Solution 2: Repair QuickBooks Desktop With Quick Fix My Program
At times, the damage present within the QuickBooks application may also trigger QuickBooks Error Code 1402. So, to repair the program, you must run the Quick Fix My Program, and for that, you must download and install QuickBooks Tool Hub 1.6.0.8.
- Open the QuickBooks Tool Hub and hit the Program Problems tab.
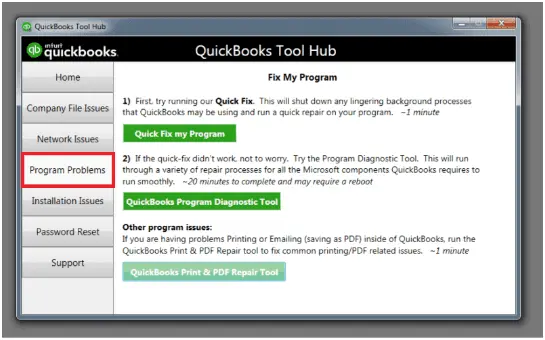
- After this, tap on the Quick Fix My Program tab.
- Then, start the QuickBooks Desktop app and launch your data file.
Solution 3: Use QuickBooks Install Diagnostic Tool to Fix Installation Issues
You can also resolve most of the QuickBooks problems by running the QuickBooks Tool Hub 1.6.0.8, including the installation issues like Fix QuickBooks Error 1402, Error 1406, and QB Error 1603. So, to run the QuickBooks Install Diagnostic Tool, you must perform the following steps.
- Launch the QuickBooks Tool Hub that you have downloaded.

- On the dashboard, tap on the Installation Issues tab.
- Now, hit the QuickBooks Install Diagnostic Tool and wait for some time till the tool completes the scanning.
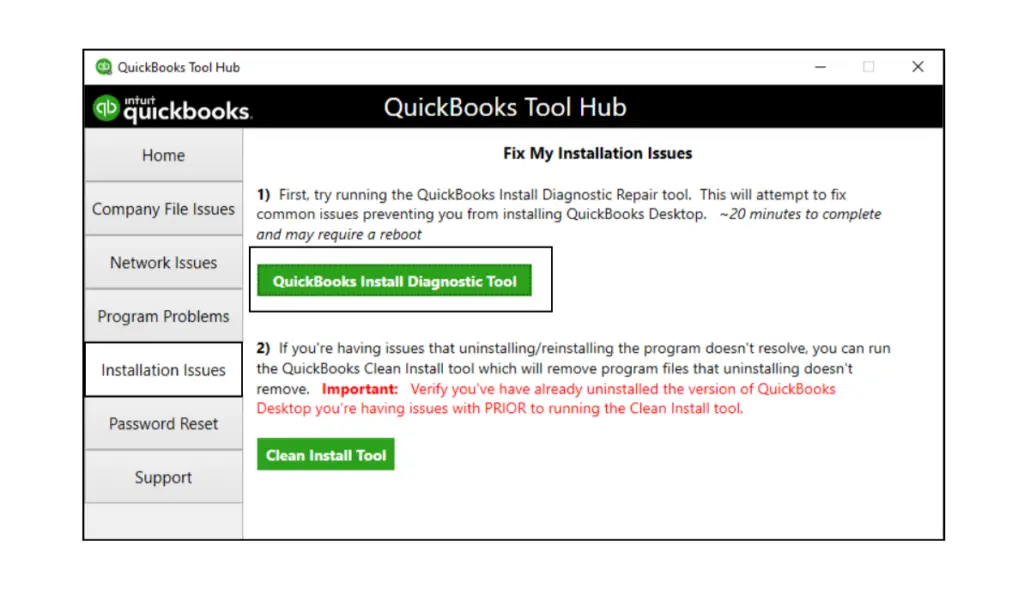
- Once the process is complete, start your Windows PC once again.
Solution 4: Repairing the Windows Components Manually
If running the Install Diagnostic tool doesn’t resolve QuickBooks Desktop Error 1402, then try fixing the specific Windows components. If you aren’t sure and don’t have any knowledge, then you can take help from an IT expert.
Follow the instructions given below to repair the Microsoft .NET Framework or MSXML components.
Review .NET Framework 4.5 (or a higher version)
In case the checkbox of .NET Framework 4.5 (or later) is already selected.
- Tick-mark the checkbox of .NET Framework 4.5 (or later) to turn it on.
- After this, click OK to save your changes.
- Start your Windows PC again.
When the checkbox of .NET Framework 4.5 is not already marked:
- Tick-mark the checkbox of .NET Framework 4.5 (or later) to switch it off.
- Thereon, click OK to save your changes.
- Now, relaunch your Windows PC.
- Once you log in to Windows, use the steps for turning on .NET Framework 4.5 again.
Review .NET Framework 3.5 SPI.
When the .NET Framework 3.5 SPI checkbox isn’t previously marked:
- Mark the checkbox of .NET Framework 3.5 SP1 to turn it on.
- Thereon, choose OK to save your changes.
- Now, relaunch your Windows PC.
When the .NET Framework 3.5 SPI is selected earlier:
- Tick-mark the checkbox of .NET Framework 3.5 SP1 to turn off.
- Now, click OK to save your changes.
- Relaunch your Windows PC.
- Once you log in to Windows, use the steps for turning on .NET Framework 3.5 SP1 again.
Fixing the issues with the damage present in MSXML components
Go through the steps below to resolve the issues with MSXML components:
1. Registering the MSXML files on a 64-bit operating system:
- Press the Windows logo key and then type cmd.
- After this, right-click CMD and select Run as Administrator.

- Now, in the command prompt window, type cd\windows\syswow64.
- After that, type regsvr32 MSXML6.dll and hit the Enter key.
- At last, try to download QuickBooks Desktop and then install it.
2. Registering the MSXML files on a 32-bit operating system:
- Press the Windows logo + R keys to launch the Run command.
- Now, insert CMD in the search bar and press Enter.
- In the command prompt screen, type regsvr32 MSXML6.dll, then press Enter.
- At last, try to install QuickBooks Desktop again.
Solution 5: Run QuickBooks Desktop in Selective Startup Mode
At times, the interference of third-party apps, such as antivirus software, may create trouble installing QuickBooks. Therefore, to avoid such interruptions, it’s best to run the QuickBooks Desktop in Selective Startup mode. For that, you must try implementing the given steps.
First Step: Move to Selective Startup
Accessing the QuickBooks Desktop in Selective Startup may avoid the interruptions of third-party apps. In case you get any issues while performing these steps, connect with your IT expert for help.
- Launch the Windows Run window and type msconfig in the search bar.
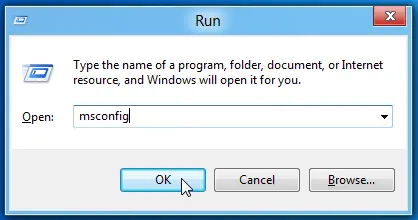
- After that, click OK, and it will open the System Configuration window.
- Now, head to the General tab and choose Selective Startup and Load System Services tab.
- Tap on the Services tab and then tick the Hide all Microsoft Services checkbox.
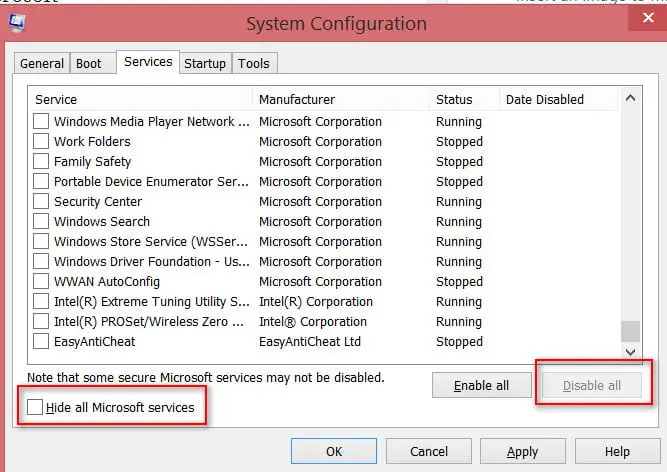
- Next, hit the Disable All tab and verify that the Hide all Microsoft Services checkbox is not selected.
- You must pick the Windows Installer from the services list.
- Thereon, click OK and then hit Restart from the System Configuration screen.
Second Step: Remove & Then Install QuickBooks Desktop
- To begin the process, reinstall QuickBooks Desktop.
- Press the Windows + R keys to access the Run Window.
- Insert msconfig in the text area and click OK to open the Configuration screen.
- Now, move to the General tab and choose Normal Startup > OK tab.
- Finally, hit the Restart option from the System Configuration window.
Solution 6: Edit the Windows Account Settings Manually
You must shift to the Windows Administrator account to modify the settings.
Move to Windows Administrator Account
- Press the Windows logo key to access the Windows Start menu.
- Now, insert CMD into the search area.
- When you see the CMD icon, right-click on it and then choose Run as Administrator.
- In the new window, write net user administrator /active: yes and press the Enter key. Once the command is complete, exit from the command window.
- Now, open the Start menu and hit the Sign out option.
- Pick the account that says Administrator and sign in. Herein, you won’t require a password.
Make Changes To User Permissions
- Launch the Start menu and insert File Explorer in the text area.
- By this, it will open the File Explorer window, wherein you can locate the C:\Program Files\Common Files.
- You must right-click on the Common Files folder and hit the Properties tab.
- Now, head to the Security tab and opt for the Edit menu.
- When you are in the Group or user names section, tap on the Users tab.
- Within the Permissions for Users area, verify that the following settings are off, including Modify, Read & Execute, List folder contents, Read, and Write.
- Finally, hit the Apply and then the OK to save the necessary changes.
Reinstall QuickBooks
- You must remove the old QuickBooks version and then install the latest version again.
- Once again, click the Start menu and log out of the administrator account.
- Next, log in to your usual user account and again open the Start menu.
- Insert CMD, right-click on CMD, and click Run as Administrator.
- Now, write net user administrator /active:no in the Command window and hit Enter key. With this, it will instantly hide your administrator account.
Conclusion
We hope that you may find this post worth reading and helpful in resolving QuickBooks Error 1402. Moreover, it also helps you in installing the QuickBooks application without any interruption. If you still have any trouble with the QuickBooks Desktop application, then connect with our BizBooksadvice professionals for help.
Frequently Asked Questions (FAQ’s):-
Question 1: What precautions must you take to prevent QuickBooks Enterprise Error 1402?
Ans. To prevent the QuickBooks Enterprise Error 1402 from occurring in the future, you must consider the following things.
- Initially, you must verify that you have generated a backup of the QuickBooks file.
- Make sure you are using the latest QuickBooks Version for smooth installation.
- Also, see that no antivirus software blocks the interruption of the QuickBooks installation.
Question 2: Why is my QuickBooks Desktop update not installing?
Ans. Incorrect Windows Firewall and antivirus software settings might prevent users from installing the QuickBooks Desktop updates. Therefore, to resolve the issue, you need to configure the firewall and antivirus software settings.
Question 3: What are the different errors faced while installing QuickBooks Desktop?
Ans. Users often face numerous errors while installing QuickBooks Desktop, such as QuickBooks Error 1402, QuickBooks Error 1406, QuickBooks Error 1702, QuickBooks Error 1603, and QuickBooks Error 1904.
Question 4: How can I detect if I am getting QuickBooks Error Code 1402?
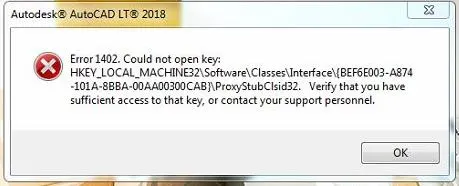
Ans. Whenever users come across QuickBooks Error Code 1402, a warning message appears: “Error 1402. Could not open key: [specific path]. Verify that you have sufficient access to that key or contact your support personnel.” This error mainly appears while trying to install or update the QuickBooks application.
Question 5: Can QuickBooks Desktop Error 1402 cause damage to my company’s data?
Ans. No, the QuickBooks Desktop Error 1402 doesn’t cause damage to your company data directly. However, corruption or damage to the QuickBooks application may affect the data. Therefore, it is advisable to create a backup of the company file for security purposes.
About The Author

Jonathan Browns
Jonathan Brown is a trained QuickBooks professional with 10 years of experience in the accounting sector. Moreover, he is passionate about helping businesses reduce the stress of managing accounts. Also, he is proficient in assisting entrepreneurs and small business owners to use QuickBooks and enhance their accounting experience.

QuickBooks Desktop, Payroll or Enterprise
Advanced Support for QuickBooks Desktop, Payroll & Enterprise Solutions
From payroll tax setup, direct deposit issues to Enterprise performance tuning and Desktop upgrades - our QuickBooks experts provide accurate and stepwise assistance. Get dependable support designed to minimize downtime and maximize efficiency.
Recent Posts
-
Fix QuickBooks Error PS032 | QB Payroll Update Error
-
How to Fix QuickBooks Error 12031 (Network Timeout Issue)
-
QuickBooks Error PS036: Causes, Fixes, and Prevention
-
Converting from QuickBooks Desktop to QuickBooks Online: A Complete Guide
-
Tried Everything? Here’s How to Fix QuickBooks Error Code 80070057