Create & File 1099s in QuickBooks For Stress-Free Tax Season

- By Jonathan Browns
- Oct 30, 2025
- Accounting
- 7 min read
The businesses that deal with independent contractors, freelancers, and other non-employees must create and file 1099s in QuickBooks. Moreover, this form is also used for reporting the payments to independent contractors, gambling winnings, rents, royalties, and more. However, if you are paying the contractors in cash, check, or a direct deposit form, then filing the 1099s form with the IRS is important. Herein, in this guide, we have explained how to create and file 1099s in QuickBooks Desktop & Online. So, let’s get a deep dive into this post and experience a trouble-free tax experience.
Who Needs to File a 1099-NEC Form?
The following are the conditions when you need to file a 1099-NEC form in QuickBooks.
- You can file a Form 1099-NEC for anyone whom you paid $600 or more within the last year.
- Also, it is necessary to file this form if any person you’ve withheld any federal income tax under the backup withholding rules.
- Moreover, this form can be filed by contractors, freelancers, vendors, or any other non-employee.
- In case you have already reported any information on Box 7 of the 1099-MISC form, then it will be reported on the 1099-NEC form.
Who Needs to File a 1099-MISC Form?
- According to the U.S. tax law, you can file a 1099-MISC form for any individual you paid $600 or more in the last year.
- The payments available on the 1099-MISC are geared towards vendors, attorneys, and other individuals who are not proper contractors.
When is the Due Date for Filing the 1099 Forms?
You can file 1099 in QuickBooks Desktop and Online versions. However, the due date of filing the form is as follows:
- The Form 1099-NEC due date is January 31.
- For the Form 1099-MISC, the due date is March 31 if you file electronically.
How to Create and File 1099s With QuickBooks Desktop?
If you require paying contractors in the form of cash, check, or direct deposit, then it is essential to file 1099s with the IRS. QuickBooks Desktop helps you in preparing your 1099s form using the details already existing in your account. So, if you are wondering how to prepare 1099 in QuickBooks Desktop, then follow the steps instructed below. Once you are done preparing the form, you are supposed to file it online or print it and then mail it to the IRS.
First Step: Verify that Your Updated the QuickBooks Desktop
Before moving further with the procedure, it is essential to update the QuickBooks Desktop for smooth processing of the 1099-NEC and 1099 MISC forms.
QuickBooks Desktop
To ensure that you are running the latest QuickBooks update, mark the checkbox next to the Reset Update option.
Second Step: Begin Creating Your 1099s Form in QuickBooks Desktop
Perform the steps below to create your 1099s form in QuickBooks Desktop.
- Under this process, head to the Vendors, click the 1099 forms, and then opt for the Print/E-file 1099 Forms option.
- After this, you must generate the backup.
- Now, choose the Get Started option beside the 1099 form that you want to prepare. In case you want to create both 1099-NEC and 1099-MISC, then you have to repeat the steps for the other form. Note: You have to make the necessary modifications to the 1099 forms and boxes, so choose your forms carefully. Many businesses will opt for the Non-employee compensation, Box 1 on the 1099-NEC, but it is necessary to consult with your accountant if you have made any other types of payments.
- For instance, if you want to file for New Jersey or Wisconsin, 1099 forms filed in these states might contain some special rules for boxes 16 and 17 in the form.
- Thereon, choose the vendor that requires a 1099 form and hit the Continue option.
- Moreover, you must verify that the vendor details are correct. Herein, you have the option to modify if there are any wrong details by double-tapping on the section that needs to be changed. Then, hit the Continue option.
- Thereon, start mapping the vendor payment accounts and hit the Apply payments to this 1099 box. Then, pick the account with which you want to link the payment. If you notice that any boxes are gray, it means that they are mapped to the other 1099 form. Herein, you can only map accounts to one 1099 form. Once you are all sorted, hit the Continue option.
- Note: If you notice a message popping up in red, it shows that the settings won’t tally with the current IRS thresholds. Choose the SOW IRS 1099-MISC filing thresholds. Then, opt for the Reset to IRS Thresholds option.
- Now, start verifying your payment details for exclusions. Furthermore, to learn more about what can be excluded, check what payments are excluded from a 1099-NEC and 1099-MISC. Then, pick the View Included Payments or View Excluded Payments to get the insights regarding the reports, and click the Continue tab.
- Following this, go through the vendors and amounts to whom you wish to report and click Continue.
- Note: In case you wish to look for the vendors who don’t meet the IRS threshold, choose the View Summary Report option.
- At last, decide whether you wish to print 1099s or e-file the form. In case you prefer to e-file your 1099s form, then you have to print the form.
QuickBooks Desktop For Mac
- Initially, ensure that you have generated a backup copy of the file.
- After this, head to Vendors, click the 1099s Forms > Print or E-File 1099/1096 option.
- Next, choose the Get Started on 1099-NECs or Get Started on 1099-MISCs for the 1099 form that you wish to generate. In case you prefer to generate both 1099-NEC and 1099-MISC forms, then you have to resume the same steps for the other forms.
- Afterwards, pick a suitable vendor that requires a 1099 form and ensure that the vendor details are mentioned correctly. Herein, you have the option to do the necessary changes by double-tapping on the section that needs to be updated.
- Thereon, start mapping the vendor payment accounts. Then, hit the drop-down arrow below the Account section, and pick the account you wish to link the payment with. If you notice that the boxes are marked as gray, it means that they are mapped to another 1099 form. Herein, you have the option to map the accounts for only one 1099 form.
- Now, you must check out the included as well as the excluded payments.
- Thereon, choose the View Included Payments or View Excluded Payments to look for the detailed reports.
- Next, start reviewing the vendors and amounts that you wish to report and click the Next tab.
- At last, select whether you wish to print 1099s or e-file. If you wish to continue to e-file your 1099s, then use the steps below.
Learn More:- How to Install & Set Up QuickBooks For Mac?
Third Step: Begin Importing Your Data Into Tax1099
Once you have prepared the 1099s form in QuickBooks, opt for the E-file button to carry on with the on-screen instructions to import the data into the 1099s TaxAccount.
Fourth Step: E-Filing of the 1099s in Tax1099
Once you import the data, you will notice the Tax1099 dashboard presenting the list of vendors, amounts, and boxes. Perform the steps instructed below for e-filing of the forms.
- Primarily, opt for the vendor name or hit the Edit tab to make changes to the vendor or box information, and click the Update tab.
- In case you have to file the 1099s form with your state, provide the necessary details below the respective state boxes.
- Thereon, choose the vendors that you wish to upload for e-filing by selecting the box and clicking the Next tab. If you notice any errors, a pop-up message will show on the screen. Once it is modified, choose the vendors once again and click the Next tab.
- Now, pick the vendors by marking the box located next to the Date column. Then, decide how you wish to send copies to the recipient/vendors by marking the box below the USPS Mail or Email Recipient. Here, you also have the option to pick the Download Multiple PDFs to offer vendors their copies yourself. Note: You have to pay an extra charge if USPS Mail is preferred.
- Following this, if you prefer to file 1099s in QuickBooks with your state, select them and hit the Next or Calculate Tax1099.com Fee to verify the total filing fee.
- Once you are done winding up with the options from the Select Forms page, you will be redirected to the Payment Page. After mentioning the payment details correctly, choose the Pay & Submit to e-File option.
- At last, if you need to generate both 1099-NEC and 1099-MISC forms, then you have to repeat the steps for the other form.
Fifth Step: Start Verifying Your Filing Status
Once you have submitted your 1099s form to the IRS, return to the account to verify its status.
How to Create & File 1099 Form in QuickBooks Online?
If you are wondering how to prepare 1099 in QuickBooks Online, then perform the steps given below.
First Step: Generate Your 1099 Form
You have to make a choice between the two different options while trying to generate your 1099s form. This will enable the QuickBooks prep for you or prep with the QuickBooks help. Once you file the 1099 form, you will get an email or mail a copy to your contractors.
Method 1: Let QuickBooks Prep For You
- Under this process, move to Payroll and click the Contractors option.
- After this, choose the Prepare 1099s form and pick the option to Let QuickBooks do it. Then, choose the Get Started option.
- Thereon, you must ensure that your company name, email address, and tax ID are appropriate. Also, verify that it tallies what’s available on tax notices or letters from the IRS. Then, opt for the Edit tab and do the necessary modifications.
- Now, choose the View Results option and then review your 1099s form.
- Afterwards, pick the $ amount beside each Contractor to learn more about the breakdown of each payment made to the contractor. You can see which accounts are used and what boxes map to the 1099-NEC or 1099-MISC forms. Then, you can also check the excluded amounts.
- Furthermore, choose the $ amount beside each Contractor to know the breakdown of each payment made to the Contractor. Herein, you can review which accounts are used and what boxes are mapped to the 1099-NEC or 1099-MISC forms. Moreover, you may also check the excluded amounts.
- Next, you must choose the “Update account mapping to 1099 boxes” to edit the 1099-NEC or 1099-MISC boxes that indicate the type of payments made to your contractors this year.
- Once you are all set, tap on the “I’ve reviewed and am ready to file” option.
Method 2: Prep With QuickBooks Help
QuickBooks will prepare the 1099s form and then start handling your team smoothly with QuickBooks Payroll.
- Under this process, move to Payroll and choose the Contractors option > Prepare 1099s option.
- After this, choose the “I’ll do it myself” and then click the Get Started option.
- Thereon, you must verify that your company name, email address, and tax ID are up to the mark. Also, verify that it tallies with what’s found on tax notices or letters from the IRS. Then, pick the Edit option to make the changes.
- Now, tap on the Confirm info and get started option.
- Following this, opt for the Select accounts tab and ensure that the accounts are used for your 1099 expense or payments. Then, go with the Add option.
- Later on, beside each account added option, choose the 1099-NEC or 1099-MISC boxes that indicate the type of payments made to your contractors this year.
- When you are on the Tracked for 1099 tab, mark a checkbox beside each Contractor who must get a 1099 form. Ensure that the Contractor’s personal details and email addresses are correct. Then, hit the Edit option to do the necessary changes.
- In case your Contractor is missing, choose the Not Tracked for 1099 tab. Then, choose the Add to tracked list to include the Contractor in the Tracked for 1099 tab and click the “ Back option”.
- Furthermore, you must check the Reportable total amount for each Contractor selected and click the Next tab.
- Important Point: You will not be able to review certain electronic payments to contractors made by Credit card or PayPal. This is so because these are reported to you by the businesses. If you are unable to get all of the payments you expect, pick the Non-reportable payments only option.
- Thereon, pick the Preview option to see each 1099 from and ensure that the correct amount is entered in each box. Then, click the Continue to 1099-MISC to see your 1099-MISC forms and tap on the Next option.
- After this, choose the Continue to E-File option for e-filing the 1099 form. Otherwise, pick the “I’ll print and mail” option to print and then mail the forms on your own.
Second Step: E-Filing of Your 1099s Form
Once you have prepared the 1099 form and ensured that the details are up-to-date, let’s start e-filing the form.
- Once the 1099s form is prepared, choose the e-file option and then look for the 1099s form.
- After this, carry on with the on-screen steps to accomplish your federal and, if possible, state 1099 e-file. Moreover, here you can also check the 1099 form of each Contractor.
- When asked, pick the delivery option for your Contractor’s copies. Extra fees are charged for mailing the 1099 forms. If this option isn’t visible, then it states that you have previously given your contractors online access to 1099s when it is added to QuickBooks. Then, move back through the 1099 e-file flow.
- When asked, you must insert the billing details accurately.
Third Step: Review Your Filing Status
Once you file your 1099s form with the IRS, you will be notified regarding the filing status via email. You can also review your filing status anytime in the QuickBooks Online application.
- Under this process, move to the Taxes option and click the 1099 filings tab.
- After this, start reviewing the status for the e-filing below the Filing Status.
- Thereon, opt for the View 1099 option and check the PDF copy.
How to Create and File 1099s With QuickBooks Contractor Payments?
Follow the steps below to create and file 1099s with QuickBooks Contractor Payments.
First Step: Adding Up Your Contractors and Payments
The users accessing the QuickBooks Contractor Payments for all your payments throughout this year, and you need to generate 1099 forms.
In case you notice any missing payments or you are a new user to QuickBooks Contractor Payments, then pick the product to know how to include a lump sum or individual payments to your contractors.
QuickBooks Contractor Payments with QuickBooks Online
- Firstly, you must choose the Contractor you want to add payments to.
- After this, pick the Pay with direct deposit ▼ drop-down, then opt for Create expense.
- Thereon, provide the details for the past payment, then pick the Save and close option.
QuickBooks Contractor Payments without QuickBooks Online
A. For adding one payment at a time
- Under this process, choose the Contractors, then tap on the Contractors option.
- After this, choose the Contractor you want to add payments for.
- Thereon, select the Pay with direct deposit ▼ drop-down, then select Write check.
- Now, mention the details for the past payment, then hit the Save option.
B. For adding multiple payments at once
- Under this process, move to the Contractors option and click the Overview tab.
- Now, head to the Record Payments option.
- Next, you must choose the contractors for whom you wish to make payments.
- Thereon, for every Contractor chosen, provide the details for the past payments.
- Once you are done making every Contractor’s payments, pick the Record Payment option twice.
Second Step: Generate your 1099s Form
- Proceed with the instructions below for your product to get started.
- Sign in to the Contractor Payments with QuickBooks Online page.
- QuickBooks Contractor Payments Only: The users must move to the Contractor and then click the Contractors option.
- After this, opt for the Prepare 1099s option and verify that your company name, email address, and tax ID are accurate. Also, check that it tallies with the match you get on tax notices or letters from the IRS. Then, opt for the Edit tab to make certain changes.
- Now, pick the Confirm Info and Get Started. Then, hit the Select accounts or verify that the accounts are used for our 1099 expenses or payments, then select Add.
- Following this, choose the 1099-NEC or 1099-MISC boxes that show the type of payments made to your contractors this year and click Next.
- When you are on the Tracked for 1099s tab, place a tick-mark next to each Contractor who should get a 1099. Then, click the Edit option to make any changes.
- In case a contractor is missing, then opt for Not tracked for 1099 tab > Add to tracked list for adding the Contractor with the Tracked For 1099 tab. Then, hit the Back option.
- Now, start reviewing the Reportable total amount for each Contractor chosen and hit the Next tab.
- Furthermore, choose the Preview tab to see each 1099 and see the amount mentioned in every box, and click Continue to 1099-MISCs.
- Finally, hit the Continue to E-File for e-filing the 1099s form.
Third Step: E-Filing of Your 1099s Form
Once you have prepared the 1099 form and ensured that the information is correct on your 1099 form, you must e-file it.
- Firstly, you must hit the E-file option and then verify your 1099 form after preparing the 1099 form.
- After this, go through the instructions given on the screen to complete your federal and state 1099 e-file if available. Herein, you also have the option to check each Contractor’s 1099 form.
- When asked, pick the appropriate delivery option for your Contractor’s copies. You may be charged an extra fee for mailing the 1099 form. If this option isn’t available, it states that you have already chosen to provide your contractors online access to their 1099s when you link them with QuickBooks. However, if you notice that the email address is wrong, then update it and review the 1099 e-file.
- Furthermore, if asked, then mention the billing details accurately.
Note: The paper version of Copy A of Form 1099 is used for the records. It isn’t necessary to print or mail this form to the IRS.
Fourth Step: Review Your Filing Status
Once you are done filing your 1099s form with the IRS, you will be informed regarding your filing status via email. Herein, you may also review the filing status anytime.
- Start the process by seeing the status of the e-filing beneath the Filing Status. Here, we have explained the list of statuses and what they exactly mean:
- Not Submitted: It reflects that you haven’t e-filed the Form 1099-NEC or 1099-MISC with the IRS. So, you can resume revising the form.
- Submitted: This basically states that you have e-filed the form to the IRS. Note: If you prefer to revise it, you are supposed to file a manual amendment.
- Received by IRS: It basically indicates that the IRS has received your form, and it is either processing it or has previously processed and then approved it. However, the customers who have submitted their 1099 E-file forms will get a confirmation email within a week after the IRS accepts and gives confirmation for the submission. Herein, you won’t get the confirmation until mid-January or later.
- After this, choose the View 1099s option to view a PDF copy.
How to Print 1099s Form in QuickBooks?
The steps for printing the 1099s form completely depend on whether you prefer to
Case 1: If you have previously e-filed your 1099s form
1.1 QuickBooks Online or QuickBooks Contractor Payments
Whenever you e-filed your 1099s form, you can choose to print and then mail them to your employees. You may be charged for this service. However, if you choose to print or reprint the form, then have a look at the steps below:
- Firstly, choose the 1099 Filings option.
- After this, tap on the View 1099 option to check a PDF copy.
QuickBooks Desktop
In case you are accessing the Tax1099 for e-filing the forms, then you must do as per the instructions given within the Tax1099 article for printing the forms.
Case 2: If you haven’t e-filed your 1099s form
You won’t have the option to generate 1099s automatically in QuickBooks. However, there are plenty of options you can use for generating, filing, and printing the 1099-MISC and 1099-NEC forms.
- The businesses have the option to e-file the 1099s form directly with the IRS via the Information Returns Intake System (IRIS).
- On the contrary, for a small fee, you have the option to e-file your 1099 form with the QuickBooks and Intuit products.
Now, when you come to know whether you have previously e-filed your 1099 forms or not, pick the suitable product to look for the steps for printing 1099 forms.
How to Print 1099 in QuickBooks Online & QuickBooks Contractor Payments?
If you haven’t previously e-filed the form, then you can use QuickBooks to generate the forms for printing and filing on your own.
Before starting the procedure, ensure that you have bought the 1099 kit by mid-January for printing. Make sure that you meet the IRS filing and contractor delivery deadlines.
- Firstly, move to the 1099 filings option and choose the Prepare 1099s to generate your 1099s form.
- Once you are all set, pick the Print and Mail Instead option.
- Next, start performing the steps given on the screen to verify your alignment, and then start printing your forms.
QuickBooks Desktop
Make sure that you have the 1099 kit by mid-January, which is mandatory for printing purposes. Moreover, you must also ensure the IRS filings along with the contractor delivery deadlines.
- The users must update the QuickBooks Desktop file to the latest release. Herein, ensure that you have marked the Reset Update checkbox.
- Note: Make sure that you are on the latest release for your 1099s to print correctly.
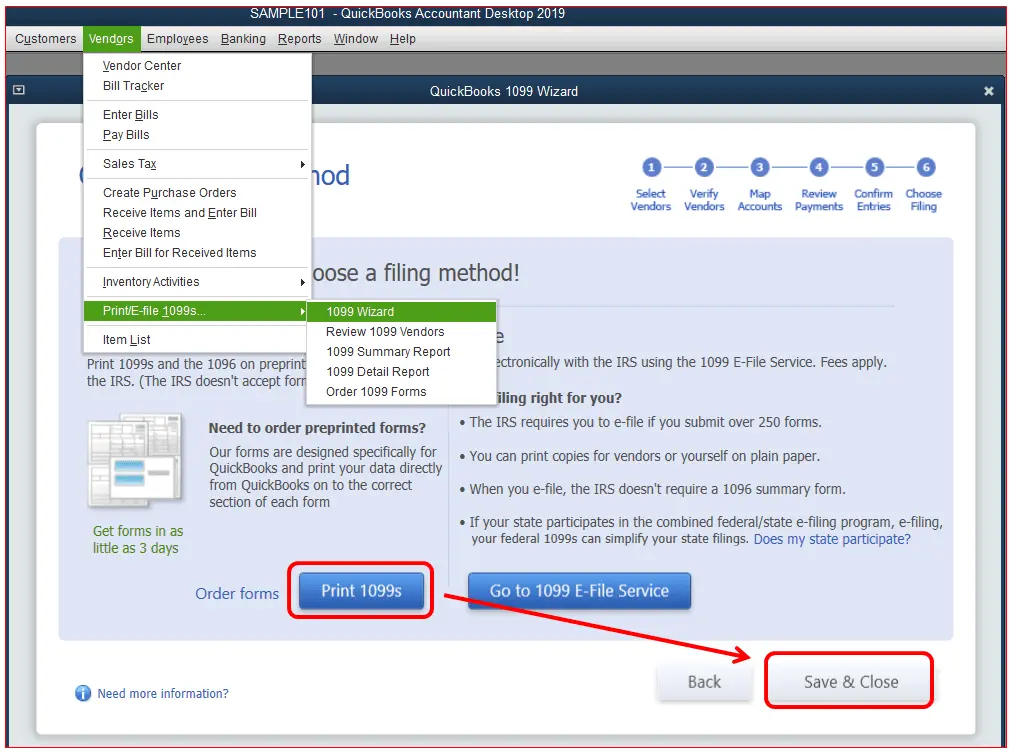
- After this, move to Vendors, then choose the 1099 Forms, then Print/E-file 1099 Forms. Later on, start generating your 1099s.
- When you are on the “Choose a filing method window”, opt for the Print 1099-NEC or Print 1099-MISC option.
- Now, pick the specific date range for the forms, then hit the OK tab.
- Proceed further by choosing all vendors you wish to print 1099s for.
- Furthermore, choose the Print 1099 option and then tap on Print 1096s instead, if printing Form 1096.
- At last, you must cross-check your printer settings, then choose the Print option.
QuickBooks Desktop for Mac
- Primarily, you must verify that you have updated QuickBooks Desktop for Mac to the newly launched version.
- After that, browse to the Vendors option > 1099 Forms > Print or E-file 1099/1096. Then, generate your 1099s form.
- Thereon, when you are on the Choose a filing method window, hit the Print 1099-NECs or Print 1099-MISCs.
- Next, you must mention the date range for the forms, then pick all vendors you wish to print 1099s for.
- Furthermore, opt for the Print 1099 option.
- At last, cross-check your printer settings, then pick the Print option.
Conclusion
We hope that this comprehensive post will help you create and file 1099s in QuickBooks Desktop and Online versions smoothly. Thus, it will help in e-filing the taxes on time without any further delays. Furthermore, if you are still struggling while filing the form, then take help from our QB professionals for immediate assistance.
Frequently Asked Questions (FAQ’s)
Question 1: What is reported on a 1099 form?
Ans. Form 1099 is an informational tax return that is used to report income from freelance work, investments, royalties, rent, online transactions, and real estate. You will receive a Form 1099 electronically or by mail from the person or entity who has paid you.
Question 2: What is the major difference between the 1099-MISC and the 1099-NEC forms?
Ans. Form 1099-NEC is used for reporting non-employee compensation, like payments of $600 or more to independent contractors. Form 1099-MISC is used for reporting other types of miscellaneous income, including rents, royalties, prizes, awards, and medical and healthcare payments.
Question 3: Can you e-file 1099s in QuickBooks Desktop?
Ans. Yes, you can create and then e-file 1099 forms in QuickBooks Desktop.
Question 4: Is it possible to create a 1099 for another year?
Ans. No, if you are a QuickBooks Online, QuickBooks Contractor Payments, or QuickBooks Desktop user, then you can only generate 1099s for the most recently closed tax year. However, if you access Tax1099, then you can file for up to 2 prior tax years without the QuickBooks integration.
Question 5: Does QuickBooks mail 1099s to contractors?
Ans. Once you prepare and e-file the 1099s form from your QuickBooks Online account, Intuit will deliver the copies to the contractors without charging any cost. The 1099s form will be mailed by 31st January to the Contractor’s residential address in their profile. In case your Contractor doesn’t get their 1099 form within seven business days after January 31, you may consider printing the form from the Taxes page after e-filing.
About The Author

Jonathan Browns
Jonathan Brown is a trained QuickBooks professional with 10 years of experience in the accounting sector. Moreover, he is passionate about helping businesses reduce the stress of managing accounts. Also, he is proficient in assisting entrepreneurs and small business owners to use QuickBooks and enhance their accounting experience.

QuickBooks Desktop, Payroll or Enterprise
Advanced Support for QuickBooks Desktop, Payroll & Enterprise Solutions
From payroll tax setup, direct deposit issues to Enterprise performance tuning and Desktop upgrades - our QuickBooks experts provide accurate and stepwise assistance. Get dependable support designed to minimize downtime and maximize efficiency.
Recent Posts
-
QuickBooks Bookkeeping: The Practical Way to Keep Your Books in Order
-
QuickBooks Merchant Services: Everything You Need to Know Before You Sign Up
-
QuickBooks Payroll Assisted: Everything You Need to Know
-
How to Contact QuickBooks Online Customer Service Team 2026
-
QuickBooks Online Login: Sign in to Access your QB account